GSoC 2017-netjsongraph.js milestone 1

netjsongraph.js(GitHub) is a visualization library for NetJSON. During the first month, gratifying results have been achieved. I have done most tasks for the first stage of netjsongraph.json. Thanks for the nice mentor and this great chance to let me learn a lot of skill and techniques. Here are some results:

Minor version published

Npm is currently the largest open source package management community, it is very convenient for developers to release or iterative update netjsongraph.js.

Development workflow imporved

I have imported some modern front-end development tools to simplify the development process, including webpack (build tool), yarn (package management), babel, eslint, jest (test framework). Developer can run or test the project by one line command. all tools are advanced and familiar to JS developers, so they can contribute more easily.

Rewrited visualization by webGL

I had developed three demos with three different technologies: Sigma.js, Pixi.js and Three.js.
Sigma.js code looks very concise, but importing of its plugins (such as force layout plugin) in modern way is so hard. Pixi.js and Three.js I used it only to render d3 force layout. And three.js looks slow than Pixi.js but its slowness may caused by lines render way.
But I finally decide d3 4.0 and three.js is the best choice currently. Because they are both famous and iteration rapidly. Pixi.js is also great but it only support 2d render, so if we want to expand our visualisation to 3D in the future, we can only choose three.js. Three.js is a library which lightweight webGL packaging in order to avoid writing WebGL directly that is very hard and verbose.
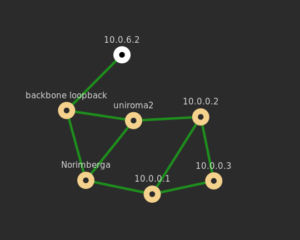
Then I refactored the demo to a Class and write some API backward compatible, including function to fetch data, theme switching, autosize, metadata and nodedata panel and zoom, hover, click event handler. It looks like:
netjsongraph.js
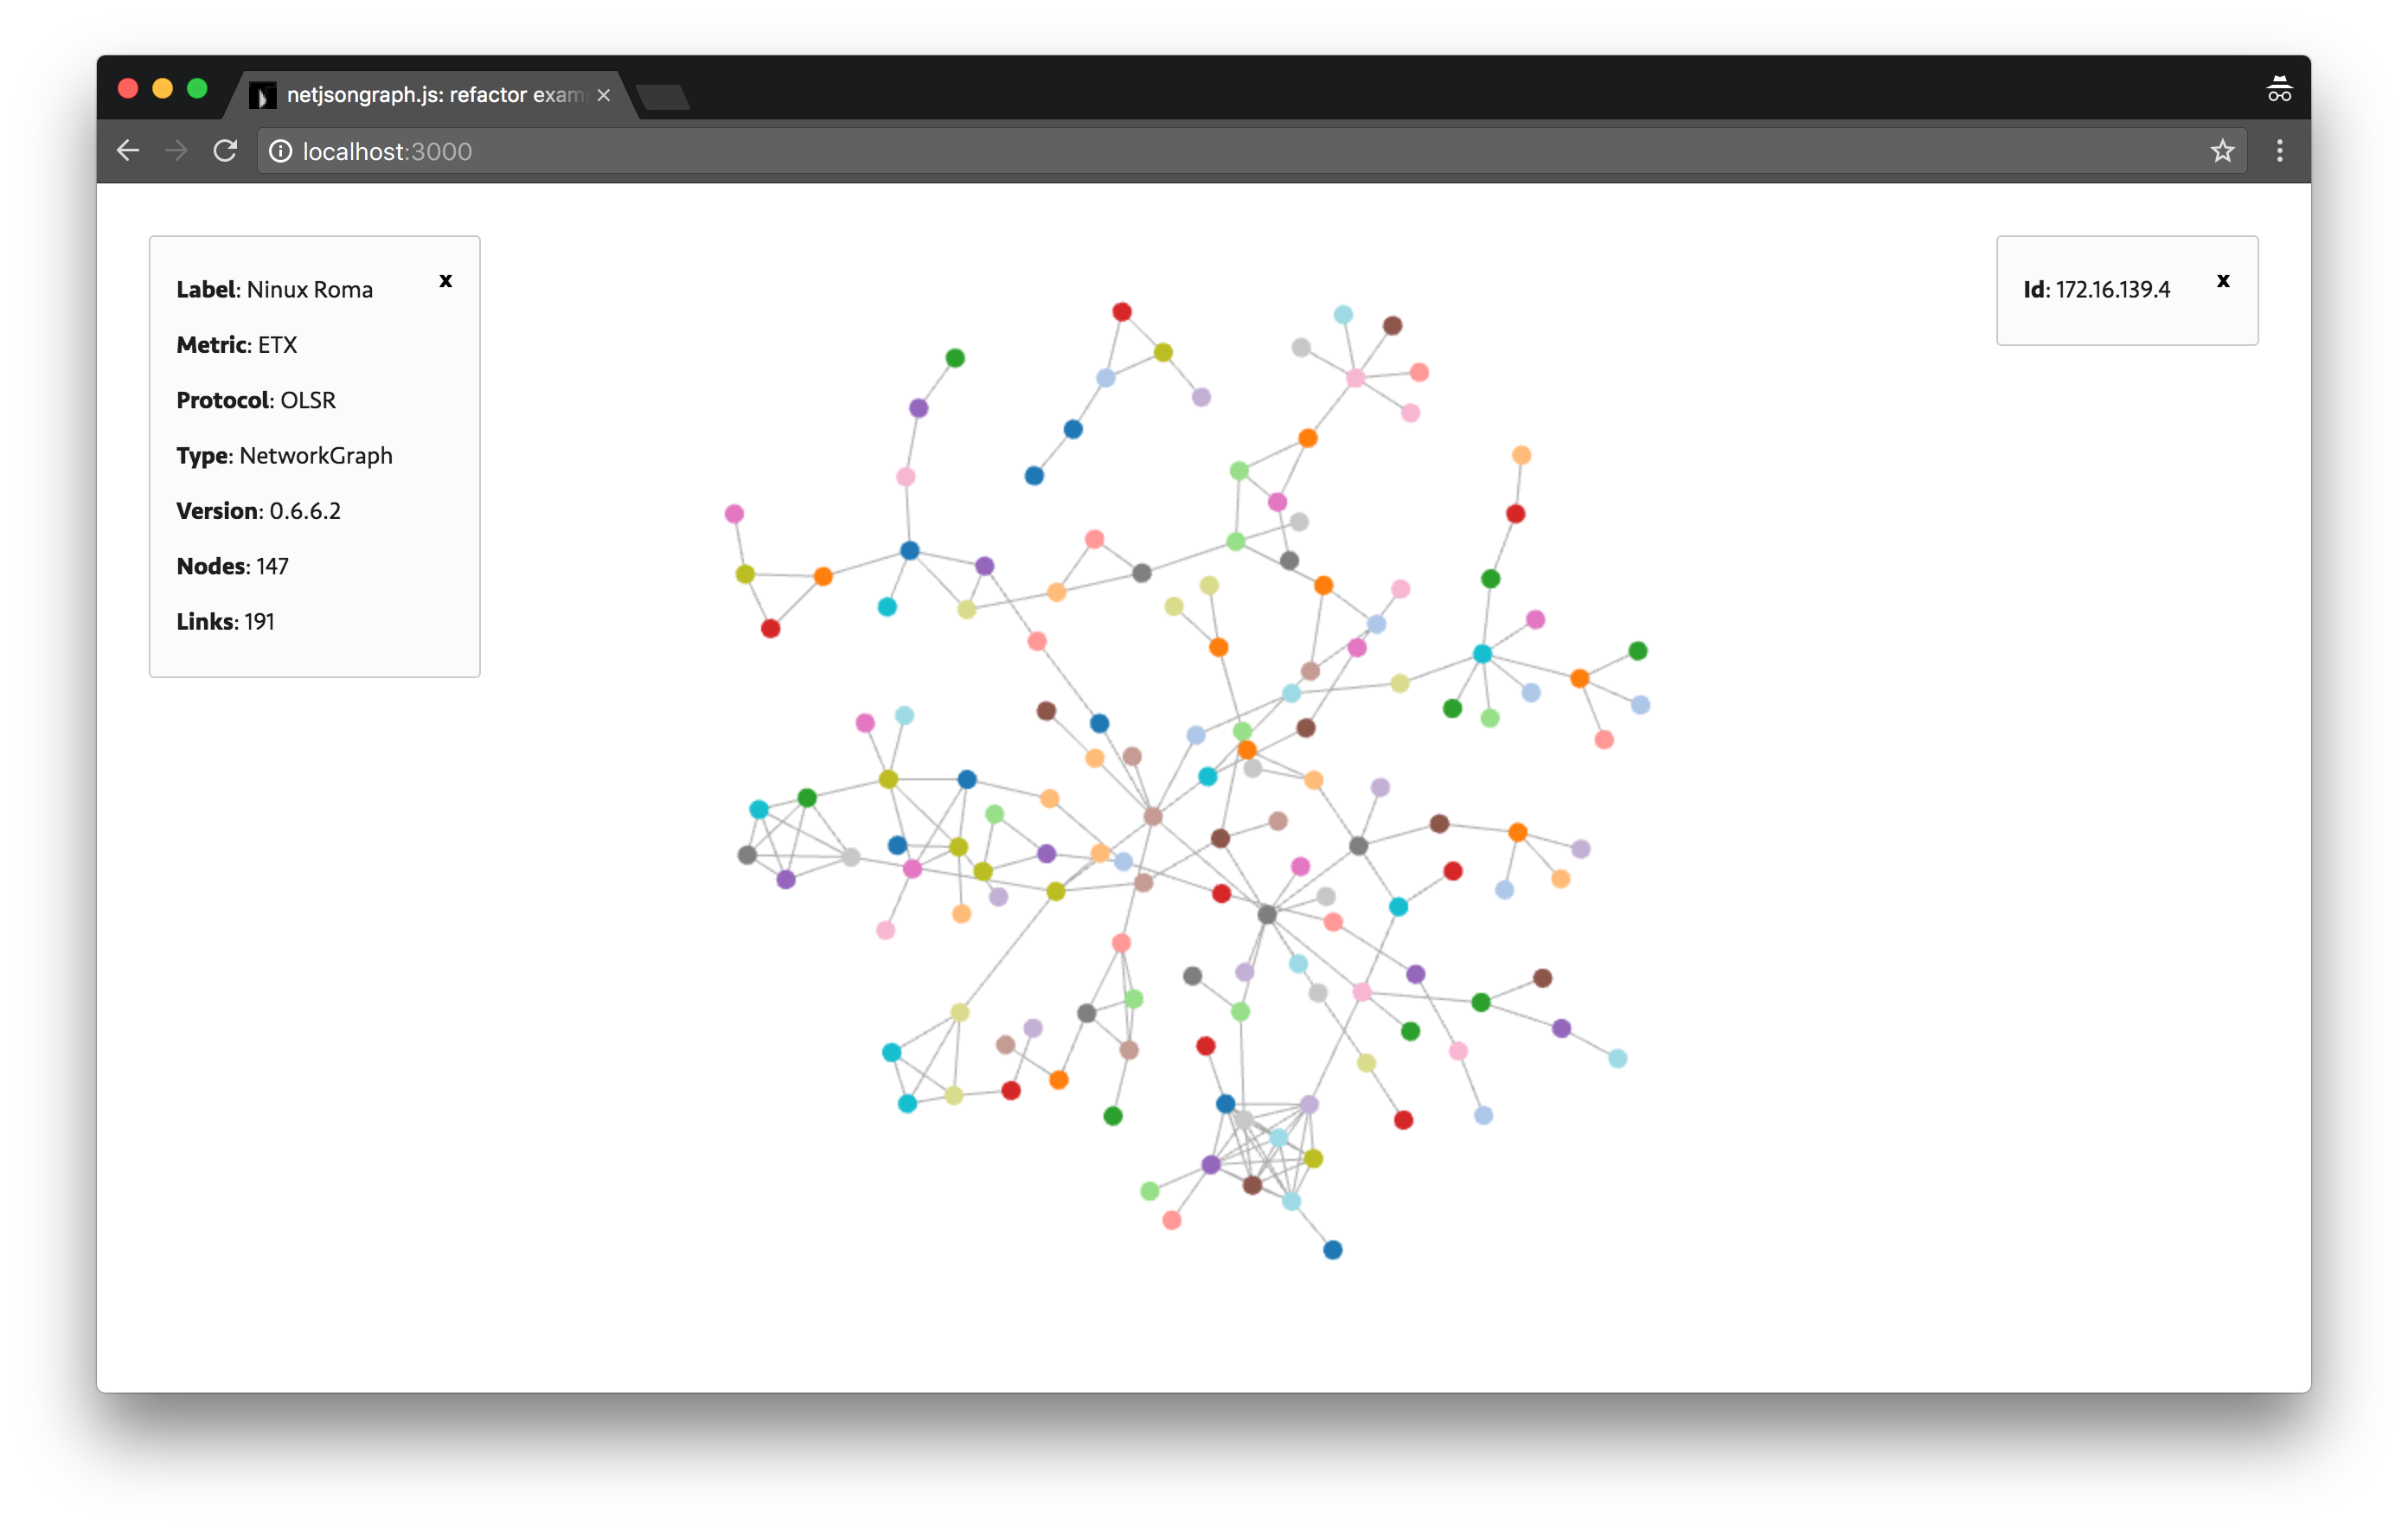
Metadata and node data panel are on top left and right corner, force graph for Netjson visualization in the center.

Tests added

Some unit tests have beed added and CI has beed integrated by Travis and Coverall. Because I wrote tests rarely before, so I meet some trouble and read a lot docs and examples to learn how to write test and how to use Jest. One problem I’ve met is test failed when import object with WebGL renderer. I’ve send a issue: https://github.com/facebook/jest/issues/3905 .

Next stage

I will complete the compatible API in the next week, and below are tasks for next milestone:

  • add optional geographic map
  • add a way to redraw graph by supplying new data
  • add more interactions
  • improve force layout details

Conclusion

Next version which have more interaction and rendered by WebGL is comming soon. and it will be soon integrated in the brand new OpenWISP 2 Network Topology module.

During this period I learned a lot of things, including how to use git rebase, how to write commit messages more clearly, how to write test, KISS principles, worse is better principles and so on. Great thanks for GSoC, Freifunk and mentor Federico.

TDD and Unit Testing in Lua: The OpenWRT/LEDE case

A lot of code has been written, and none of the LUA code written for OpenWRT/LEDE (at least on my knowledge) uses testing as a way of verifying the quality of the code.

I want to use this approach as it has proven useful for other projects.

If you are interested in understanding what TDD is, here there is a little excerpt from one of Uncle Bob’s explanations of how TDD works: https://www.youtube.com/watch?v=GvAzrC6-spQ

In order to do testing on this platforms, the library should not require LuaROCKS (because the default development environment does not require it).

Let’s see what LUA has to offer in this area.

Lua Unit Testing Libraries

Thankfully, Lua wiki is an amazing source of information. You can find information about unit testing over here: http://lua-users.org/wiki/UnitTesting

There are many Lua Unit Testing libraries, but for what I understood the most used is Luauit, so I will try to work on an example and share it with you ASAP.

Lunitx: a good contender

There is also a guy that did a review on the available tools: http://web.archive.org/web/20141028091215/blog.octetcloud.com/?p=32

His concern was not in the context of OpenWRT/LEDE, so there are things that need to be considered that don’t apply for him.

He basically saw that lunit was good, but needed some tweaks, to he forked it into lunitx… which was forked again and this is the outcome: https://github.com/dcurrie/lunit

Conclusions

These seems to be the mos viable options.

I’ll be testing these during the next days.

If you have any suggestion or comment, please leave it below.

geolocator (Software defined GPS) first evaluation

Hi together,
Now I am coming to my 1 phase: evaluation. An introduction into the geolocator (Software defined GPS) has been already done last month. You can find it here [0]. In the previously mentioned blog post I have told about the 3 main sub-projects: web backend, gps-share, LEDE Package. In this post I will show you what I have done in each sub-project. Beginning with the web backend:

web backend

This sub-project should replace the old web backend of the openwifi.su project. 
The old backend is split into various programs and scripts, grown over years. First of all I started with the part of receiving positions. This program is written in ruby and just parses the URL as a string. So users can simply call
wget -O - http://openwifi.su/api/v1/bssids/64700274945A,0018E7DC21BB,30FC681F37A6,F81A673626E8,EC086BA8ED18,8416F9A8E2FA,E894F6A230E4,98DED020D00A,EC086B3349B2,F81A677F5CD8,A0F3C1654BA6 2&>1
and will receive latitude and longitude. The BSSIDs in the above URL are from surrounded WiFi networks. The old ruby code just drops all characters up to the last splash and splits the BSSIDs by comma. The result array will be integrated into and SQL command which returns a position for each BSSID. The code for this part is non public, because the developer doesnt want to risk attacks by hackers. I started porting the old ruby code to golang. Currently I am working on the database connection. So in the next few days the backwards compatibility will be finished. The current code can be found here [1].

gps-share

gps-share is a software which provides GPS informations in the local network, written in rust [2]. It supports many GPS hardwares and shares the GPS informations over a network-NEMA format. Zeeshan Ali, the maintainer of geoclue, has already released a first version of gps-share [3]. Zeeshan and I discussed on the Mozilla Location Service Mailing-list about that project [4] . As I told it in the last blogpost, the gps-share is an alternate project to the original idea. This helps geoclue to work directly with GPS-hardware´s and builds an defined interface via dbus to receive geopositions over GPS hardware, surrounding WiFis or other ways.

LEDE Package

The last  sub-project is a new LEDE-package, which provides geo positions received by their surrounding WIFIs. I have already built a first version of that package here [5]. I also started discussing with maintainers of the gluon framework, which is a popular framework in the Freifunk community. My plan is to integrate the goelocator also in gluon so routers can automatically receive its position. A first draft can be seen here:

An idea is that the Web interface of the router could detect installed packages and provide their options on the Web interface. This means, that in the drop down menu, the option “Automatic (geolocator)” will only be shown if the package geolocator is installed. This makes it easier for local (freifunk) communities to integrate new options of position detection into their firmware.
This is also my last week of my exam period. Now I can work full time on the project. Next plans are improving functionality of the new backend, building CI unit test for the new planed API and building the Mozilla Location Service communication interface to sync the requests between MLS and openwifi.su.

GSoC 2017 – wlan slovenija – Report 1 – HMAC signing of Nodewatcher data

What’s been done

The first blog post that describes the idea and goals can be read here.

After getting a bit more familiar with the code base the first thing that had to be done was to set up the work environment. I chose to go the virtual machine route so an actual router did not need to be used, making the development easier. An instance of the nodewatcher is running on a virtual machine running Ubuntu Linux. It runs in a Docker development environment and is set up by using the provided Docker Compose configuration. To enable data collection from nodes the monitor system also needs to be running.

To test the the nodewatcher’s HMAC signing capabilities I set up a dummy test node, turned on HMAC signing and used a python script to push some data on to the nodewatcher.

The next step was to set up a development node. With a lot of help from my mentor Kostko I used firmware-core to create a LEDE virtual machine, compile nodewatcher-agent packages, transferred them to the LEDE machine, used SSH to connect to it, installed them and tested the basic nodewatcher-agent functions. The whole setup and development process was documented in detail in the nodewatcher-agent README. Then I set up the agent’s http.push module and pushed some data on to the nodewatcher instance.

A local network like one in the above image was set up for development. Due to my lack of experience with networking I encountered some issues like not being able to ssh into the LEDE VM and not being able to send packets from LEDE VM to Nodewatcher VM, but with patience from my mentor it all works and the lesson was surely learned.

What’s next

So the hardest part is done, right? I am now working on adding a HMAC signing like it’s already done in the python script. It needs to be developed for both pushing the data from a node to the nodewatcher and pulling the data from a node.

I am contributing using my github account.

Onwards! Good luck!

GSoC 2017 – Milestone 1

June Progress

During the past weeks, I have mainly worked on LoxiGen. LoxiGen is a compiler which generates OpenFlow serialization and de-serialization libraries for C and Java. I have used the tool before and was able to build on my own work introducing the necessary message types for my GSoC project. Since I have chosen ONOS as my Software-Defined Networking (SDN) controller, I used ONOS’ fork of LoxiGen as a starting point. This required hard-coding some message types to make ONOS’ fork produce valid C libraries. I am planning to get in touch with LoxiGen’s maintainers soon to try and figure out if some of my work can be used towards a merge of the two diverted code bases.

[Edit: Major change of plan]

In an older version of this blog post, I wrote that I was going to implement a kernel module to enable the de-coupling of hostapd and the physical access point. Yesterday, I had a long discussion with my mentor and Johannes, another GSoC participant for Freifunk (read about his project here). We decided to drastically change the direction of my project. Instead of aiming for the (undoubtedly) cool and advanced feature of running hostapd as a Virtual Network Function, I am going to focus my efforts on a simpler use-case. The reasoning is to have a more stable and ready-to-use toolset for the management of larger OpenWRT/LEDE deployments in the end. In other words: Do less but do it well.

To this end, Johannes and I are going to work on a set of interfaces to make our projects compatible. The vision is as follows: I am going to write an SDN application that registers the ONOS controller with Johannes’ OpenWifi server. Whenever a new access point joins the network, it discovers the OpenWifi server and fetches its configuration from it. Included in this configuration are the address and port of the ONOS controller. Thus, the new network node is able to connect to the SDN controller without the need for manual configuration by the network operator.

Next Steps

As mentioned above, Johannes and I will have to establish interfaces for our projects to interact. We also need to set up a combined testbed to test our implementations. On my end, I will start by adding the possibility to configure the OpenWRT/LEDE agent that connects to the ONOS controller through UCI. That way, the agent’s configuration can be queried and altered through the OpenWifi REST API. This should be rather simple. Next, I will write a proper REST API for my controller as well as the application that communicates with the OpenWifi server. Then, I will add features for network management such as the ability to move clients to a specific access point or to ban them from connecting altogether. Lastly, I will write SDN applications for automatic network management, for example, a load balancer that distributes clients evenly across available access points that is powered by the data stored in a client hearing map.

Implementing Pop-Routing in OSPF – June Updates

This is a continuation of the previous post [1].

During this month I have implemented the NetJSON plugin for BIRD. It exposes the topology of an OSPF Area using the network-graph format and thus allows Prince to fetch the topology and calculate the timer’s value.
I deployed a small testbed to debug my code using the network emulator called CORE [2]
Here you can see the testbed:

I’m currently working on this repository [3] and I’m looking forward to send a PR to BIRD.
I defined a new command in the bird’s cli: “show ospf topology netjson”. It returns a network-graph output that can be used by prince or by any other NetJSON[4] compatible software.
Here you can see the topology of the testbed using d3.js [5][6].

In this next coding period I will implement a plugin for Prince that interacts with BIRD. Unfortunately it uses a UNIX Domain socket instead of a network socket, so I’ll need to code the communication routines from scratch.

Cheers, Gabriel

[1]: https://blog.freifunk.net/2017/05/30/implementing-pop-routing-ospf
[2]: https://www.nrl.navy.mil/itd/ncs/products/core
[3]: https://github.com/AdvancedNetworkingSystems/bird/tree/origin/int-new
[4]: http://netjson.org
[5]: http://ninux-graph.netjson.org/topology/49aecbcf-a639-47a7-9f58-e39de5d57161/
[6]: https://github.com/netjson/django-netjsongraph

GSoC 2017 – Add MPTCP support in LEDE/OpenWRT trunk – June progress

Info form the project

For more info whats the goal of the project, please visit my first blogpost which is here.

What done yet


I created this simple topology for trying out the technologies. I’m still in experimenting status but have some results as well. This virtualized test enviroment run on my machine. The paths between the MPTCP supported machines are shaped to 10 Mbps. With iperf3 and Wireshark I verified that the MPTCP protocol is working fine: clearly shows 20 Mbps between the two MPTCP supported machine (I use the latest 0.92 MPTCP kernel which is based on the 4.4 kernel version). Tha path between the MPTCP and Endhost machines are not shaped, so the throughput is much higher than 20 Mbps. I configured shadowsocks-libev on MPTCP1 (ss-server) and Endhost1 (ss-redir) machine. Then I tired an iperf3 download between Endhost1 and MPTCP2. This looks like:
Endhost1 <——————]TCP[——————-> MPTCP1 <———————]MPTCP[——————–> MPTCP2
I successfully get the 20 Mbps on Enhost1 which is the aggregated throughput of path1 and path2. (continue)

Continue reading “GSoC 2017 – Add MPTCP support in LEDE/OpenWRT trunk – June progress”

PowQuty Live Log First Update

As mentioned in my previous blog post, i am going to add a live log and notification system for
certain events to the power monitoring tool PowQuty. The first steps have been done and the
configuration has been extended.
Three types of notifications have been added to the configuration options during the first month of coding.
Namely email, slack and mqtt. Mqtt was in use before, but was extended to allow a second host and topic for
the power quality events.
The powquty configuration page was redesigned to use a separate tab for each notification option
to increase overview.

The old configuration page would have been very crowded with all the new options
The new configuration view with mqtt tab open

Power quality events, that cause a notification are:

  • Voltage dip between 10% and 90% of the reference voltage of 230V
  • Voltage swell above 110% of the reference voltage of 230V
  • Voltage dip < 10% of the reference voltage
  • More than 5% of the samples of one harmonic are above the threshold

As the power supply network in Berlin was not willing to provide such events an option for test measurement
input was needed. A file read flag for powqutyd was added and needs a little bit of clean up
before a pull request on the upstream powqutyd.
The library for the USB-oscilloscope provides the number of EN50160 events per measure cycle and
the kind of each event. As of now some basic slack notifications are added, which provide the event
type and the event start time from measurement start in milliseconds to the channel and team set
in the luci web interface or under /etc/conf/powquty.

Slack notifications with start time in milliseconds relative to measurement start, probably will be UTC or local in the future

In the notification the type of event is provided to allow the network administrator to react directly
to the changes, without to check the log any further.
The other notification options will be added and tested soon.

Attended Sysupgrade Status Report

Hello,

this is the first status report before the initial evaluation. It will cover the current status and my plans for the next weeks. As planed, I manged to set up a demo instance of the update-server and a working version of the luci web-view. Both will be covered later in this article.

What has been done

The project can be splittet in two parts, the Luci web-view, written in HTML and JavaScript and the update-server, currently implemented with Python 3.

Luci Frontend

The user interface received a new tab entry called “Attended Sysupgrade”. A click opens the very simple update view. Later additional information may be added.

The button fires an image request to the server based on retrieved system information (installed distribution, packages, version). The server returns status codes as described in the git repository.

During the build phase the JavaScript pools the Webserver to see the current status. Currently it’s queued, building or created. The view will be updated accordingly.

Once the image is created a flash button appears, a click will download the created image from the server and uploads it to the router. Once done, a new created ubus call will initiate a sysupgrade keeping all settings.

After a reboot the new release is installed (see bottom right).

Behind the scenes

The web-view uses JavaScript with XMLHTTP Requests, no external library is used. Theattended-sysupgrade packages is currently less than 5KB in size. As I had no JavaScript experience before the project there may be lots of optimizations missing, these will be added during the next weeks.

To upload the image to the router, the package cgi-io is used, saving the sysupgrade.bin in /tmp.

Update Server

The updates server is as well splittet in three parts. The request handling, a simple cli and the image building.

Request Handling

Currently a simple flask server provides the needed routing of /update-request, image-request and download. All requests will be checked for sanity and only then processed. If the request is valid a database lookup will check if the image was build before or is currently building. If none of these, a build job is added to the queue.

Whatever action is performed, the server tells the web interface  the current status.

Currently the flask server will run in a gunicorn instance with any number of worker threads. Gunicorn runs behind a Nginx which handles the image download as well: /download will only increase a counter and redirect to a /static folder full of created images.

Command Line Interface

The CLI helps to setup the update server. It has commands to initially setup the database, fill it with data, setup Imagebuilders and update package lists. Right now the Imgebuilders initialization is automated but not jet on demand, only triggered by command line.

In a future release the CLI could also create images for testing, clean the update server and more. It may be used by cronjobs later.

Image Building

Next to the request handling a very simple build manger takes care of the serialization of image builds. The manager open images builders and create the image. On success the database will be updated and the image requests will show the image URL.

The build manger could delegate workers to build in parallel. The master/worker setup is possible but not planed. Depending on practical experience this feature will be added.

Demo

I ran the ansible found here against a demo server and is currently usable to create images for LEDE. To test the image creating process you can use a simple bash script. Please keep in mind that building is limited to supported devices. The demo server does not automatically follows the git repository.

The demo server is the cheapest Google VM I could find. If you have any advise where to go, please let me know!

Future

  • The web-view needs more attention to be user-friendly and be error resistant. The JavaScript code need some cleaning.
  • The update-server should setup (download tar, check packages, etc) on demand, not pre-setup by CLI.
  • network_profiles currently do not work.
  • The replacement table is not working jet.
  • New images should be created if a package is upgrades.
  • Libremeshs flavors need support
  • The attended-sysupgrade package need auto builds for all targets.