GSoC’22 Final Report : Videoodyssee

Introduction

Hello folks đź‘‹

The past 4 months has been pretty exciting and challenging for me . Me and my mentor Andi Bräu together worked on a cool project called Videoodyssee , with GSoC’22 almost coming to an end in this blog post I wanna share all of my accomplishments , results and little bit about the project.

About Videoodyssee

In 2017 we started our video portal for freifunk at media.freifunk.net. To get videos online we have a more or less complicated upload workflow:

  1. Upload video file to a processing server.
  2. Correct video file settings.
  3. Convert video to target formats.
  4. upload to CDN and Youtube.
  5. Publish the video to the media portal.

The previous Videoosyssee system has some problem like

  • With current lambdacd pipeline we can’t have multiple workers to enable parallel video processing.
  • The current lambdacd pipeline isn’t maintainable anymore and it has got a lot of dependency issues.
  • Currently we don’t have any video verification steps in our publishing workflow which leads to publishing of unwanted videos.

So we decided to re-implement the pipeline using a new CI/CD tool and we chose to use the GoCD tool to build the pipeline as it suits better for the video processing pipeline we are looking to build. Later in the project we also decided to re-implement the Videoodyssee uploader using React.

Systems Involved in the project:

1 . Videopipeline : A GoCD server with processing pipeline to process and publish the video.

2. Videoodyssee Frontend : A React frontend application for the users to submit the video data and admin dashboard for the admins.

3.Videoodyssee API : A Node.js REST API implemented using Express framework.

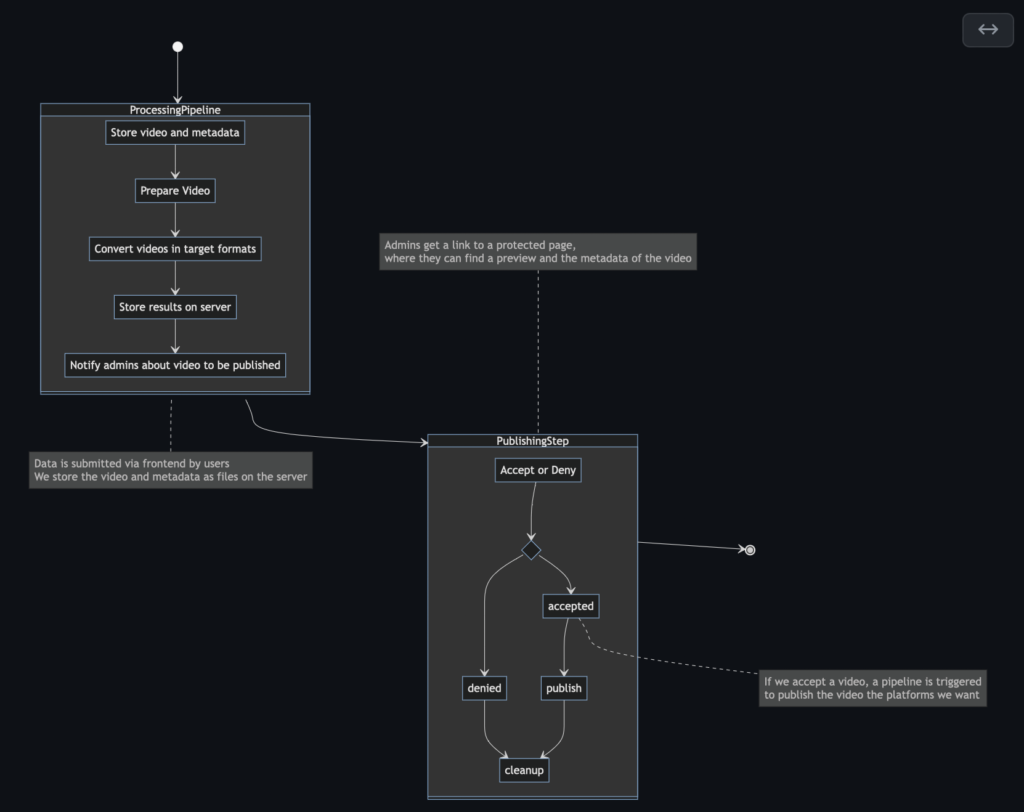
Video upload workflow:

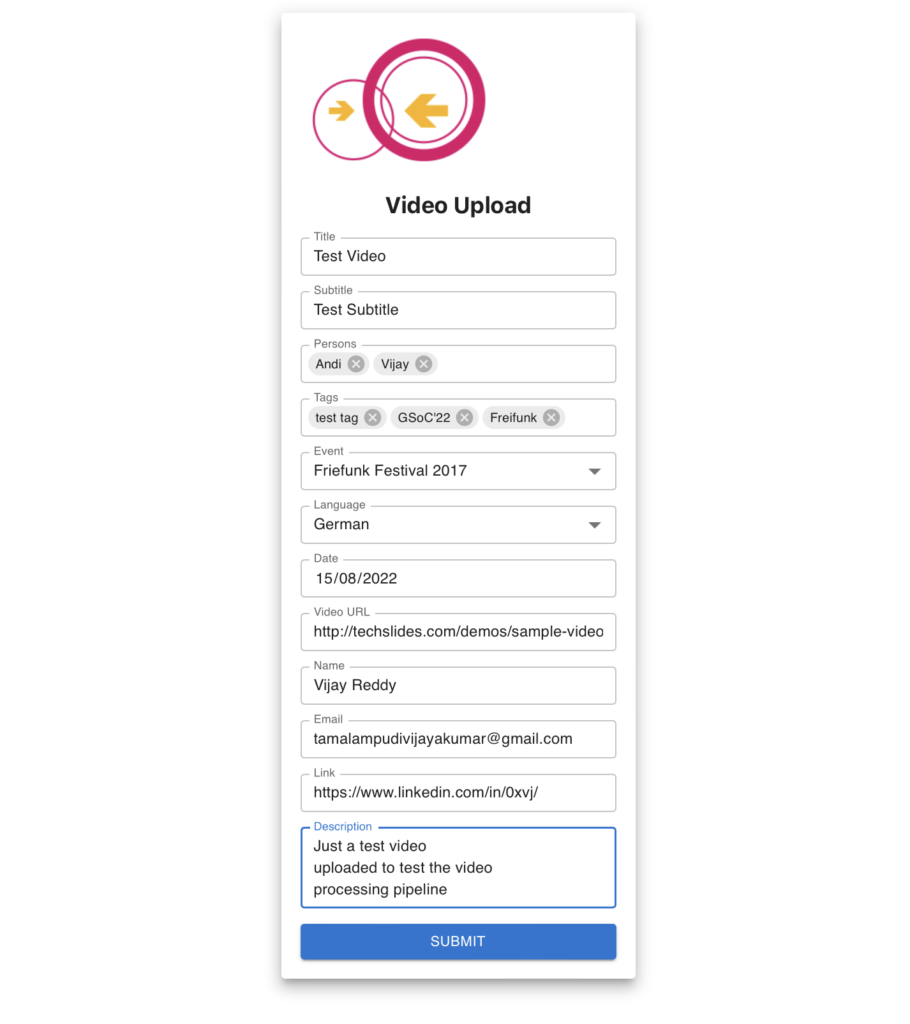
  1. User submits the details of the video using the video details submission form.
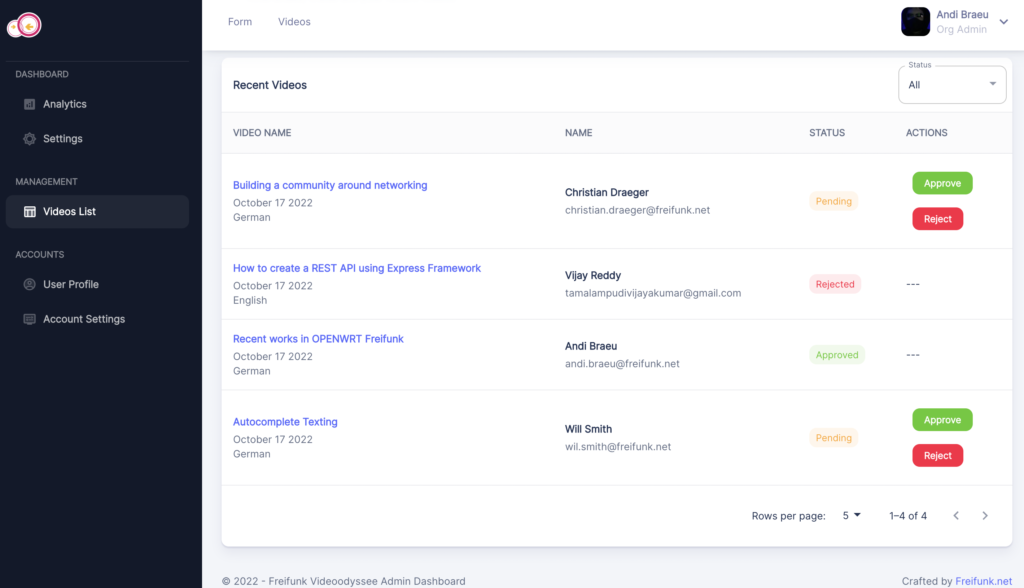
  2. Admin gets a notification email about the newly submitted video.
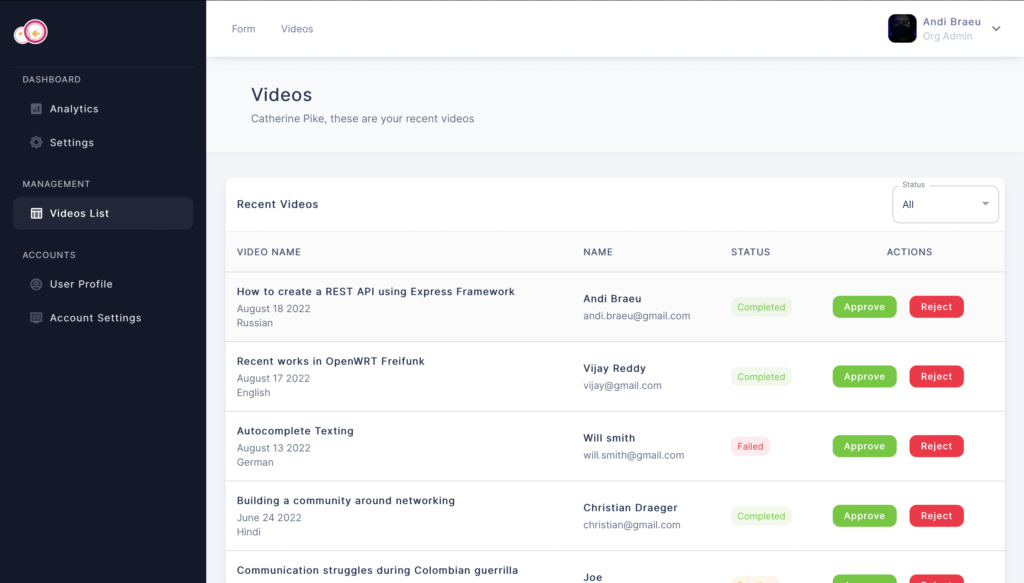
  3. Admins logs in to the Videoodyssee admin dashboard reviews the video and approves it.
  4. When the admin approves the video it will trigger the video processing pipeline.
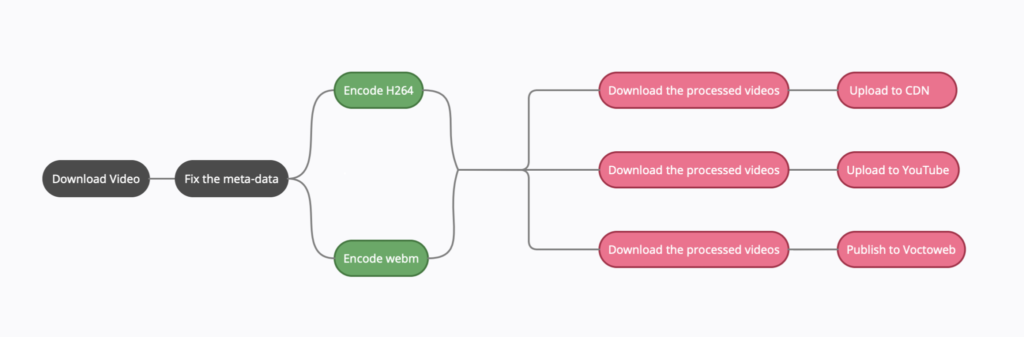
  5. The processing pipeline will download the video , fixes the video meta-data , encodes the video into webm and h264 formats , generates the thumbnail and timelens data , uploads all the files into the CDN and publishes the video to Voctoweb.
  6. After the video is published to Voctoweb user will a notification email saying that his got published to the video portal successfully.

Video processing pipeline

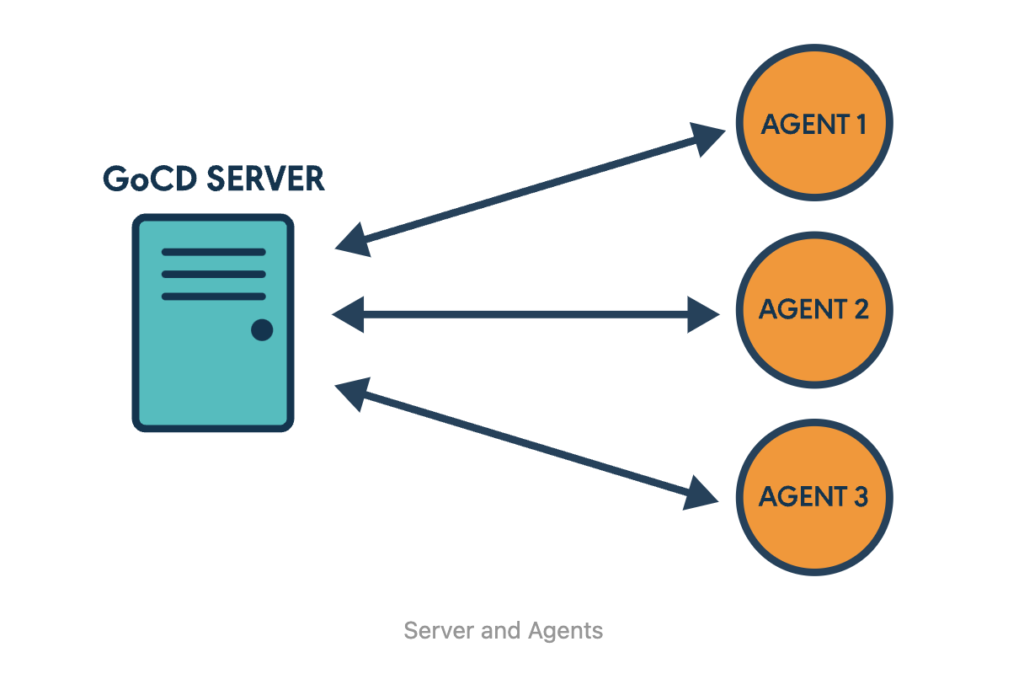
The pipeline is implemented using GoCD , a CI/CD tool as it suits better for the video processing pipeline we are looking to build. The GoCD follows master-slave architecture which consists a Go-Server and multiple Go-Agents.

Go-Server

Go-server acts as a master and is the one that controls everything, assign the jobs to Go-agents and provides the user interface to users of the system.This is where we define the pipelines and trigger the pipelines.Go-server assigns the jobs to the agents which are free and stores the artifacts produced by Go-agents.

Go-Agents

The agents are the ones that do the actual work like processing videos , generating thumbnails and uploading processed videos. We can have N number of agents which we can scale up or scale down according to our needs. So in future if we need to process more number videos at the same time we can increase the number of agents to get the job done.

You can have a look at the video processing pipeline code here. And here is the Videpipeline GitHub repo https://github.com/freifunk/videopipeline .

Tasks accomplished:

  • We created a config repo in GitHub to store the pipeline code so that whenever we change the pipeline code GoCD server will automatically pull the changes and builds the new pipeline.
  • Implemented the video processing pipeline.
  • Modified the pipeline processing scripts to make them work with the new GoCD pipeline.
  • Automated the provisioning and deployment of Go-Server and Go-Agents using Ansible. You can have a look at the Ansible playbooks here.

Remaining tasks:

  • Automating the pipeline deployment from the GitHub config repo.
  • Publish the video to YouTube.
  • Notify the admins with an email when a new video is submitted by someone.
  • Notify the publisher when his video got approved , processed and published to Voctoweb.

Videoodyssee Frontend

For the users to submit the video details we need a frontend application which takes the data from the user and sends it to the REST API which will eventually trigger the pipeline using the GoCD API to start the video upload workflow.

We chose to use the React to implement the frontend application as it is quick and easy. The frontend application will have a upload form for normal users and admin dashboard for the admins for all administration tasks like approving/rejecting videos , updating video details etc.

Task Accomplished:

  • Implemented the video upload form so a user can submit the details of a new video.
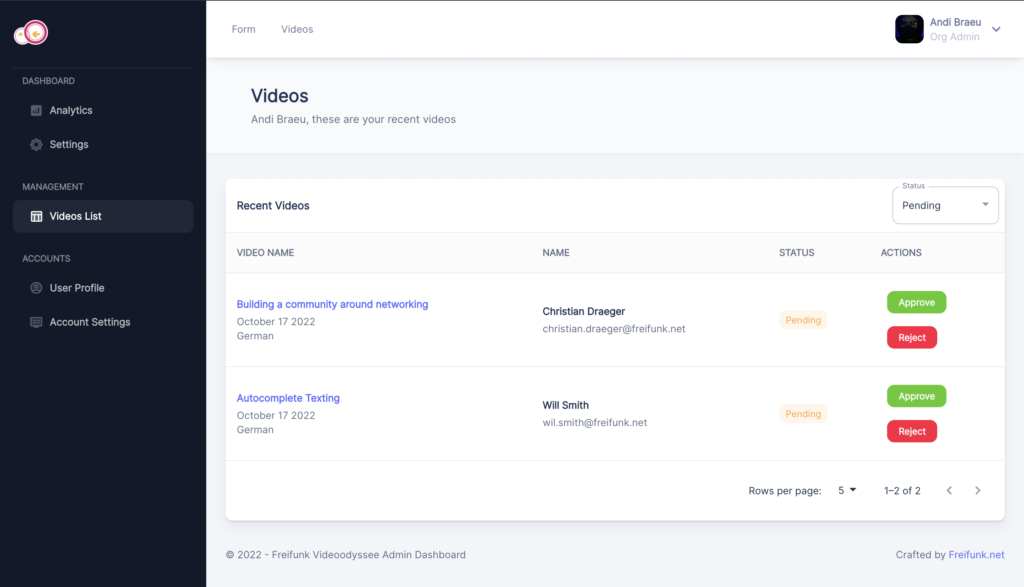
  • Implemented the Videodyssee admin dashboard where admins can review the videos to accept or reject them.
  • Implemented Authentication so that only admins can access the videoodyssee admin dashboard.

Remaining Tasks:

  • Implement the functionality to update the details of already published videos.
  • Implement the functionality to update video details before approving a video.
  • Implement the user management.
  • Implement profile management.

Videoodyssee API

We used Node.js Express framework to implement the REST API which will handle the requests from the Videoodyssee frontend. We chose Express as it is quick and easy to implement a REST API using Express framework. We have used systemd as the process manager for the API server which will have some benefits like the server will restart on its own when it crashes.

Tasks Accomplished :

  • Implemented a route which will take the video details from the frontend and triggers the GoCD processing pipeline.
  • Automated the deployment process of REST API server using Ansible by implementing videoodyssee-api playbook.

Video review process:

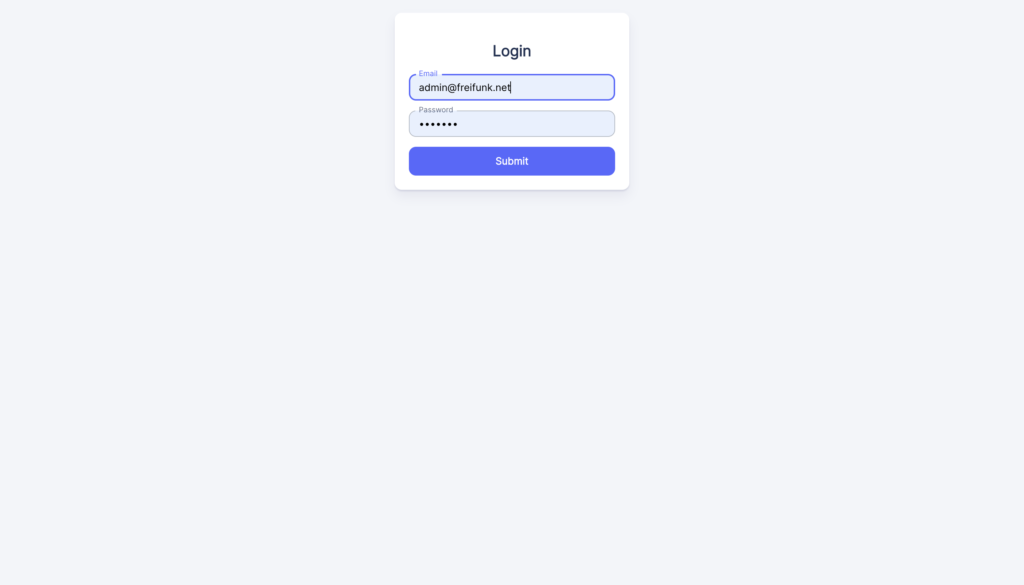
  1. Admin logs into the Videoodyssee admin dashboard by using username and password.
  2. Reviews the video details and if clicks the video title he can open the video in another tab to watch it.
  3. If everything is fine he will approve the video.
  4. If some of the details are wrong he can change the details and then approves the video.
  5. if the admin thinks that the video is a spam video he can reject it.

Conclusion:

Finally the GSoC’22 has been pretty exciting and challenging for me .My mentor Andi Bräu really helped me a lot in the development process. I have learned a lot about open source development workflows, automation using Ansible and unit testing.

And finally , I would like to thank my mentor Andi Bräu for his incredible support and feedback.

If you got interested in my project and wanted to know more about it you can reach out to me on Linkedin.

Report Final GSOC 2022- Try LibreMesh without having a router

In the first blog, some problems that users were running into when trying LibreMesh were mentioned. In short, they consisted of:

  1. When you wanted to shut down a node that had been run previously, you left an interface up on the host.
  2. When you wanted to start a node to change internet access, this was not possible since the port required by the qemu_dev_start script was always occupied by the systemd_resolved process.
  3. When the node cloud was brought up, it had called ifconfig, and since this functionality is not installed in versions later than Ubuntu 18.04, the user could not run the node cloud.

To solve these problems, the strategy that was chosen was to modify the files already created, also creating detailed documentation to facilitate virtualization for anyone who wanted to try LibreMesh.

Milestones accoplished

1. Improvement of the environment:

All the problems mentioned meant obstacles when testing LibreMesh, thus causing users to decline in the knowledge of the tools that LibreMesh proposes. So, identifying and correcting them would offer any user a cleaner testing environment, free from any obstacles that depend on the LibreMesh code.

1.1 Close interface on the host

The solution to this was to modify the qemu_dev_stop script. The interface that was raised is called lime_br0, so the line was placed inside this file:

lime_br0 ip link

In this way, the interface on the host will stop the execution of the node.

1. 2. Collision in port

In this case, the solution was to change the port occupied by the DHCP service for the wan interface:

dnsmasq -F 172.99.0.100,172.99.0.100 –dhcp-option=3,172.99.0.1 -i “$WAN_IFC” –dhcp- authorized –log-dhcp –port=5353 –bind-dynamic

1. 3. Calls to ifconfig

In this case, the files that were modified were two:

– linux_bridge.py

– linux_bridge_port.py

which are located inside the lime-packages/tools/ansible/modules directory.

Where there were ifconfig calls, ip was used.

In linux_bridge.py the changes were the following:

– def brctl (self, cmd) :

– return self.module.run_command ([‘brctl’] + cmd)

– def ifconfig (self, cmd) :

– return self.module.run_command ([‘ifconfig’] + cmd)

+ def ip(self, cmd) :

+ return self.module.run_command ([‘ip’] + cmd)

– (rc, out, err) = self.brctl ([‘addbr’, self.bridge])

+ (rc, out, err) = self.ip ([‘link’, ‘add’, ‘name’, self.bridge, ‘type’, ‘bridge’])

– self.ifconfig ([self.bridge, ‘up’])

+ self.ip([‘link’,’set’,’up’, self.bridge])

– self.ifconfig ([self.bridge, ‘down’])

– (rc, out, err) = self.brctl ([‘delbr’, self.bridge])

+ self.ip([‘link’,’set’, ‘down’, self.bridge])

+ (rc, out, err) = self.ip ([‘link’, ‘del’, self.bridge])

In linux_bridge_port.py the changes were:

– def brctl (self, cmd) :

– return self.module.run_command ([‘brctl’] + cmd)

+ def ip(self, cmd) :

+ return self.module.run_command ([‘ip’] + cmd)

– (rc, out, err) = self.brctl ([‘addif’, self.bridge, self.port])

+ (rc, out, err) = self.ip ([‘link’, ‘set’, self.port,’master’,self.bridge])

– (rc, out, err) = self.brctl ([‘delif’, self.bridge, self.port])

+ (rc, out, err) = self.ip ([‘link’, ‘del’, self.port,’dev’,self.bridge])

qemu_cloud_start.yml was also modified:

+ enable_wan_param: “{{ (‘–enable-wan ‘ + enable_wan ) if enable_wan is defined else ” }}”

– shell: (../qemu_dev_start –node-id {{ node_id }} –eth0 {{ lm_ifname }}_0 –eth2 {{ lm_ifname }}_2 {{ rootfs }} {{ ramfs }} &)

+ shell: (../qemu_dev_start –node-id {{ node_id }} –eth0 {{ lm_ifname }}_0 –eth2 {{ lm_ifname }}_2 {{ enable_wan_param }} {{ rootfs }} {{ ramfs }} &)

– linklocal: “fe80::5000:ff:feab:c0{{ node_id }}%lm_cloud{{cloud}}”

+ linklocals: “{{ linklocals | default([]) | union([ hostvars[item].linklocal | default() ]) }}”

Conclusion:

The solutions that were given to the different problems and everything documented to be able to use LibreMesh greatly contribute to anyone who doesn’t even know what LibreMesh is and who wants to try it for the first time.

When a person is not knowledgeable about something and there are multiple problems they run into, and no help to clarify the picture, that person is more likely to stop spending effort on domain knowledge and look for other similar options, which you can understand and access more easily.

That is why the fact of not encountering the problems raised and of having documentation that guides this testing process means that users do not decline so easily and want to use mesh networks, which were the objectives pursued from the beginning.

The development of this whole project was very challenging for me. From the use of tools that I did not know like ansible-playbook, network management with which I was not so familiar, the use of virtual machines, the familiarization with the LibreMesh community to the management of a project itself, there were many things that I learned and what I take away from this project.

I am enormously grateful to my mentor Germán Ferrero, a great person, who has been able to guide me along the way I have traveled, always encouraging me to move forward and being there to answer any questions.

I also thank my advisor Tomas Assenza, other great person, who encouraged me to carry out this project from the beginning and who was faithfully present throughout its duration.

I am very happy about everything I learned in this beautiful experience.

Thank you very much for reading and following this tour!

Final Report on Minstrel TX Rate Control in User space – GSoC ’22

Hi everyone! With the GSoC 2022 session almost coming to an end, this is my final blog post to share all of the accomplishments, conclusions, and outlook for the Minstrel TX Rate Control in user space.

Goals of the Project

  • Adding a proper output to the existing user space Minstrel HT to aid in rate control analysis.
  • Extending user space Minstrel HT with missing functions present in its kernel counterpart.
  • Addition of new estimators/filters for research purposes.
  • Proper documentation, demo, and guide on working with the Minstrel HT package.

All of the mentioned goals have been completed. Furthermore, there have been additional changes/improvements to the user space Minstrel HT that isn’t listed above. With this, the next sections will cover all of my contributions to the project followed by future work and limitations.

(1) New Output

Before GSoC ’22, the user space Minstrel HT didn’t have a proper output which wasn’t even easily interpretable. Furthermore, it wasn’t possible to run a script to analyze the performance of the user space Minstrel HT. Hence, I’ve replaced the old output which was simply a printout of the rate statistics dictionary with its own dedicated file and folder for each access point. For each access point and the physical WiFi chip, it creates two files: rc_stats and rc_stats_csv. The rc_stats is a human-readable output of the RateTable object for user convenience whereas the rc_stats_csv is a file that stores all the RateTable data throughout the execution of user space Minstrel HT for offline analysis.

The output has been previously discussed in the previous blog post with the screenshot of the outputs which can be found here.

(2) Addition of new functions from kernel Minstrel HT

The user space Minstrel HT has been extended with additional functionalities from the kernel Minstrel HT which was missing prior to GSoC ’22. Consequently, the user space Minstrel HT now, in terms of functionality, is closer to its kernel counterpart than before.

get_avg_ampdu_len: Calculates and returns the average AMPDU length for a station connected to the access point.

calc_retransmit: Previously, the retry count in the multi-rate retry chain was static and set to a specific value (10) for all the rates. With this new function, the user space Minstrel HT now dynamically computes the retry count for each rate in the rate setting.

check_sudden_death: Checks if the two best throughput rates have sudden packet loss and, if the packet count is greater than 30 with 75% loss, then the affected rate is downgraded.

prob_rate_reduce_streams: Tries to find a more robust rate index that uses fewer streams than the current maximum probability rate.

downgrade_rate: Reduces either the best or the second best throughput rate to the maximum group throughput rate from a lower group that uses fewer streams.

For the addition of these functionalities, the RateMan package had to be extended to parse additional station information such as AMPDU length, AMPDU packet, and overhead for MCS and legacy rates.

(3) New Estimators

The user space Minstrel HT has been added with two new filters: Butterworth Filter and Exponentially Discounted Averaging and Variance. The kernel Minstrel HT no longer uses the Exponentially Weighted Moving Average (EWMA) and has switched to the Butterworth filter, however, prior to GSoC ’22, the user space Minstrel HT only had a simple implementation of the EWMA. The details on the Butterworth and the Discounted filter have been already discussed in my previous blog post which also includes the implemented mathematical formulas.

Regarding the EWMA, the previous implementation of the filter in user space Minstrel HT was also not identical to the kernel variant. Since the EWMA is used to calculate the average AMPDU length for a station, I’ve updated the implementation of the EWMA in the user space Minstrel HT and now consists of both EWMA level and division.

(4) Restructure

During the GSoC ’22 coding period, the RateMan package was restructured twice and, as the user space Minstrel HT is dependent on RateMan to perform kernel rate control functionalities, it was also modified to make the rate control algorithm compatible with the changes. Additionally, the user space Minstrel HT was also refactored to split the minstrel module into two modules: minstrel and sample module. Consequently, this enables each station to have an independent Sample object for probing which can be scaled and customized as needed in the future. Furthermore, the previous structure of user space Minstrel HT consisted of several independent loops which could have been avoided or merged to save computation time. Therefore, I’ve reduced the number of iterations in the minstrel module which has significantly reduced the computation time.

Previously, to obtain the best throughput rate and also the maximum probability rate, the user space Minstrel HT ran all the computations of finding the rates every time and was not stored to be accessed later. However, I’ve changed it such that, for an update interval, the best throughput rate and maximum probability rate are calculated only once and are available as an attribute of the RateTable object for direct access. Furthermore, I’ve also added a new attribute called “max_group_prob_rates” which stores the maximum probability for each group.

(5) Configuration

The user space Minstrel HT has been added with a configuration module to tweak filter parameters and rate control properties such as sample interval and update interval. The configuration file also allows the user to select the filter to be used for rate control. Currently, the user can choose from the following filters: Exponentially Weighted Moving Average (EWMA), Butterworth filter, and Exponentially Discounted Averaging and Variance.

The configuration parameters have been discussed in the previous blog post if this is in the interest of the reader. I have not included it here as this blog post is meant to only serve as an overview of all the changes and reiterating it here would only make the post longer.

(6) Rate-setting Experiment

Towards the end of GSoC ’22, I was also involved in conducting several experiments to validate the rate setting functionality in user space. For this, I created a separate GitHub repository with scripts to configure and run rate-setting experiments. The experiment script, for all supported rates, sets the rate between the client and access point, and after a rate-setting delay collects packet statistics for a specified time duration. The rate-setting delay and the time duration for rate statistics collection are completely configurable by the user. The output is stored in a file that shows, for each rate setting, the rates used, and their statistics.

For example, a WiFi connection with three supported rates could have the following experiment output:

Setting Rate Index 00
{’00’: {‘attempts’: 275927, ‘success’: 236525, ‘timestamp’: ’16d54c2156813120′}}
Setting Rate Index 01
{’01’: {‘attempts’: 366064, ‘success’: 318634, ‘timestamp’: ’16d54c3dfcf4af70′}, ’00’: {‘attempts’: 1199, ‘success’: 584, ‘timestamp’: ’16d54c3cb7d445a0′}}
Setting Rate Index 40
{’40’: {‘attempts’: 270312, ‘success’: 255716, ‘timestamp’: ’16d54deb84d2b0a0′}}

The middle result would denote that after setting the rate between the connection to index ’01’, we still see that rate ’00’ was used where we would generally only expect to see ’01’.

(7) Sample Rate

The last thing that I worked on during GSoC ’22 was another prominent but older rate control algorithm, called Sample Rate, in user space. The Sample Rate algorithm was developed by John C. Bicket in 2005. Unlike Minstrel HT, Sample Rate is not time interval based but real-time packet-based rate control. In the beginning, the Sample Rate algorithm sets the rate index to the highest bit rate. If a rate index fails, then it switches to the next highest bit rate until it finds a rate that works. Every 10th packet, the algorithm samples a random bit rate that does not have four successive packet failures, and the lossless transmission time is less than the average transmission time of the current best rate.

The algorithm uses only the latest results that are not older than 10 seconds to determine the average transmission time for each bitrate. The best rate is the data rate with the lowest average transmission time per packet. The transmission time is calculated as follows:

tx_time(rate) = airtime(rate) + backoff_time(failed_packetes)

The average backoff time, in microseconds, for up to 8 attempts of a unicast packet is:

Where to find my work?

GitHub Repositories

  • scnx-py-minstrel
  • scnx-snippets/rate_setting_validation
  • scnx-sample-rate

The repositories have not been public yet, but they will soon be released as open-source.

Future Work and Limitations

The user space Minstrel HT is running and fully functional but it has been only run on decent hardware i.e. laptop and not on embedded systems. It could be that the user space Minstrel HT requires heavy computation and may not be able to perform timely update intervals when running on an OpenWRT router itself. The output file, rc_stats_csv, file stores all the historical RateTable data which causes it to grow quite quickly and infeasible for experiment durations longer than several hours. Hence, a good addition to the user space Minstrel HT could be an in-built compression for the CSV file.

Furthermore, there are still some minor functionalities remaining to be implemented in the user space Minstrel HT. The kernel Minstrel HT uses a random sampling table to select probe rates which could be also implemented in the user space Minstrel HT as well instead of filtering from a list of potential probe rates. Additionally, now that the average AMPDU length can be calculated in user space Minstrel HT, the AMPDU length can be used to find the estimated throughput in an exact way as in the kernel variant.

The user space rate control API (minstrel-rcd) doesn’t have a way to set the retry count for RTS/CTS frames. Once this is implemented in the API, the calc_retransmit function in the user space Minstrel HT can be extended to compute and set the retry count for RTS/CTS frames as well. Similarly, the minstrel_ht_get_max_amsdu_len from the kernel Minstrel should also be implemented in the user space, in case it can be explicitly used which isn’t the case as of now.

Concluding Thoughts

The GSoC ’22 session has been a great opportunity to research and develop user space rate control algorithms. Even though, this is only the start of user space rate control algorithms, within the short time frame, a lot of work has been completed which has met and exceeded the initial goals. The Minstrel HT user space algorithm is now almost complete with all the functionalities from its kernel variant. Aditionally, another user space algorithm, Sample Rate, has also been implemented as a python package using RateMan.

I would like to thank my mentor, Prof. Thomas HĂĽhn for his time and guidance throughout the project. This was a fruitful experience and would love to see the future of rate control in user space.

Final GSoC’22 report: TX-power control in mac80211

(1) Goals of this GSoC project @ Freifunk

This project started with the major goal to make TPC per packet and per MRR possible in the Linux kernel. To achieve this we had several subgoals:

  • Implementation of new mac80211 status and control structures to annotate and account TX-power settings per packet
  • propose the changes to the Linux kernel to get it upstream
  • enable the TX-power per packet support in Mediatek mt76 driver and Atheros ath9k driver (TPC per MRR for ath9k)
  • validate the TPC per packet / per MRR feature

Overall seen, these goals have been reached up to now as I will explain in the following. The implementation of a TPC algorithm und subsequent performance measurements to investigate the impact of TPC in WiFi networks were not in the scope of this project. But the project is the foundation for this and makes further development possible.

To find out more about the project and its motivation, please see my first post here.

(2) What has been implemented

Here a small conclusion of which parts I have covered in my project:

  • TX-power annotation in mac80211 layer
  • TPC driver support
    • TPC support in Atheros ath9k driver
    • TPC support in Mediatek mt76 driver (mt7615 only so far)
    • TPC support in hwsim (WIP, still has some bugs)
  • static TX-power per station via debugfs
  • more work in ongoing research project ‘SupraCoNeX’

Instead of explaining everything again, I refer to the corresponding parts of my midterm post here. There I already explained some of my work in more detail. Best way to see the modifications in detail is to look at the single patches and commits referred in section (3).
There are some changes compared to the midterm status that I will explain here.

(a) TX-power annotation in mac80211

To annotate and account TX-power, some changes to the structures of mac80211 were necessary as already shown in my last post. To summarize this, the changes include:

  • add new members in struct ieee80211_tx_info.control and struct ieee80211_sta_rates
  • provide an abstract definition for different TX-power levels via struct ieee80211_hw_txpower_range
  • add additional hardware flags for TPC support
  • other required minor changes

I covered those in detail in the last post and they haven’t been changed that much since the midterm post. Only the data type of the TX-power annotation in struct ieee80211_tx_info.control and struct ieee80211_sta_rates was changed. Before, it was an 8-bit unsigned integer which is usually sufficient for power levels supported by wifi chipsets.
The data type is now a 16-bit signed integer. Power levels still can only be defined with positive indices, but negative values in the fields can be used to pass an ‘invalid’ or ‘unset’ power level. This solves the problem that otherwise the corresponding TX-power controller would always need to deliver a valid power level. By setting a negative value, the driver should determine a power level on its own. For example in ath9k, this means the default MAX_RATE_POWER is used. This is similar to the annotation of a TX-rate where usually an 8-bit signed integer is used and negative values also mean ‘invalid/unused’ rate. The size of the type needs to be 16-bit because the 8-bit would interfere with the declaration of TX-power ranges. While an u8 can address power level indices up to 255, the s8 ends at 127. Thus, 16-bit is needed.

Not to forget, prior to the beginning of GSoC I already extended and modified the TX status path in mac80211 accounting the TX-power. For details see the first two commits in the list in section (3).

(b) TPC support in wireless drivers

The support in wireless driver usually covers two code paths: control path and status path. The changes in the control path were basically easy to implement. There are less limitations and often already existing structures to pass additional information with an SKB for transmission. All three driver implementations (ath9k, mt76, hwsim) are therefore just passing the TX-power through the control path and finally write it to the TX descriptor for each packet. In case if mt76 there were no such structures for additional information, but because mt7615 only supports TPC per packet, the single member in the ieee80211_tx_info.control could be used.
However, the status path was more difficult, especially in mt76. To increase performance and have less to execute in the hot path, the status path is designed asynchronously. In detail, the SKB is usually added to a queue after transmission and will asynchronously dequeued and finally processed by a tasklet or a worker, running on another thread or core. These queues are SKB-only queues which means that every information that needs to be passed must be somehow contained or referenced in the SKB. There are fields in ieee80211_tx_info which can be used for this purpose, in particular status.status_driver_data, rate_driver_data and driver_data. These fields are then used in ath9k and mt76 to pass additional status information per packet.

The driver implementation for ath9k has been optimized a bit since the last blogpost and the mt7615 implementation was added also. But they are both by far not optimal and just intended as a first proof-of-concept, to be further developed and optimized as part of what is left to do.

(c) static TX-power per station

One way to set a fixed TX-power per sta, and also the first way that was implemented (mostly for initial tests), is via minstrel_ht rate control. An additional debugfs file is created for each station when the rate control is initiated. By writing to this file, the written TX-power index is saved by minstrel_ht and applied to each packet for which the rate control is called. In contrast to the implementation in my midterm post, where the fixed TX-power was only set per interface, it was now changed to be per station.
Although this variant was pretty easy to implement, it has some downsides. First, when the rate control is not called for a packet, the fixed TX-power has no effect. This is currently the case for non-data frames for which the rate control is not called in mac80211. Second, when a WiFi device supports TPC, but does not use a rate control algorithm in mac80211, the fixed value also has no effect. And also regarding the new feature, which I mention in section (4), this first variant is rather limited.

Thus, a second variant was implemented which just uses the mac80211 layer and the driver. The per-sta structure ieee80211_sta already has a sub-structure which describes the characteristics of a link and already has some sort of TX-power annotation (see struct ieee80211_sta_txpwr), but is not used by most drivers. To use this for static TX-power per station, the setting will be included in the TX control path of the covered drivers and a debugfs entry is added per station. This entry is independent from rate control but also recognized in the drivers.

(d) validation and the enclosing research project

The enclosing research project for my project is called SupraCoNeX and tries to make WiFi faster. This also includes the TX-power control. In the project, an API in minstrel for both rate and TX-power and userspace implementations of rate and TX-power control algorithms are developed. Those will use my work as a foundation. More details and resources will be linked below when the research project and its outcomes will be published.

As the project did not cover to implement a TPC algorithm and this would be enough work for another project, basic validation and testing of TPC was performed with the implementations. Similar to the procedure described in my midterm post, the TX-power was statically set for each tested driver to be applied per packet. By changing the TX-power and observing the RSSI measured with a monitor interface, it was validated that the power can be adjusted appropriately, is used for packet transmission, is correctly reported in the tx status and has an impact on throughput and signal strength.

(3) Where to find my work

This section will be updated regularly to include all discussions and commits in relation to the Linux kernel so the further development can be easily tracked.

All the patches and changes against Linux kernel / OpenWrt tree I have developed are currently located in a Github repository: https://github.com/jonasjelonek/GSoC22-TX-power-control
As soon as the changes are accepted in the ongoing or yet to be started discussions on Linux kernel mailing list, the patches will be removed and instead links to the appropriate commits will be added here.

LKML discussions:

Commits in Linux kernel:

As soon as results of the mentioned research project are published, they will be linked here too. My work is based on this project and vice versa.

(4) What is left to do and beyond

The scope of the GSoC project has been fulfilled but the overall TPC work is not finished yet. There is still some imminent work to be done, mostly optimizations and extensions:

  • include advice and improvements from LKML discussions in implementation
  • improve and extend the proof-of-concept TPC support implementations in drivers
  • include TPC for mt7603 and ath5k drivers
  • do more tests and validations

Some of these points will be done by me in the following weeks, other parts may be art of other people’s work or other projects. Part of the ongoing research project is will be the TPC algorithm and the tests associated with this, based on the driver implementations.

As the kernel always changes and support for different technologies is introduced over time, the TPC implementation may be adjusted over time. For example, work has begun in the Linux kernel wireless subsystem to support a feature which will be introduced by WiFi 7, called Multi-Link Operation (MLO). Basically, this feature allows access point (AP) and station (STA) to use multiple frequency bands (2.4GHz, 5GHz, 6GHz) in parallel for data transmission to increase performance. Possibly, my work can be extended to support MLO. Currently, both rate control (RC) and TPC only support a single link per STA respectively are not aware of multiple links.

Concluding thoughts

With this project, the foundation for further TPC development in the Linux kernel was laid by providing the required structures and extensions to annotate and account TX-power in both TX control and status path. Some things are still left to do for me and I am looking forward to continuing with my work in this project. With the work I have done ’til now, other developers can also start to work in this direction and do research or develop on top of this.

GSoC’22 was a great experience but also hard work. I clearly do not regret having done this project and I am planning to continue to develop and research in this field and to further contribute to open-source projects of any kind, e.g., the Linux kernel. During the project time I have learned so much about the structure of the Linux kernel and how it works and most importantly how development for and contribution to it are managed with the Git, maintainers and LKML.
My mentor Thomas helped me a lot regarding problems and implementation review and advice. It was great to work with him and I am looking forward to working with him again in the future.

If you got interested in my project and want to know more, have questions or even suggestions for improvements, etc., please contact me by email: jelonek.jonas@gmail.com or visit me on Github or LinkedIn.

I hope you liked it!

GSoC 2022 – Implement elRepo.io unit testing – Final evaluation

Hi all Freifunk and GSoC communities!

The summer has gone and GSoC is almost finished! We did a good amount of work this summer, assuming challenges and historical issues, refactoring part of the code following good design patterns and automatizing the implemented tests on the Gitlab CI/CD.  As you see, lots of different but related topics! 

Milestones accomplished

  • Refactor the code to use feature first pattern and split the logic and view:

https://gitlab.com/andrearuizrull/elRepo.io-android/-/merge_requests/6

https://gitlab.com/andrearuizrull/elRepo.io-android/-/merge_requests/5

https://gitlab.com/andrearuizrull/elRepo.io-android/-/merge_requests/4

  • Refactor elRepo-lib to be mockable:

https://gitlab.com/andrearuizrull/elrepo-lib/-/merge_requests/2

  • Fix historical issues:

https://gitlab.com/andrearuizrull/elrepo-lib/-/merge_requests/3

https://gitlab.com/andrearuizrull/elRepo.io-android/-/commit/07b904f38f23b2ab7ca67a69b8e4be40c32f23b9

  • Implement unit tests:

https://gitlab.com/andrearuizrull/elRepo.io-android/-/merge_requests/8

  • Add test stage on Gitlab CI/CD:

https://gitlab.com/andrearuizrull/elRepo.io-android/-/merge_requests/7

https://gitlab.com/andrearuizrull/elRepo.io-android/-/pipelines/629815191

  • MR to the main repo to merge the work done!

https://gitlab.com/elRepo.io/elRepo.io-android/-/merge_requests/8

https://gitlab.com/elRepo.io/elrepo-lib/-/merge_requests/2

https://gitlab.com/elRepo.io/retroshare-wrapper-dart/-/merge_requests/4

This is not only about unit testing

The GSoC project propose to implement unit testing on elRepo.io stack, but we had to do some work before it. Along with my mentors we made important changes on the elRepo.io stack code…

We refactored stuff!

On all the GSoC process we realized that elRepo.io-android had a lot of logic mixed with the UI: big Widgets that do a lot of stuff, very difficult to test. Beside my mentors, after the study of different patterns, we decided to do a big refactor of the application using a design pattern that makes elRepo.io-android more scalable, with the logic and the UI separated, and where the widgets was as much tiny as possible, following SOLID principles. 

On this way, we cleaned up the code, splitting logic from UI, splitting UI on little pieces, and thinking the best way to organize the code on a feature first folder structure:

Also, elRepo-lib, was designed using top level functions, impossible to mock, which make it difficult to test. We refactored all the library following this answer to make it testable, using singletons and Mockito library to generate the code. After refactoring it, we can create mocks of elRepo-lib classes, so we can write the tests easier because we don’t need to mock all the API calls that any function of the elRepo-lib have to do (decreasing the number of lines of a test considerably)

And fixed historical issues

As I went so deep on the elRepo.io code, I was able to found a way to fix a UI historical issue. Mixing elRepo-lib native cache system with the Riverpod providers, on this refactor, we went able to implement our own self cache Riverpod based, letting us to improve the UI user experience without breaking elRepo-lib compatibility. 

This, also bring us to find a Retroshare related issue:   

https://gitlab.com/elRepo.io/elRepo.io-android/-/issues/67

But unit testing still there!

On all this oceans of refactors, bug fixing and substantial improvements, we still worked on the unit testing implementations.

Before the refactor, unit test was difficult, widgets where huge, elRepo-lib top level functions can’t be mocked, everything was slow and difficult to test. But after the refactor, the speed of writing a test increased exponentially. 

We faced up how to test widgets, how to mock libraries self generating the code magically, stubbing functions, mocking responses, finding widgets etc… And, in addition, the app could be now developed easier using TDD (Test Driving Design) thanks of the refactor.

After all, we integrate a testing stage on the Gitlab Ci/CD for elRepo.io-android, which introduces superficially on the world of Docker and Gitlab pipelines. 

Conclusion

GSoC was all the time an exciting experience that brought lots of challenges that I didn’t expect to find. There where some parts of the initial proposal that we didn’t achieve: integration tests for elRepo.io-android, or unit testing unit tests for elRepo-lib or for the retroshare-dart-wrapper.

But we achieved something more interesting and more valuable: we prepared all elRepo.io stack to work easily with a TDD workflow, we refactored substantially the code until the deeper parts of it. We prepared the app to be scalable, modular, and ordered to be easy to maintain, collaborate, or improve. Definitively, we pushed a step forward the quality of the code. 

And I take with me a valuable present about how to test, and how to design apps. An important knowledge to continue helping on the development of this awesome app, and other flutter apps. I’m really happy to have been a GSoC participant this year. 

Completing the Retroshare Web Interface – Google Summer of Code 2022 Final Report

This blog constitutes the final progress of the work done in Google Summer of Code 2022 under the organization Freifunk and project Retroshare Web Interface.

About me

I am Sukhamjot Singh, a 4th-year undergraduate in Computer Science at International Institute of Information Technology Bangalore. I love 2 things – Table Tennis and Open Source development. The fact that my contribution, however small or big, will be a part of something huge and useful, motivates me to work further.
Anyone having any queries regarding GSOC or the project can contact me anytime through email – sukhamjot2001@gmail.com

Objectives

The development of a web interface for the communication platform Retroshare was the major objective of this project. The goal was to provide as many features in the web interface by making use of the existing JSON API and provide a user friendly experience for the same.

Tech Stack : Mithril (Javascript) [A lightweight Frontend Framework]

Home Page

Relevant Links

Development

With the help of my mentors Cyril Soler and Gio, I have provided some major functionalities in the web interface. One thing to note is that the priority was to provide the relevant functionality first with some focus on the design part.

The major contributions include:

Channels Tab

This tab is developed for using the Channel related features of Retroshare.

Subscribed channels
Create Channel


We can subscribe to specific channels and then have access to the content.
Search functionality is also provided for Channels and Posts.

Create a new Post.

Post View has functionality to download files as well.

Comments Functionality

We can comment on Posts, reply to the comments and upvote/downvote comments.

Forums Tab

This tab is developed to use the Forums features of Retroshare.

My Forums
Create Forum

Functionalities for subscribing to a forum to have access to their threads and searching forums is also provided.

Forum View(Bold for unread theads)

Functionalities – Create a new thread, reply to a thread, mark a thread unread and view all the messages.

Thread View
Options to edit own threads
Edit Thread

Files Tab

Under Files tab I provided some additional facilities such as directory searching and some Download options.

In the Friends Files, the download option for each file is also added.

Friends Files
My Files

Boards Tab: The Boards Tab has similar functionality as the Channels Tab. Due to the structured and modular code of the Channels Tab, it is also being reused to build the Boards Tab. Along with community member defnax, Boards Tab is also under progress.

Work to be done

The progress of the project was satisfactory and achieved expected milestones. But there is still a lot of work to be done in the web interface to have comparable functionalities with the QT interface.

Some of the issues that need work in the future:

  • Search in Files Tab
  • Uploaded Files in Files Tab
  • Uploading attachments in Posts in Channels Tab
  • Pending Options in Config Tab.

Along with this, some of the Github Issues also need attention. I will be sure to work on these issues and functions in the future.

Concluding Thoughts

I would like to thank my mentors Cyril Soler and G104hck for the amazing support and constant feedback on the project. The weekly meetings with Cyril for the progress of the project have helped a lot to track the shortcomings and gain knowledge on writing good quality code. Also, the community members especially @defnax and @rottencandy have helped a lot with their continuous inputs.

I hope I can continue this journey in the coming months and can see this project being deployed with all its features and the user friendly UI.

Call a Friend(GSoC-22) Final.

About the app:

Meshenger was initially a Java based android app, which allowed users to make p2p audio as well as video calls over local networks i.e no server or Internet access needed.

Goals for GSoC 2022:

As the app was built initially using Java, our priority was on converting it to Kotlin for better performance and stability. The app didn’t had a very good UI, so designing the new UI and its implementation was another thing we wanted to focus on. There were several crashes that needed to be fixed along with fixing the deprecated dependencies, fixing the Call feature and cleaning up the Address Management screen were all a part of our 12+ weeks of efforts put into making the Meshenger app functional, removing the extra features that aren’t functional as of now and polishing the app to an extent that we are able to make a new release for it.

Goals Achieved:

After the midterm evaluations, I had a version of Meshenger with updated UI and Codebase converted to Kotlin but the Calls were still not working, we were unable to identify the reason why the calls aren’t working and as Google has officially stopped maintaining the WebRTC library which acts as a backbone to the Meshenger app we decided to start over with the Master branch as in that branch calls were working.

Now I had to convert the Master branch Codebase to Kotlin, implement the UI I designed earlier, add all the features that were in the Development branch and not in the Master branch, polish the app so its good enough to make a new release and restructure the Address Management screen.

It was a huge task with a very little time left to finish, but with great assistance from my mentor Moritz we have accomplished all the above mentioned goals for the project, without the guidance and availability of my mentor it would have been impossible to complete on time.

My overall experience in Google Summer of Code 2022, as a contributor was full of challenges, I learned a ton of new things and enjoyed it a lot.

Videoodyssee Project Update

Hello folks đź‘‹

The first phase of my GSoC is pretty exciting and challenging , together with my mentor I decided to complete the video processing part of the project in the first phase of the project.

Before started working on the project me and my mentor Andi Bräu figured out a video processing workflow so that we get a bird’s-eye view of the project and can figure out systems need to be implemented for the project.

Video Processing Workflow

Video processing workflow

Systems Involved in the project:

1 . Videoodyssee Frontend : A React frontend application for the users to submit the video data and admin dashboard for the admins.

2. Videoodyssee API : A Node.js REST API implemented using Express framework.

3. Videopipeline : A GoCD server with processing pipeline to process and publish the video.

Video pipeline

After evaluating several CI/CD tools we chose to use the GoCD tool to build the pipeline as it suits better for the video processing pipeline we are looking to build.

Tasks completed:

  • We created a config repo in GitHub to store the pipeline code so that whenever we change the pipeline code GoCD server will automatically pull the changes and builds the new pipeline.
  • Automated the installation of the GoCD server and GoCD agent in our remote machines using ansible playbooks.
  • Implemented processing pipeline upto the video encoding part.
  • Changed the previous video processing bash scripts to make them work with the current GoCD pipeline.
Video pipeline

Videoodyssee Frontend

For the users to submit the video details we need a frontend application which takes the data from the user and sends it to the REST API which will eventually trigger the pipeline using the GoCD API to start the video upload workflow.

We chose to use the React to implement the frontend application as it is quick and easy. The frontend application will have a upload form for normal users and admin dashboard for the admins for all administration tasks like approving/rejecting videos , updating video details etc.

Tasks Completed:

  • Completed the video upload form so that a user can submit the details of a new video .
  • Automated the deployment of the frontend application to GitHub pages using GitHub Actions by implementing a deploy workflow.
  • UI design of the admin dashboard is also completed.

Below is how the admin dashboard will look like:

Admin Dashboard

Videoodyssee API

We used Node.js Express framework to implement the REST API which will handle the requests from the Videoodyssee frontend. We chose Express as it is quick and easy to implement a REST API using Express framework.

Tasks completed :

  • Implemented a route which will take the video details from the frontend and triggers the GoCD processing pipeline.
  • Automated the deployment process of the pipeline using Ansible by implementing videoodyssee-api playbook.

Conclusion:

Finally the first phase of GSoC is very exciting and challenging for me and my mentor Andi Bräu really helped me a lot in making design choices and development. I hope the second phase of GSoC would be as exciting as the first phase.

Tasks for the second Phase:

  • Completing the remaining part of the processing pipeline upto the publishing step.
  • Automating the pipeline deployment process using Ansible .
  • Implementing the Unit testing in the REST API.
  • Completing the Admin Dashboard frontend and backend.

Try LibreMesh without having a router- Midterm

First tests inside the virtual machine

Boot from disk image

The first objective in the second stage was to run the virtual LibreMesh in a virtual machine.

The tool used to perform the virtualization was QEMU, and the operating system chosen to run inside the virtual machine was Debian 11.

To do this, the following commands were sent from the console on the host:

  • sudo apt install qemu qemu-utils qemu-system-x86 qemu-system-gui  //qemu installation process
  • qemu-img create debian.img 10G //creation of the hard disk image
  • wget  https://cdimage.debian.org/cdimage/daily-builds/daily/arch-latest/ amd64/iso-cd/debian-testing-amd64-netinst.iso //downloads the boot image
  • qemu-system-x86_64 -hda debian.img -cdrom debian-testing-amd64-netinst.iso -boot d -m 512  //runs the virtual machine

In the virtual machine it was necessary to reinstall applications such as qemu-system-x86, git, and to clone the LibreMesh repository (https://github.com/libremesh/lime-packages) with the corresponding updates; In addition, necessary tools such as ansible, clusterssh, ifconfig and bridge-utils were installed.

As we did before on the host, the next step was to do the following tests on the VM:

– Start a node:Just as it was done on the host, to start a virtual LibreMesh, the qemu_dev_start script from the lime-packages repository was executed and it worked without problems. However, it should be noted that when you want to access LimeApp through the browser on the host, this is impossible as there is no way to access from the host to the node in the virtual machine or vice versa.

– Give internet to the node: since Debian used SLIRP as the default network backend, it already had the dhcp server configured, so any virtual had access to the internet.

However, the use of this network backend had some limitations such as:

– ICMP traffic doesn’t work (so you can’t ping inside a guest)

– On Linux hosts, ping works from within the guest, but needs some initial setup

– the guest is not directly accessible from the host or external network

– Run the node cloud: When running the LibreMesh node cloud on the host, there was a problem that the dhcp server wanted to wake up on a port in use.

As mentioned in the previous point, Debian used SLIRP as a network backend, so the port in use problem would arise again. This is how the need arises to run Debian Guest by passing it two tap interfaces so that an IP and internet access can be manually and statically configured.

Settings on the virtual machine

Once the first tests were done, the next goal was to be able to access the LimeApp of a node that was created inside the VM from the host browser.

This was achieved by changing the configuration with which Debian Guest was started and making the connections specified below.

Connection between Host and Debian Guest:

To solve this, a bridge between the network interfaces of the host and the Debian Guest was created.

The idea was to bring up the virtual Debian by passing two backend taps to it, one for lan and one for wan. The lan tap would emulate the connection of the host by Ethernet cable to some node of the network and the wan would be the necessary emulation of the network’s internet connection.

Thus, the following commands were executed on the host:

  • ip link add name bridge_tap type bridge
  • ip addr add 10.13.0.2/16 dev bridge_tap
  • ip link set bridge_tap up
  • ip tuntap add name lan0 mode tap
  • ip link set lan0 master bridge_tap
  • ip link set lan0 up
  • ip tuntap add name wan0 mode tap
  • ip addr add 172.99.1.1/24 dev wan0
  • ip link set wan0 up
  • iptables -t nat -A POSTROUTING -o wlo1 -j MASQUERADE
  • iptables -A FORWARD -m conntrack –ctstate RELATED,ESTABLISHED -j ACCEPT
  • iptables -A FORWARD -i  wan0 -o wlo1 -j ACCEPT
  • echo 1 | sudo tee /proc/sys/net/ipv4/ip_forward

Finally, the virtual machine was runned with the following command:

  • qemu-system-x86_64 \
  • -hda debian.img -enable-kvm -cpu host -smp cores=2 -m 2048 \
  • -netdev tap,id=hostnet0,ifname=”lan0″,script=no,downscript=no \
  • -device e1000,netdev=hostnet0 \
  • -netdev tap,id=hostnet1,ifname=”wan0″,script=no,downscript=no \
  • -device e1000,netdev=hostnet1

It was also necessary to modify the etc/network/interfaces file by manually assigning the wan and lan taps of the virtual IP addresses within the range 10.13.0.0/16 for the lan tap and 172.99.0.0/24 for the wan tap .

Also, as the internet connection had a default route, we had to disable and stop the connman.service process so that it could take the route that had been assigned with the ips.

For this, it was executed:

  • sudo systemctl stop connman.service
  • sudo systemctl disable connman.service

And in the /etc/resolved.conf file, the line where DNS appeared was uncommented and the IP of Google’s public DNS was placed so that Debian would have access to the internet.

Connection between Debian Guest and LibreMesh Virtuals

The configuration here was achieved by creating another bridge within Debian, and bridging the same Debian’s lan tap interface with the lan interface of any of the nodes within the cloud. In this case, “Host A” was chosen and the following was executed (since it’s a test before we arrive to a final solution involving every node, it could have been made in any host):

  • ip link add name bridge_lime type bridge 
  • ip link set bridge_lime up 
  • ip link set ens3 master bridge_lime 
  • ip link set lm_A_hostA_0 master bridge_lime

Then in the host, to the bridge created previously (bridge_tap) an ip was added in the range of the node.

  • ip addr add 10.235.0.43/16 dev bridge_tap

Conclusion

In this first stage, several advances were achieved, such as the understanding of the problems of testing LibreMesh on any computer; the choice of tools and resolution of said problems creating a cleaner environment for the execution of Mesh networks.

Achieving this, it was possible to access the LimeApp of a node raised in the virtual Debian from the host browser.

What will be sought in the near future is to improve the fact that a cloud node has access to the internet and to automate the installation of Debian and all the configuration achieved in scripts so that it works on different hosts.

Thanks for reading!

Update on Traffic Monitoring and Classification Via XDP/eBPF – GSoC22

The first phase of my GSoC journey focused on get packets level statistics. The works I have done can be described as follow, (1)building the openWrt testbed to run XDP code, (2)following the issues and threads in openWrt forum and community to get familiar with the barriers of running eBPF code on openWrt, (3)leveraging XDP kernel code in official XDP-projects to collect data of wireless traffic(4) implementing my own XDP kernel code and user space loader to collect statistics like throughputs and etc. (5) designing two scenarios, co-channel interference and channel fading, to validate the variation of packets level statistics. The following sections describe my explorations in details.(All the tests are performed on Thinkpad X201i with x86_64 openWrt OS)

XDP Capacity

Like many eBPF developers on openWrt, I encountered lots of barriers when setup a user space loader. It includes big and little endian problems, XDP and eBPF library chaos, architecture related issues and etc. All the problems shown are responsible to our implementation of eBPF/XDP traffic monitoring tool, because we cannot bypass the official XDP support.

Previously, we just have one native XDP loader on openWrt – iproute2. It is indeed a method to load XDP object file, while it would do nothing about user space code, which provide the most convenient method to manipulate different statistics.

When crossing compile the XDP kernel program to BPF object file, the implicit include path of lib headers brings lots of chaos.

Getting the data collected by kernel code

Since we just had official xdp-tools support on openWrt recently. There are two ways for packets-level information collection.

  1. collecting data from /sys/kernel/debug/tracing/trace . Debugging level print is a way to retrieve data collected by kernel programs. Specifically, using bpf_trace_printk helper function. However, it is a little different for XDP kernel program to output information to debugfs. The main reason is that XDP kernel objects are driven by XDP events, that is packets ingress, we are only able to call bpf_trace_printk when the packets come in, which limits the flexibility of statistics poll. So, collecting data from debugfs can be seen a trade-off between official xdp-tools support and collection capacity.

The procedure of this way can be described as follow:

  • crossing compile the XDP kernel program to object file using openWrt SDK or even using host clang
  • uploading the object file to openWrt router and loading it using iproute2 or xdp-loader in xdp-tools package
  • getting data from debugfs and do post-processing
  1. collecting data via user space xdp-loader. Another way to collect XDP kernel data, which is also demonstrated by xdp-project, is to implement user space loader to load the kernel program and get statistics simultaneously. My method is to leverage xdp-tools‘ APIs such as attach_xdp_program provided in util to implement user space xdp-loader. The reason is xdp-tools is not stable ,while porting xdp_load_and_stats.c to openWrt is equivalent to manipulating xdp-tools package which have been done by others. However, I just followed the PR xdp-tools: include staging_dir bpf-headers to fix compiling with sdk by PolynomialDivision · Pull Request #10223 · openwrt/openwrt (github.com) to get my xdp-loader work on x86_64. In user space, packets level data collection related struct is
 struct record {
       __u64 rx_bytes;
       __u64 rx_packets;
       __u64 pps;  //packets per second
   }

The user space loader is like

   static bool load_xdp_stats_program(...) {
       ...
       if (do_load) {
           err = attach_xdp_program(prog, &opt->iface, opt->mode, pin_root_path);
       }
       ...
       if (do_unload) {
           err = detach_xdp_program(prog, &opt->iface, mode, pin_root_path);
       }
       ...
       stats_poll();
   }

As mentioned above, we have tried two ways to build up an entire system running XDP code to collect packets level information. Method (1) is more of a hacky approach while method (2) is still in progress.

Dedicated use cases

Due to the rate adaption mechanism in mac80211 subsystem, there are many situations that will affect the wireless transmission link, thereby affecting the throughput of the wireless network cards, which is reflected in the number of packets and bytes received and sent. We designed two scenarios, co-channel interference and channel fading, both related to packets level statistics, which could be our future classification samples.

For co-channel interference scenarios, we have two routers corresponding to two laptops. In the scenario without co-channel interference, router A is set to channel 1, the laptop C and router A form a wireless link using iperf3. At this point, the router B and laptop D are powered off. In the scenario with co-channel interference, the router B is set to channel 3, which brings spectral-overlap.

For channel fading scenarios, we use a pair of receiver and transmitter, then change the distance between them to validate variation of throughput, and also put some occluders on the line of sight to change the transmission state of the wireless link.

Conclusion

It has to be said that running eBPF code on openWrt is really a unique experience, and I also saw the efforts to official eBPF support in openWrt community. It is a tough journey to try different user space loader and build up a monitoring environment. Since I spent lots of time setting up my first eBPF environment and running the entire XDP program on my openWrt PC. The schedule for the next phase will be tight.

Next phase of GSoC is clear:

  1. There are some other information that xdp hook not supported like signal strength , SNR and etc. I will explore eBPF capacity to get such data
  2. We still have no bug free XDP support on openWrt so far. I will participate in community to do related work

Thanks for reading!