LibreNet6 – final report

A tail of dependencies

Creating the LibreNet6 service is highly is highly dependent on LibreMesh as the former builds on the latter’s existing script. So issues within the LibreMesh framework broadened my working scope, to focus on other areas as well. In the process I discovered some general flaws in the framework which I’m now happily fix over the next several weeks, independent of the Google Summer of Code. A focus will be the network profile management, which is currently somewhat messy, to allow new users to setup their own networks without deeper understanding on the lower levels of LibreMesh configuration. The network profile issue is very related to LibreNet6, as of now user still need some SSH and shell skills to connect.

To understand the current problem, feel free to check the mailing list archive.

The output

On the surface this project result an English manual on how to setup the IPv6 gateway and server. Instead of just translating (and correcting) the existing manual, I read into Tinc 1.1 and its new features, which vastly simplify the setup process for clients. It’s meant as a step by step manual only requiring the user to know how basic SSH and shell functions.

For the backend, Altermundi provided a VM which will serve as IPv6 server, working as a connection between IPv6 gateways (the client devices) and a real IPv6 uplink connection. The server is setup as described in the previously mentioned manual.

IPv6 broker vs LibreNet6

As the network uses Tinc, all IPv6 gateways build up a mesh network. When routing traffic between networks, they can decide to use the IPv6 server to route the IPv6 traffic, however may also connect directly via IPv4 to other gateways. This behaviour is one of the initial motivations of LibreNet6, as this highly reduces ping latency’s in cases, where the IPv6 server is on another continent, but two different mesh clouds are close to one another. Both IPv6 gateways connect directly to one another, routing traffic over IPv4 without using the IPv6 server.

Interest of LibreRouter

People from the LibreRouter project wrote me about their interest in integrating this feature in the LibreRouter v2. In that case it would not only enable IPv6 connectivity but also work as a remote help system, where users may receive setup help from the LibreRouter team. This feature is planed for the near future and details not yet completed.

Migrating from existing LibreNet6 setups

Now that the server works, future work has to be done to migrate all existing setups to the new server. I’ll work on that over the next few month, independently of the GSoC.

Final thoughts

This was my second time to participate in the Google Summer of Code and for a LibreMesh project. I’m happy they were satisfied with my last years project as they chose me again this year. The last years project took quite some time until users started to use it, however I’m happy to see it now being used on a daily basis. In the future I’m trying to improve LibreNet6 just as active as the image server.

LibreNet6 – update 2

This is an quick update on my work on LibreNet6 and LibreMesh within the last weeks. The exam period in Tokyo started and I had a cold which slowed me a bit down, once both passed I will focus with doubled concentration on the project again!

Multiple servers

The approach of using Tinc allows the usage of more then one IPv6 server, allowing to connect the servers of multiple communities with different IPv6 subnets. Babeld automatically detects where to route traffic when using external subnetworks. This is fortunate as it is possible that there is a high latency between mesh gateway and IPv6 server which would slow down traffic. However, using Tinc and babeld I ran a setup with two mesh gateways both using two different IPv6 subnets. While pings to the other network had high latencies at first (me in Tokyo, one IPv6 server in London and one in Argentina), Tinc automatically exchanged the IPv6 addresses of the mesh gateways which then could connect directly, lowering the latencies. Summarizing this experiment, using Tinc makes the network independent of the public IPv6 addresses.

No lime-app plugin

Initially I though of creating a lime-app plugin which allows to easily requests access to a Tinc mesh. However, after an evolution with my mentor and reading more about Tinc, we decided against it: The new 1.1 release of Tinc not only simplifies joining a mesh by offering the invite and join commands, but also allows to do all configuration automatically with the help of an invitation file. These new features simplify the project much more then I though, following the Spanish documentation on Altermundi.

Adding some security

As mentioned above some parts where easier as excepted, I though of looking into additional tasks for the project. Currently the usage of babeld requires all users of the mesh to fully trust one another as babeld does not provide any security (I could find) regarding announced routes. Mesh routing with security is offered by BMX7, which introduces a model to set (dis)trust between nodes. For this reason I’ve been in contact with Axel Neumann, the developer of BMX7, to fix an long standing error in OpenWrt which lead to false MTU rates in BMX7. The fix was merged upstream and thereby allows to test BMX7 over Tinc as a secure babeld alternative.

English documentation

Beneath the experiments I’ve started to translate (and simplify) the Spanish documentation of LibreNet6 and will upload it to the GitHub repository once finished. Important part is also how to configure 6to4 tunnels as surprisingly few VM providers offer any IPv6 connectivity per default but only a single public IPv4 address.

GSoC 2018 – LibreNet6 – Update 1

During the last few weeks I jumped into LibreNet6 and started on setting up a local testbed. With a couple of routers and an virtual machine with real a IPv6 subnet I followed the current Setup (Spanish) guide and eventually got it running. The process had various stumbling stones and is rather unpleasant to setup. In a future setup I’ll try to make the setup as simple as possible, only involving the installation of a single package.

The need of LibreNet6

Simply said, LibreNet6 allows using the IPv6 functionality of LibreMesh (LiMe). With a single configuration file at /etc/config/lime it’s possible to set nearly all functionality of the LiMe framework, from access points, mesh connects, used addresses to activated routing protocols. In the default configuration all nodes have a /64 IPv6 subnet defined which is pseudo randomly generated based on the hash of the defined network name, which thereby all nodes of a (Layer2) mesh cloud share. The subnet is part of Altermundi’s address space, enabling in theory public IPv6 addresses to all nodes and clients of the LiMe cloud. However, most mesh gateways don’t have a direct connection to Altermundi.

There comes LibreNet6, it connects via a Tinc mesh multiple community networks which only have Internet access via a NATed IPv4 address. Only the cloud gateways (CG) have to use babeld, within the mesh network other routing protocols can be used. All the CG has to do is announce public IPv6 uplink to the rest of it’s cloud. Once multiple mesh networks are linked together their clients can start connecting directly via IPv6. A feature of Tinc is to perform NAT traversal so both CG’s may connect directly with one another to avoid routing all traffic over the IPv6 server.

One of the advantages of LibreNet6 is to handle multiple IPv6 server and CG at the same time. Babeld allows to choose the fastest connection within the Tinc mesh and in mesh clouds the used mesh routing protocol decides which CG to take.

Speeding up development

I’m not completely new to the LiMe code and contributed on various end within the last years (motivated by my last years GSoC). Developing and testing new software were always tedious as all packages had to be created individually per targets architecture. To speed up this process I spent some time on settings up automatic snapshot builds for LiMe take care of automatic updating of LiMe snapshot repository. As nearly all LiMe code is Lua, it’s unnecessary to compile packages for all targets. To have a single package running on all architectures, the PKGARCH:=all settings can be used in packages Makefiles, and so I did. As a result, LiMe has now CI and a constantly updated snapshot repository, this will allow me (and other LiMe devs) to accelerate the development and testing of new functionality and packages!

Evaluation of the current LibreNet6 state

So far the setup was roughly like that:

  • Using Tinc 1.0 with a GitHub repository to share public keys, which were then deployed on servers.
  • Babel were installed manually on nodes requiring execution of various bash scripts.
  • Administrators had to [keep track of used subnets
  • manually](http://docs.altermundi.net/LibreNet6/Setup#subredes)

With the previously mentioned testbed I tried some new software and came up with an easier setup which stays compatible with already deployed connections:

  • Use Tinc 1.1 with all it’s new feature called invite and join allows clients to connect simply by running Tinc with a given invite url. This also handels key creation & exchange and setup of all Tinc related configuration files via a invitation-created script.
  • Use of the recently added lime-proto-babled to automatically configure all babeld, inclusive in combination with LibreNet6
  • Offer a lime-app to execute Tinc’s join command via web interface and show state of connection, like a simple IPv6 ping check.
  • Create a simple admin interface to show connected cloud gateways and used IPv6 subnets.

Next steps

So far I spent most of the time on understanding LibreNet6, babeld, Tinc and CI and setting up a running testbed. Next week I’ll create a LiMe package to be installed on CG’s, setting up babeld and Tinc. Also I’ll dig into the lime-app to understand the web framework and offer a simple interface for users. Lastly I’ll write a guide for server owners how they can setup the IPv6 server on a Debian system, using real IPv6 or 6to4 tunnels in case only a public IPv4 is available.

GSoC 2018 – LibreNet6

Project Introduction

Community mesh networks often often lack IPv6 connectivity as their gateway connection can’t offer stable IPv6 addresses (which won’t change every night). A possible solution is to distribute bigger subnets via a tunnel connection between a server (or VM) and mesh gateway nodes. This approach already exists called LibreNet6. While the current implementation works, it’s hard to setup and only documented in Spanish language. Within this GSoC project the LibreNet6 stack should be simplified and better documented. Making it easier to install for server and gateway administrators and offer a more extensive documentation.

About me

My name is Paul Spooren and this is my second GSoC. Last year I worked with LibreMesh on an easy way to upgrade routers, even if opkg is missing. Beneath the GSoC I’ve worked on various parts of LibreMesh.

Project Requirements

  • IPv6 delegation: LibreMesh gateways use a specified IPv6 subnet of various size, depending on demand.
  • Server independece: If the IPv6 providing server goes down, nodes should keep connectivity also to the ones visible only trought LibreNet6.
  • Simple setup: The gateway operators should be able to install and receive IPv6 connectivity with as little manual configuration as possible.
  • Server interface: A simple administrative user interface should allow the management of assigned IPv6 subnets.

Current implementation

Currently the implementation uses the following software stack: * Tinc VPN: used to connect the gateway nodes with the IPv6 server. Also it’s used to allow inter mesh communication without using the servers. * Babel Routing Protocol: Used on top of the Tinc connection route between mesh gateways and server on the shortest path. * GitHub for authorized keys: All public keys of nodes authorized to connect to the mesh tunnel broker server.

Implementation ideas

  • The node setup should be installable as a package and provide the required information for connection via a simple web interface, favorable using the lime-app.
  • Using Babeld adds another routing protocol to the used stack, where most LibreMesh setups already use BMX6. It should be evaluated of BMX6 (or it’s successor BMX7) are a useable replacement.

Next steps

I’ll get access to a VM hosted by altermundi with an public IPv6 address. This will be a starting point to setup my own instance of Tinc and work on the interface. Apart from Tinc I’ll run some tests with Wireguard which might be a slim VPN replacement, even tho currently missing important features. Lastly I’ll check BMX{6,7} as a replacement for Babel (as it’s already used in most LibreMesh setups). Once these options are evaluated I’ll focus on creating an interface and packages to easily setup the whole stack!

GSoC 2017 – Attended Sysupgrade – Final evaluation update

Hi Freifunk,

This is my last post within this years GSoC. I’ll cover the progress, challenges and future of the project.

tl;dr:
Direct links to the work I’ve done this GSoC:

First a small reminder what the project is about: Enable end-users to update their routers to new releases or bulk update installed packages via a simple click in the Luci web interface. The magic lies in a server producing sysupgrade images with the same packages preinstalled as installed on the router. That happens on demand when triggered via the web interface.The image is downloaded securely via encrypted HTTP as the used browser has all certificates installed. The router does neither need certificates nor a correct running clock.

Progress

Server

At this point I’m very happy to announce a test (and usable) version of the attended sysupgrade setup. All created package recipes were accepted into the official repository and are compiled within the daily build cycle. The server runs fine obeying the described API at the Github page. Images are build within a few seconds if the request appears for the first time. The server stores previous requests and forwards to existing images instead of building it again. This reduces significantly the amount of build images due to the likely case of identical images being requested again. In addition some basic information are offered via the web servers status pages.

The server is implemented in Python3 using flask for request routing and template rendering. While that’s only the tip of the iceberg behind the server lays a rather complex PostgreSQL database validating requests, checking for package changes or transforming packages when updating to another main release. More on the transformations later.

Images created on the server. A click on manifest shows all installed packages with version. All snapshot builds are deleted midnight UTC.

To try the the server at https://betaupdate.libremesh.org have a look at the demos I prepared. Continue reading “GSoC 2017 – Attended Sysupgrade – Final evaluation update”

one server to sysupgrade them all – second report

During the last weeks I’ve been continuously working on the “image-on-demand” server and the Luci interface. The packages have been split and renamed to be as modular as possible. Developing has been split in the following four packages:

luci-app-attended-sysupgrade

The web interface.  Uses JavasScripts XMLHttpRequest to communicate with ubus and the upgrade server.  Shows basic information to the user.

rpcd-mod-attended-sysupgrade

Has a single sysupgrade function called sysupgrade. It’s a copy of to the Luci sysupgrade function but callable by ubus. This package may be replaced by a native ubus call like ubuscall system sysupgrade

rpcd-mod-packagelist

Returns all currently installed packages, ignoring packages that has been installed as a dependency. It works without the need of opkg installed using /usr/lib/opkg/status. The packages hence requires the package lists to be included in the existing image, ie. keepinto unset CLEAN_IPKG on image build. This module is important for routers with less than 4MB of flash storage. The standard package selection does not install opkg for such small flash devices.

sysupgrade-image-server

The package will install the upgrade server with all dependencies. This especially useful for the planed setup of a single web server and a dynamic amount of workers building the requested images.

In the current implementation a single queue builds one requested image after another. A new approach will separate the we main sever from the building workers. The database is reachable by every worker and they setup ImageBuilders automatically depended on requested images. This could make the service easily scale able distributing the load to zero-conf clients.

The server handles the following tasks:

  • Receiving update requests
    • Validate request
    • Check if new release exists
    • If not, check if packages got updates
  • Receive image requests
    • Validate request
    • Check if image already exists
    • If not, add image to build queue
    • Return status information for the router to show in Luci
  • Forward download requests to a file server
  • Manage workers
    • Starts and stop  workers
    • Receive created images
  • Count downloads

The workers handle the following tasks:

  • Request needed Imagebuilders from the main server
  • Download, validate and setup Imagebuilder
  • Build images and upload to main server

Requesting Images

Do demonstrate how the image requests work I setup a few small scripts. Once called they request the image specified in the json file. Don’t hesitate to modify the files to perform whatever request you’re interested in.

Depending on the request you receive different status codes:

201 imagebuilder is setting up, retry in a few seconds
206 image is currently building, retry in a few seconds
200 image created

The requests repetitions are handled by the luci-app-attended-sysupgrade but must be manually retried by the current demo scripts. Eventually a CLI will follow.

Currently the distributions LEDE and LibreMesh are supported.

Future

Soon I’ll create a Pull Request for all three router packages to merge into the OpenWrt community package repo. At that point current installations could install the packages for further testing. All three packages are tested with a virtual x86 machine and a wr841 router.

Currently Secure HTTP is used for image distribution, to improve the security I’ll look into usign to create signatures for all images.

To enable reproducible builds I’ll create an auto generated info page with all information about the image, especially include the Imagebuilders manifest file listing all installed packages with versions.

The Luci view should be more verbose and also able to notify on updates directly after login (opt-in). Currently a simple “update successful” message will notify the user after an update. This could be expanded to a report function to let the update server know which images fail and which work. All gathered information would be helpful to create different release channels.

Attended Sysupgrade Status Report

Hello,

this is the first status report before the initial evaluation. It will cover the current status and my plans for the next weeks. As planed, I manged to set up a demo instance of the update-server and a working version of the luci web-view. Both will be covered later in this article.

What has been done

The project can be splittet in two parts, the Luci web-view, written in HTML and JavaScript and the update-server, currently implemented with Python 3.

Luci Frontend

The user interface received a new tab entry called “Attended Sysupgrade”. A click opens the very simple update view. Later additional information may be added.

The button fires an image request to the server based on retrieved system information (installed distribution, packages, version). The server returns status codes as described in the git repository.

During the build phase the JavaScript pools the Webserver to see the current status. Currently it’s queued, building or created. The view will be updated accordingly.

Once the image is created a flash button appears, a click will download the created image from the server and uploads it to the router. Once done, a new created ubus call will initiate a sysupgrade keeping all settings.

After a reboot the new release is installed (see bottom right).

Behind the scenes

The web-view uses JavaScript with XMLHTTP Requests, no external library is used. Theattended-sysupgrade packages is currently less than 5KB in size. As I had no JavaScript experience before the project there may be lots of optimizations missing, these will be added during the next weeks.

To upload the image to the router, the package cgi-io is used, saving the sysupgrade.bin in /tmp.

Update Server

The updates server is as well splittet in three parts. The request handling, a simple cli and the image building.

Request Handling

Currently a simple flask server provides the needed routing of /update-request, image-request and download. All requests will be checked for sanity and only then processed. If the request is valid a database lookup will check if the image was build before or is currently building. If none of these, a build job is added to the queue.

Whatever action is performed, the server tells the web interface  the current status.

Currently the flask server will run in a gunicorn instance with any number of worker threads. Gunicorn runs behind a Nginx which handles the image download as well: /download will only increase a counter and redirect to a /static folder full of created images.

Command Line Interface

The CLI helps to setup the update server. It has commands to initially setup the database, fill it with data, setup Imagebuilders and update package lists. Right now the Imgebuilders initialization is automated but not jet on demand, only triggered by command line.

In a future release the CLI could also create images for testing, clean the update server and more. It may be used by cronjobs later.

Image Building

Next to the request handling a very simple build manger takes care of the serialization of image builds. The manager open images builders and create the image. On success the database will be updated and the image requests will show the image URL.

The build manger could delegate workers to build in parallel. The master/worker setup is possible but not planed. Depending on practical experience this feature will be added.

Demo

I ran the ansible found here against a demo server and is currently usable to create images for LEDE. To test the image creating process you can use a simple bash script. Please keep in mind that building is limited to supported devices. The demo server does not automatically follows the git repository.

The demo server is the cheapest Google VM I could find. If you have any advise where to go, please let me know!

Future

  • The web-view needs more attention to be user-friendly and be error resistant. The JavaScript code need some cleaning.
  • The update-server should setup (download tar, check packages, etc) on demand, not pre-setup by CLI.
  • network_profiles currently do not work.
  • The replacement table is not working jet.
  • New images should be created if a package is upgrades.
  • Libremeshs flavors need support
  • The attended-sysupgrade package need auto builds for all targets.

GSoC 2017 Attended Sysupgrade

Hello, my name is Paul Spooren and I’ll be working on attended sysupgrades this Google Summer of Code. I’m 24 years old and studying computer science at the university of Leipzig. With this blog post I try to explain my project, the advantages and it’s challenges.

Topic Change from captive portals.

When I applied to GSoC my first application covered the implementation of “Captive Portals” for the LibreMesh. After discussing details with my mentors we decide to switch the project.
The main shortcomings where the following:
* Captive portals need testing on all kind of devices, Apple devices using a different approach than Android, Linux distribution differ, all kinds of Microsoft’s Windows as well. Testing would claim to much effort to provide a stable solution
* Captive portals usually intercept HTTP traffic and changing it content with a redirect to the login provider’s splash page. This does not work with encrypted traffic (https) and would result in certification errors.

Discussing what has generic use to OpenWRT/LEDE and LibreMesh we came up with the topic of a simple sysupgrade solution and fixed on that.

What are attended sysupgrades?

Performing updates on routers is quite different from full Linux distribution. It’s not always sustainable to do release upgrade via a packet manager. Instead it’s usually required to re-flash the system image. Depending on the installed packages an image rebuild may be to complex for regular users. A more convenient way is needed.

The main idea is to provide a simple function within the web interface to automatically download a custom sysupgrade-image with all currently installed packages preinstalled.
An opt-in option would check for new releases and notify via luci(-ng) or command line.

This approach would also help to upgrade a router without full computer hardware. The web interface can be accessed from mobile phones and as no complicated image downloading is required all users can perform sysupgrades on their own.

Distributions like LibreMesh may have a more frequent package release cycle and devices may don’t offer opkg due to limited flash storage. The simple sysupgrade approach could be used as a opkg replacement for these special cases and keep devices up to date.

How does it work?

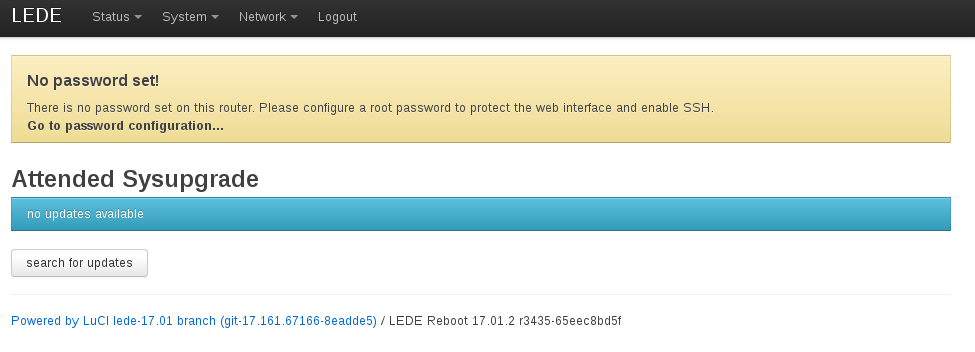
The web interface will have a new menu entry called “Attended Upgrade”. The page send the currently installed release to the server and checks it response. If an upgrade is available a notification will be shown. A click on the download button sends a request to the server and downloads the image. Another click uses the sysupgrade mechanism and installs the image. After reboot the system should run as excepted with all before installed packages included.

This project will implement an “image as a service” server side which provides custom build images depending on installed packages. A JSON API will enable routers to send requests for custom images. Build images will be stored and reused for other requests with the same package selection and device model.
A simple FIFO queue will manage all builds requests. Created images will be stored by priority queue system so most requested combination are always in cache.

Challenges

* With new releases packages may be renamed. This can be due to a split after growing in size as more and more features are added or if different versions of a tool exists. The update server has to know about all renamed packages and created an image with all needed programs. Therefore a replacement table will be created which can be managed by the community. Merges, splits and new naming convention will be covered. To make updating easy the server will try to handle changed names as automatic as possible. If there exists different possibilities to choose from there will be a menu in the web interface.

* Currently luci is the de facto web interface of LEDE/OpenWRT. Eventually it will be replaced by luci-ng with a modern JavaScript framework. All router sided routing has to be easily portable to the new web interface.

Implementation details

The main logic will happen within the browser and so can use secure HTTPS to communicate with the update server. The users browser communicates between router and upgrade server. The following diagram tries to illustrate the idea.

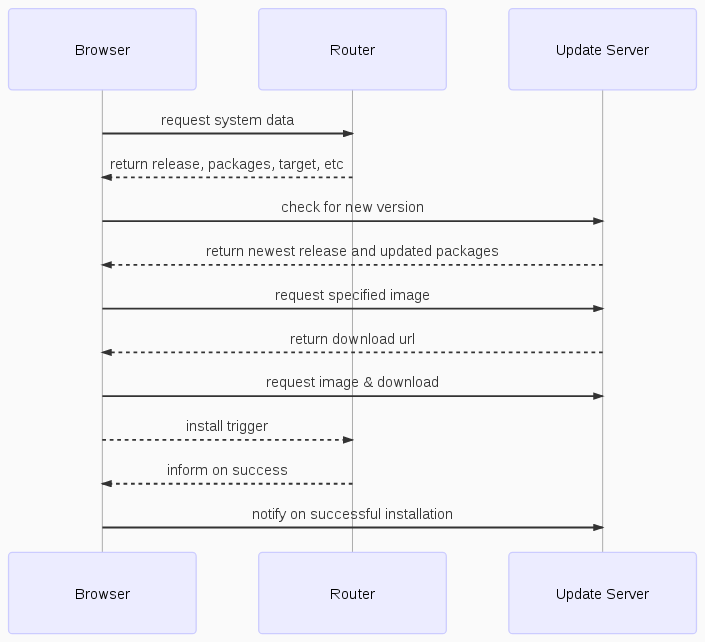
Once opened the upgrade view will ask the router via an rpcdcall to receive the installed release and send the version to the update server as an *update availability request*. The server will answer with an *update availability response* containing information about the update if exists or a simple status 204 (No Content) code. If a new release exists the web interface will perform another rpcd request to get details of the device, installed packages versions and flash storage. The information are then combined and send as an JSON request to the update server as an *image request*.

The update availability request should looks like this:

{
    "distro": "LEDE",
    "target": "ar71xx"
    "subtarget": "generic"
    "version": "17.01.0",
    "packages": {
       "opkg": "2017-05-03-outdated"
       ...
    }
}

The update server will check the request and answer with an *update availability response*:

{
    "version": "17.01.1",
    "packages": {
        "opkg": "2017-05-04-new",
        "ppp-mod-pppoe2": "2.0"
    }
    "replacements": {
       "ppp-mod-pppeo": "ppp-mod-pppoe2"
    }
}

The response contains the new release version and packages that will be updated. Not that even if there is no new release, packages could be updated via a sysupgrade. The idea is that packages without opkg installed can receive package updates as well.

All changes will be shown within the web interface to let the user know what will change. If the user accepts the upgrade an request will be send to the server. The image requests would look something like this:

{
    "distro": "LEDE",
    "version": "17.01.0",
    "revision": "48d71ab502",
    "target": "ar71xx",
    "subtarget": "generic",
    "machine": "TP-LINK CPE510/520",
    "packages": [
        "ppp-mod-pppoe2": "2.0",
        "kmod-ipt-nat": "4.9.20-1",
        ...
     ]
}

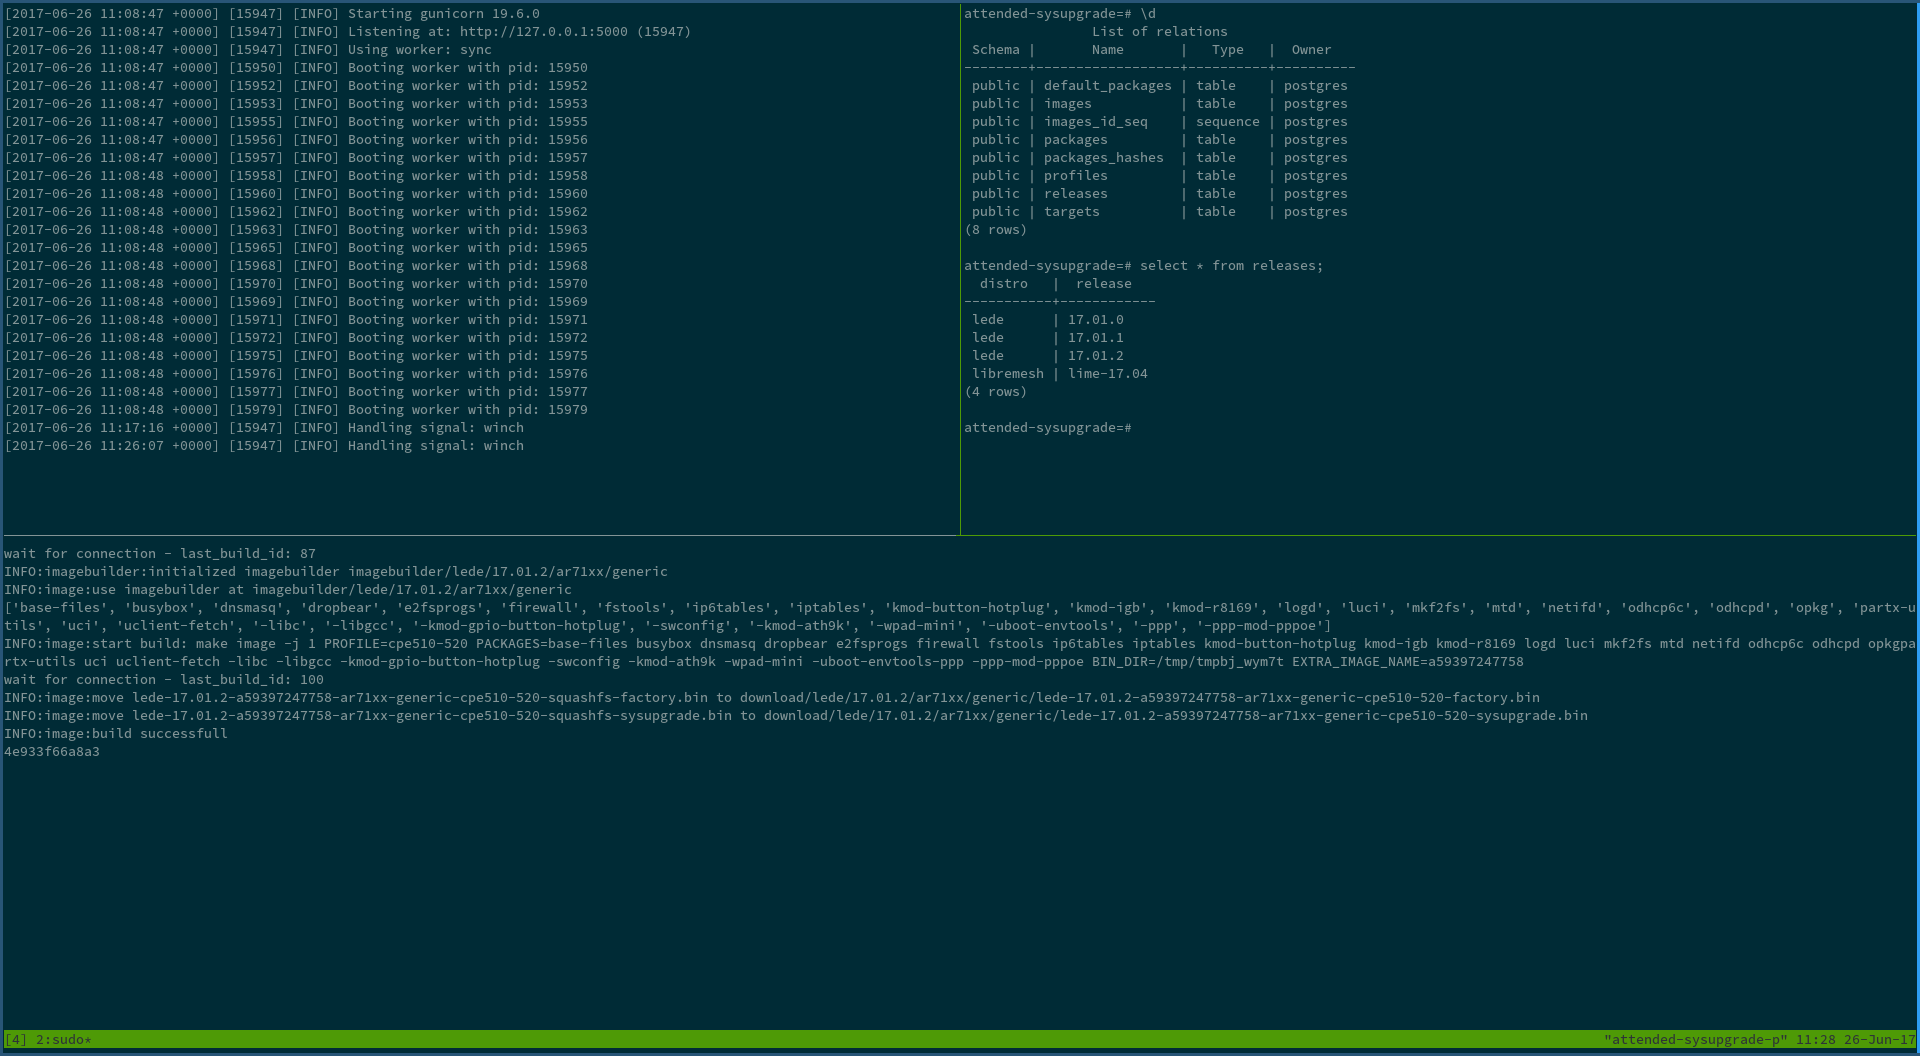
Once the update server received the request it will check if the image was created before. If so it will deliver the update image straight away. If the request (meaning device and package combination) was done for the first time a couple of checks will be done if the image can be created. If all checks pass the wrapper around the LEDE ImageBuilder will be queued and a build status API is polled by the web interface. Once created a download link is provided.

In the unlikely event of an unsolvable package problem the replacement table can’t fix itself the user will be asked to choose from a list. The new combination of packages will be send to the server as a new request resulting in an sysupgrade image. This approach still needs some evaluation if utilizable and really needed.

Using the ImageBuilder offers an generic way to offer sysupgrades for different distribution. The image builder feeds can be extended to include distribution specific packages like LibreMesh package feed

The replacement table could be implemented as followed:

# ./lede/replacements/17.01.1
{
   "libmicrohttpd": [
   "libmicrohttpd-no-ssl": [
       "default": true
    ],
    "libmicrohttpd": []
    },
    "openvpn": [
        "openvpn-openssl" [
            "default": true
        ],
        "openvpn-mbedtls": [
            "installed" [
                "polarssl",
                "mbedtls"
            ]
         ],
         "openvpn-nossl": []
    ],
    "polarssl": [
        "mbedtls": [
            "default": true
        ]
     ]
 }

libmicrohttpd was replaced by libmicrohttpd-no-ssl (installed as default) and libmicrohttpd.
openvpn splittet into various packages depending on the installed crypto library, openvpn-openssl is the default while openvpn-mbedtls is only installed if mbedtls (or it’s prior name polarssl) was installed before.

For better readability the yaml format could be preferred.

LibreMesh introduced a simple way to manage community specific configurations. This configuration method is flexible for other communities as well and should be integrated into the update server. A optional parameter could contain the profile name which will be auto integrated into new images.

"community": "quintanalibre.org.ar/comun/",

The parameter could also contain a full domain with leads to the needed files, this feature need more evaluation.

Possible features

* The current design is an attended upgrade triggered by and dependent on the web interface. A feature could be to add logic to the command line as well.

* Once the sysupgrade is possible via shell, an unattended sysupgrade would be possible. A testing and a release channel could enable unattended upgrades for tested images (device specific) only. If an image works after an attended upgrade it could be tagged and offered via the release channel.

* Mesh protocols may change and outdated routers loose connectivity. A possible solution to upgrade the devices losing contact could be to automatically login the outdated routers to updated routers open access points, perform an update and reconnect to the mesh.

Final Thoughts?

All thoughts above are not final and are more likely an RFC. I’m very happy to receive comments and critic. My goal is to have an generic update service where all communities and LEDE/OpenWRT itself can benefit from.
Feel free to contact me at paul [a-t) spooren (do-t] de or on freenode/matrix as aparcar.