A lot has happened since I last updated you. Most importantly a working prototype of my IP space map has been implemented into nodewatcher!
Continue reading “GSoC: Improving nodewatcher data representation capability (update 2)”
Das Community Blog
A lot has happened since I last updated you. Most importantly a working prototype of my IP space map has been implemented into nodewatcher!
Continue reading “GSoC: Improving nodewatcher data representation capability (update 2)”
The first blog post that describes the idea and goals can be read here.
After getting a bit more familiar with the code base the first thing that had to be done was to set up the work environment. I chose to go the virtual machine route so an actual router did not need to be used, making the development easier. An instance of the nodewatcher is running on a virtual machine running Ubuntu Linux. It runs in a Docker development environment and is set up by using the provided Docker Compose configuration. To enable data collection from nodes the monitor system also needs to be running.
To test the the nodewatcher’s HMAC signing capabilities I set up a dummy test node, turned on HMAC signing and used a python script to push some data on to the nodewatcher.
The next step was to set up a development node. With a lot of help from my mentor Kostko I used firmware-core to create a LEDE virtual machine, compile nodewatcher-agent packages, transferred them to the LEDE machine, used SSH to connect to it, installed them and tested the basic nodewatcher-agent functions. The whole setup and development process was documented in detail in the nodewatcher-agent README. Then I set up the agent’s http.push module and pushed some data on to the nodewatcher instance.
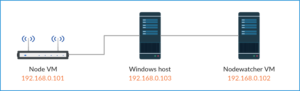
A local network like one in the above image was set up for development. Due to my lack of experience with networking I encountered some issues like not being able to ssh into the LEDE VM and not being able to send packets from LEDE VM to Nodewatcher VM, but with patience from my mentor it all works and the lesson was surely learned.
So the hardest part is done, right? I am now working on adding a HMAC signing like it’s already done in the python script. It needs to be developed for both pushing the data from a node to the nodewatcher and pulling the data from a node.
I am contributing using my github account.
Onwards! Good luck!
June Progress
During the past weeks, I have mainly worked on LoxiGen. LoxiGen is a compiler which generates OpenFlow serialization and de-serialization libraries for C and Java. I have used the tool before and was able to build on my own work introducing the necessary message types for my GSoC project. Since I have chosen ONOS as my Software-Defined Networking (SDN) controller, I used ONOS’ fork of LoxiGen as a starting point. This required hard-coding some message types to make ONOS’ fork produce valid C libraries. I am planning to get in touch with LoxiGen’s maintainers soon to try and figure out if some of my work can be used towards a merge of the two diverted code bases.
[Edit: Major change of plan]
In an older version of this blog post, I wrote that I was going to implement a kernel module to enable the de-coupling of hostapd and the physical access point. Yesterday, I had a long discussion with my mentor and Johannes, another GSoC participant for Freifunk (read about his project here). We decided to drastically change the direction of my project. Instead of aiming for the (undoubtedly) cool and advanced feature of running hostapd as a Virtual Network Function, I am going to focus my efforts on a simpler use-case. The reasoning is to have a more stable and ready-to-use toolset for the management of larger OpenWRT/LEDE deployments in the end. In other words: Do less but do it well.
To this end, Johannes and I are going to work on a set of interfaces to make our projects compatible. The vision is as follows: I am going to write an SDN application that registers the ONOS controller with Johannes’ OpenWifi server. Whenever a new access point joins the network, it discovers the OpenWifi server and fetches its configuration from it. Included in this configuration are the address and port of the ONOS controller. Thus, the new network node is able to connect to the SDN controller without the need for manual configuration by the network operator.
Next Steps
As mentioned above, Johannes and I will have to establish interfaces for our projects to interact. We also need to set up a combined testbed to test our implementations. On my end, I will start by adding the possibility to configure the OpenWRT/LEDE agent that connects to the ONOS controller through UCI. That way, the agent’s configuration can be queried and altered through the OpenWifi REST API. This should be rather simple. Next, I will write a proper REST API for my controller as well as the application that communicates with the OpenWifi server. Then, I will add features for network management such as the ability to move clients to a specific access point or to ban them from connecting altogether. Lastly, I will write SDN applications for automatic network management, for example, a load balancer that distributes clients evenly across available access points that is powered by the data stored in a client hearing map.
This is a continuation of the previous post [1].
During this month I have implemented the NetJSON plugin for BIRD. It exposes the topology of an OSPF Area using the network-graph format and thus allows Prince to fetch the topology and calculate the timer’s value.
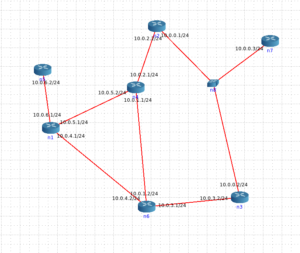
I deployed a small testbed to debug my code using the network emulator called CORE [2]
Here you can see the testbed:
I’m currently working on this repository [3] and I’m looking forward to send a PR to BIRD.
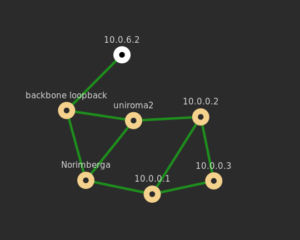
I defined a new command in the bird’s cli: “show ospf topology netjson”. It returns a network-graph output that can be used by prince or by any other NetJSON[4] compatible software.
Here you can see the topology of the testbed using d3.js [5][6].
In this next coding period I will implement a plugin for Prince that interacts with BIRD. Unfortunately it uses a UNIX Domain socket instead of a network socket, so I’ll need to code the communication routines from scratch.
Cheers, Gabriel
[1]: https://blog.freifunk.net/2017/05/30/implementing-pop-routing-ospf
[2]: https://www.nrl.navy.mil/itd/ncs/products/core
[3]: https://github.com/AdvancedNetworkingSystems/bird/tree/origin/int-new
[4]: http://netjson.org
[5]: http://ninux-graph.netjson.org/topology/49aecbcf-a639-47a7-9f58-e39de5d57161/
[6]: https://github.com/netjson/django-netjsongraph
For more info whats the goal of the project, please visit my first blogpost which is here.

I created this simple topology for trying out the technologies. I’m still in experimenting status but have some results as well. This virtualized test enviroment run on my machine. The paths between the MPTCP supported machines are shaped to 10 Mbps. With iperf3 and Wireshark I verified that the MPTCP protocol is working fine: clearly shows 20 Mbps between the two MPTCP supported machine (I use the latest 0.92 MPTCP kernel which is based on the 4.4 kernel version). Tha path between the MPTCP and Endhost machines are not shaped, so the throughput is much higher than 20 Mbps. I configured shadowsocks-libev on MPTCP1 (ss-server) and Endhost1 (ss-redir) machine. Then I tired an iperf3 download between Endhost1 and MPTCP2. This looks like:
Endhost1 <——————]TCP[——————-> MPTCP1 <———————]MPTCP[——————–> MPTCP2
I successfully get the 20 Mbps on Enhost1 which is the aggregated throughput of path1 and path2. (continue)
Continue reading “GSoC 2017 – Add MPTCP support in LEDE/OpenWRT trunk – June progress”
As mentioned in my previous blog post, i am going to add a live log and notification system for
certain events to the power monitoring tool PowQuty. The first steps have been done and the
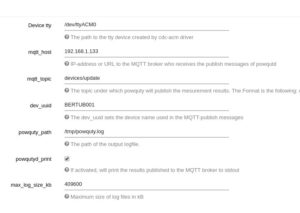
configuration has been extended.
Three types of notifications have been added to the configuration options during the first month of coding.
Namely email, slack and mqtt. Mqtt was in use before, but was extended to allow a second host and topic for
the power quality events.
The powquty configuration page was redesigned to use a separate tab for each notification option
to increase overview.

Power quality events, that cause a notification are:
As the power supply network in Berlin was not willing to provide such events an option for test measurement
input was needed. A file read flag for powqutyd was added and needs a little bit of clean up
before a pull request on the upstream powqutyd.
The library for the USB-oscilloscope provides the number of EN50160 events per measure cycle and
the kind of each event. As of now some basic slack notifications are added, which provide the event
type and the event start time from measurement start in milliseconds to the channel and team set
in the luci web interface or under /etc/conf/powquty.
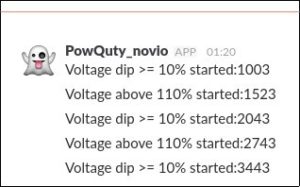
In the notification the type of event is provided to allow the network administrator to react directly
to the changes, without to check the log any further.
The other notification options will be added and tested soon.
Hello,
this is the first status report before the initial evaluation. It will cover the current status and my plans for the next weeks. As planed, I manged to set up a demo instance of the update-server and a working version of the luci web-view. Both will be covered later in this article.
The project can be splittet in two parts, the Luci web-view, written in HTML and JavaScript and the update-server, currently implemented with Python 3.
The user interface received a new tab entry called “Attended Sysupgrade”. A click opens the very simple update view. Later additional information may be added.

The button fires an image request to the server based on retrieved system information (installed distribution, packages, version). The server returns status codes as described in the git repository.
During the build phase the JavaScript pools the Webserver to see the current status. Currently it’s queued, building or created. The view will be updated accordingly.
Once the image is created a flash button appears, a click will download the created image from the server and uploads it to the router. Once done, a new created ubus call will initiate a sysupgrade keeping all settings.
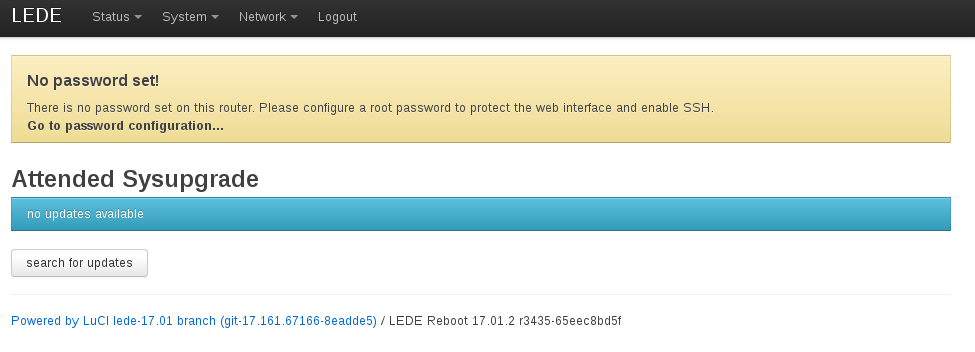
After a reboot the new release is installed (see bottom right).
The web-view uses JavaScript with XMLHTTP Requests, no external library is used. Theattended-sysupgrade packages is currently less than 5KB in size. As I had no JavaScript experience before the project there may be lots of optimizations missing, these will be added during the next weeks.
To upload the image to the router, the package cgi-io is used, saving the sysupgrade.bin in /tmp.
The updates server is as well splittet in three parts. The request handling, a simple cli and the image building.
Currently a simple flask server provides the needed routing of /update-request, image-request and download. All requests will be checked for sanity and only then processed. If the request is valid a database lookup will check if the image was build before or is currently building. If none of these, a build job is added to the queue.
Whatever action is performed, the server tells the web interface the current status.
Currently the flask server will run in a gunicorn instance with any number of worker threads. Gunicorn runs behind a Nginx which handles the image download as well: /download will only increase a counter and redirect to a /static folder full of created images.
The CLI helps to setup the update server. It has commands to initially setup the database, fill it with data, setup Imagebuilders and update package lists. Right now the Imgebuilders initialization is automated but not jet on demand, only triggered by command line.
In a future release the CLI could also create images for testing, clean the update server and more. It may be used by cronjobs later.
Next to the request handling a very simple build manger takes care of the serialization of image builds. The manager open images builders and create the image. On success the database will be updated and the image requests will show the image URL.
The build manger could delegate workers to build in parallel. The master/worker setup is possible but not planed. Depending on practical experience this feature will be added.
I ran the ansible found here against a demo server and is currently usable to create images for LEDE. To test the image creating process you can use a simple bash script. Please keep in mind that building is limited to supported devices. The demo server does not automatically follows the git repository.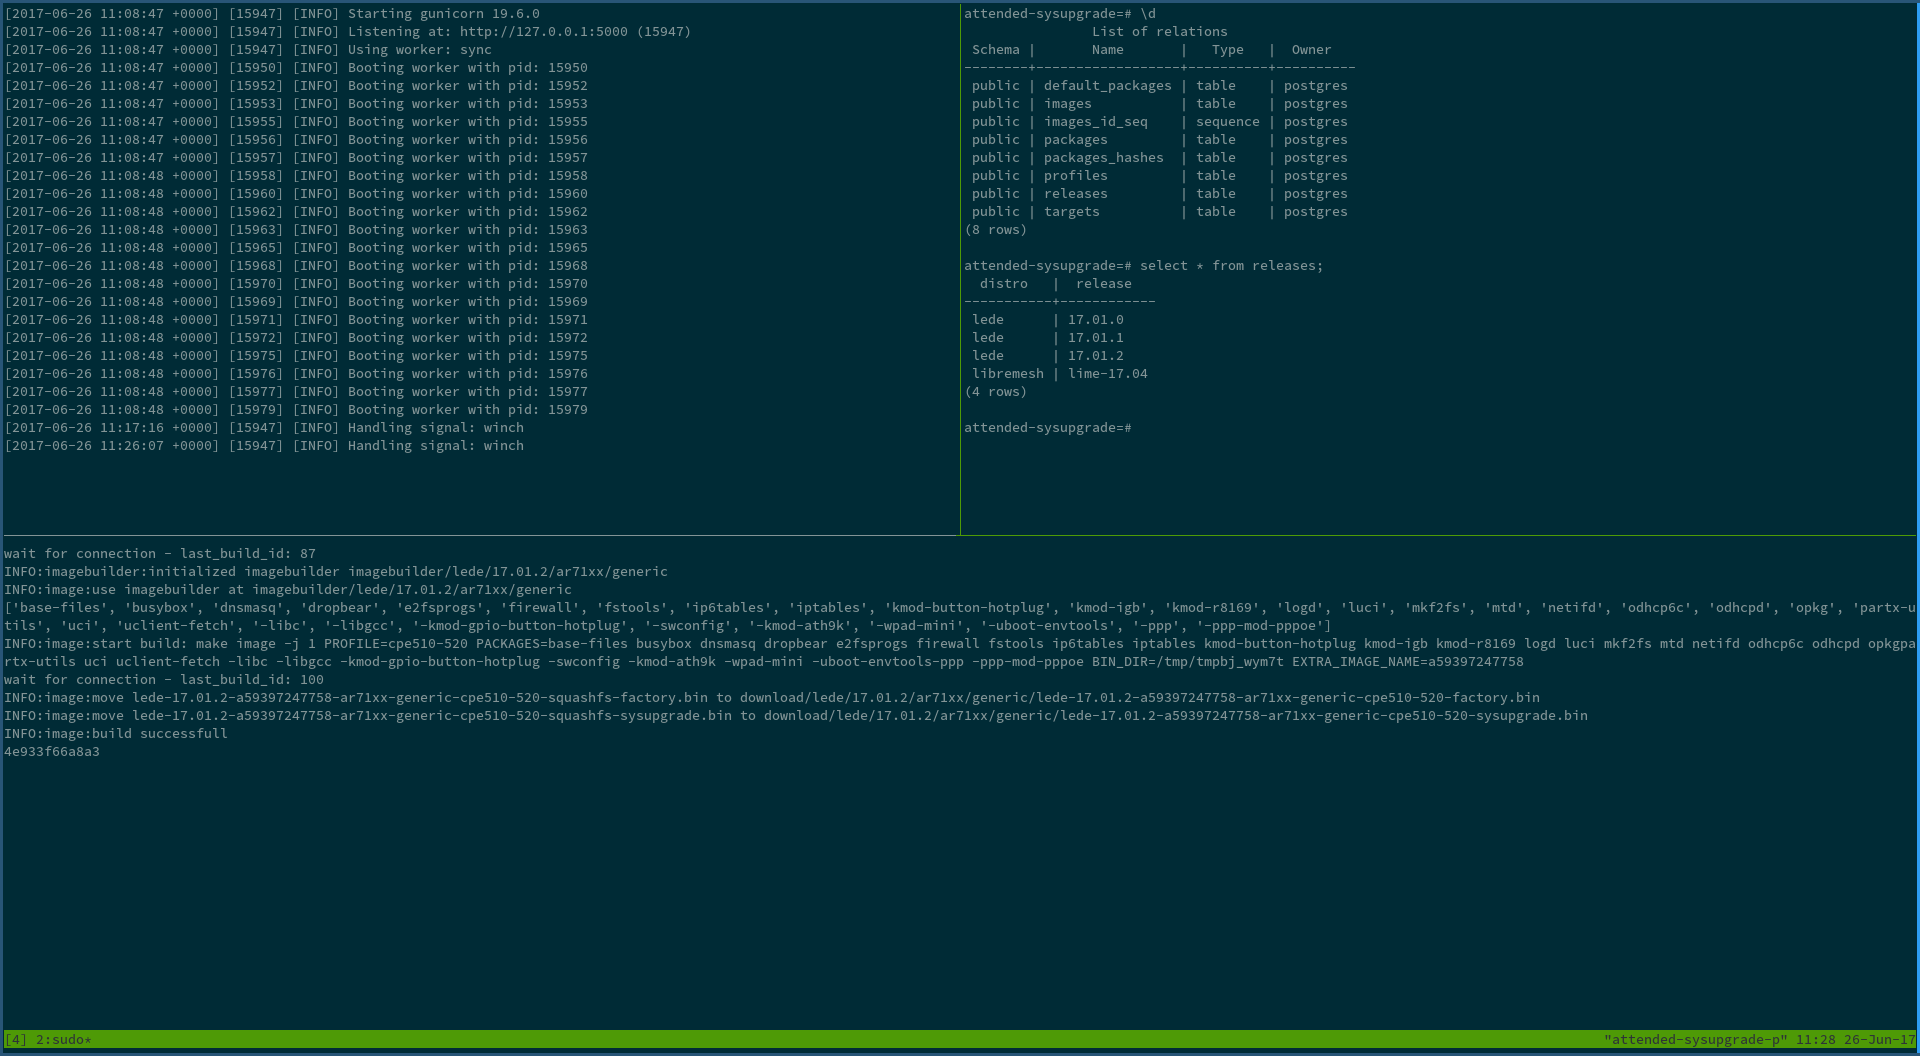
The demo server is the cheapest Google VM I could find. If you have any advise where to go, please let me know!
network_profiles currently do not work.attended-sysupgrade package need auto builds for all targets.
Today I decided to invest time on choosing the right Spectrogram library in order to create a visualization of the spectral scans.
The requirements that I thought relevant are:
This is the result of the Survey:
| rank | repository | works | realtime | weight (kb) | responsive | stars | forks | last update | notes |
| 1 | https://github.com/drandrewthomas/Speccy | yes | yes | 3 | no | 0 | 0 | 2017/03/22 | |
| 2 | https://github.com/sebleier/spectrogram.js | yes | yes | 4 | no | 7 | 3 | 2013/09/09 | |
| 3 | https://github.com/pachacamac/spectrum_analyzer | yes | yes | 5 | no | 0 | 0 | 2015/09/09 | |
| 4 | https://github.com/miguelmota/spectrogram | yes | yes | 8 | no | 51 | 9 | 2017/05/22 | |
| 5 | https://github.com/pietgeursen/inu-spectrogram | yes | yes | 166 | no | 2 | 0 | 2016/07/29 | |
| 6 | https://github.com/borismus/spectrogram | yes | yes | 2000 | yes | 78 | 12 | 2014/06/13 | have to refactor, cause it uses the microphone |
| – | https://github.com/vlandham/spectrogramJS | yes | no | 500 | no | 65 | 5 | 2014/01/23 | it doesn’t work in realtime |
| – | https://github.com/abarbu/audio-annotation | no? | ? | ? | ? | 4 | 0 | 2014 | not instalable after some time |
| – | https://github.com/arirusso/d3-audio-spectrum | no | yes | 83 | 18 | 2016/11/22 | throws errors in javascript console | ||
| – | https://github.com/octatone/spectrogram | no | ? | 110 | 8 | 0 | 2013/08/11 | seems to work only in the safari browser, couldn’t test |
Most of the Spectrum Analyzers are very simple ones… till now I havent found that allows advanced things like multiple levels of zoom, pause and resume, etc.
In the future we may need to do some work to implement this functionality.
Lets discuss the main ones.
It is a very Spectrogram traditional visualiation with an additional realtime curves graph on the upper part. It draws from top to bottom.
In relation with the visualization, the other relevant characteristic is that it draws the graph in a continuous fashion… so the old information get’s lost, and the rest scrolls each time new information arrives. We could call this one a `scrolling drawer`.
It is the most lightweight (pretty close to the next one) weighting 3kb.
The code is not elegant or customizable at all, but is small enougth to understand it easily and include new updates.
This one is a standard Spectrogram, could be characterized as a `rolling drawer` in the sense that once it gets to the end of the canvas, it continues drawing at the beginning of the canvas, `rolls` to the other side, instead of `scrolling` the content.
This one is very lightweight also, 4kb, and the code is very easily updateble to support external sources of data.
This is also a `scrolling drawer`.
It looks better for my taste (probably related with the color scale choosen) but at the functionality level is quite similar to the previous one.
The code is also very small, so it would be easy to understand it. Many configurations are hardcoded.
This is still very lightweight, but is still very basic.
The one good thing about this is that is coded in a very professional fashion… The developer uses TDD, the code is very well organized, the documentation is simple but comprenhensive, has pause and resume functionality.
This one doesn’t bring any new stuff to the table.
It uses new technologies (like JSX) but doesn’t improve in the way it is done, or the functionality it brings.
It weights many orders of magnitude more (2000kb), so it is out of the discussion.
I haven’t decided between Speccy and Spectrogram.js … but I know that with any of these I will need to do a lot of work, cause many of the desired features are not there yet (customization, mantainability, responsiveness) and others desirable are not there either (like drawing rulers, pause/resume).
I’ll build a prototype with one of those to move forward with the Spectrum analyzer for LibreMesh.
Hello everyone,
this is the status report of the OpenWifi project before the first evaluation. I like to point out in this blog post what has been done and how I like to proceed the next weeks. Looking at my initial schedule I did some things that are not on that list and missed some others. So I also like to revamp the schedule. I did a Google-document for that and I’m happy to receive comments about it 🙂
I think a lot of things that have been done are the foundation for everything else to come and a lot of things that have not been done are low hanging fruits.
I think overall my initial schedule contained too many elements and I need to focus more on what is important and what are optional changes. I think I want to focus on testing/docker/https and authentication/authorization until the next evaluation and do the communication plugin-API from then until the end. Everything GUI-related might happen after GSoC.
That is the biggest part I did but I think also the most important point to get the project to a more professional level and make usage easier for new people. There is a docker hub for openwifi docker images. This way you don’t have to build the image – you just need to pull it. The image is build by TravisCI on new commits – so it is up to date.
I also started to implement tests based on docker images. There is a test that boots up a LEDE docker image and an openwifi docker image and checks if the LEDE container discovers the openwifi image and registers to it. This test is also done by TravisCI.
Just last week I also updated the docker image in the way that it can now also optionally ship with nginx and therefore use TLS! Nginx is also doing the client side certificate validation and sets a header value according to the outcome. (I guess something similar is also possible for apache and other servers)
TravisCI testing has also been added for pyuci.
The discovery script has been completely revamped and is now a lot more readable. It also serves now as small client that updates the registration every 3 minutes.
Pyuci has been refactored and extended. Diffs are now a separate class and can be applied and reverted from a config. Also the testing has been extended somewhat and is done by TravisCI.
A basic user management has been added. That is a database entry and password hash storage using passlib and an openwifi authentication scheme. The admin user can add and modify users via a rest API.
I also thought about how to implement rights management – more on that below.
The new database model has not been on my initial schedule so much. But actually there is a lot to do. What has been done is proper syncing via sqlalchemy events of the database representation and the rpcd-json representation.
OpenWifi now saves change to a config in a revisions database table.
Since there is now a proper infrastructure for docker based testing it should be used more like for testing https and configuration changes.
More tests are needed for the new database model and pyuci.
The new db model needs testing and methods for adding and removing of links and configurations. It should keep IDs consistent upon updating (to allow configuration sharing) -> so maybe make use of new pyuci diff features.
Also I should get rid of all old configuration access (like old templating and configuration changing). It might be nice to have a gui for the DB configuration but this has not the highest priority.
The authentication needs to authenticate API keys and client side certificates.
Give users/API-keys access based on node and pattern matching. Add option to restrict registration to client side authentication.
The pattern matching could be in the form the current master-config query or a path string (like network.lan.ipaddr or network.[interface].ipaddr or network.lan.*). It should be possible to set patters for read only, read write and restrict. (For example to have a eveything mathing pattern but restrict access to one specific pattern).
It should also be possible to restrict access luci2 (it doesn’t make sense to restrict the db querys if luci2 access is allowed ;)).
The discovery script should be updated to setup capabilities and communication protocol (like rpcd, rpcd-TLS, NetJSON, etc.) on registration.
Nice to have features would be that it has an option to stop once a registration was successful and to accept a retry count.
I the future it would be nice to work together with OpenWISP and have and share the discovery mechanism.
In this month I was making several advances in the implementation of Luci2 in Libremesh. Mainly the tasks were to generate a image of the firmware with Luci2 and analyze through a study of the traffic the way in which the rpc acutally builds the menu and manages the ACLs. The idea is to reduce the size to the maximum so that its use is feasible and at the same time reduce the dependency to the frontend frameworks.
All this was possible because I traveled to the Battelmesh in Vienna, where I was able to meet and talk with different members of the team and especially with Jow, who explained the current state of development and put me in contact with other developers. We also talked about possible changes and implementations to ensure some retrocompatibility or at least a simple form of migration from Luci to Luci2.