Now I would like to give you a full state of each above mentioned subproject. Firstly I will explain about the web backend and finally a peroration including my valediction as a Student by Google Summer of Code.
web backend
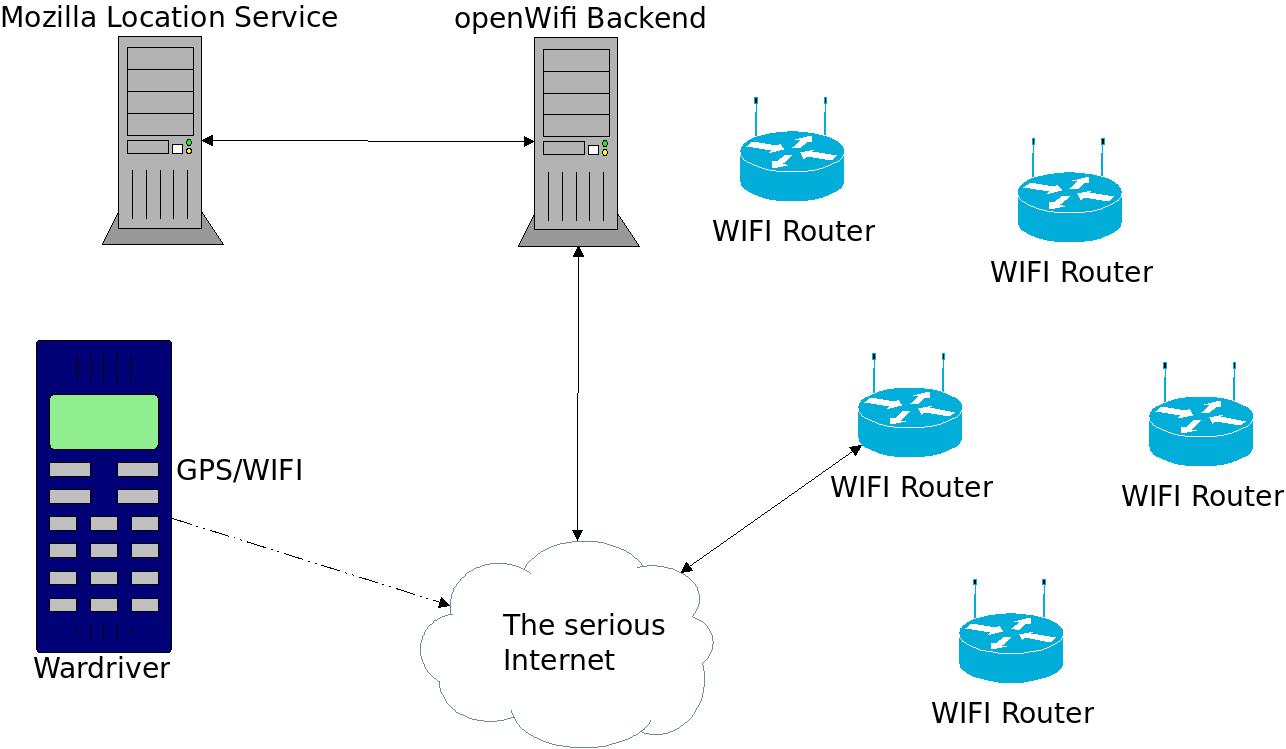
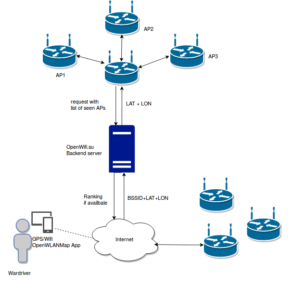
Generally the backend service receives over the OpenWLANMap[7] App from mobile phones the mac addresses of surrounding wireless networks linked to GPS positions. This information will be stored into a database. If a device like a WiFi router requests its position, it will send surrounding Wireless mac addresses to the backend and get back a geo position, which is calculated from these information in the database.
The new web backend called sgps-core[8] is an API-core, which should replace the old openwifi.su backend. The old one consists of a collection of different programs in different program languages. sgps-core includes a fully backwards compatibility to the old openwifi API[9] for requesting a position. sgps-core is written in Golang, which processes a lot faster than the old API, which is written in Ruby. sgps-core is more secure because it checks and take only requested strings, which contain only comma separated macaddresses with 12 hex characters.
As a fallback feature, sgps-core is able to receive coordinates from unknown WIFIs by requesting them on Mozilla Location Service (MLS)[10] if there are no db entries for that WIFIs. The position for clients will be returned in form of latitude and longitude. As a quick reminder, here is the schemata from the first post, which represented the the functionality of sgps-core:
The sgps-core solved a problem about calculating the position. The old method counts the average of all latitude values. Analogous for longitude. The new method calls geographic midpoint calculation and needs 4 parameters lat0, lon0, lat1, lon1 (give two take one) which will be explained in detail in following:
deg have to be replace with latitude or longitude value.
rad = deg *π / 180 <- Generally conversion from degrees to radiant.
dlon = (lon1 – lon0) * pi / 180
lat0 = lat0 * π / 180 <- lat0 from degrees to radiant.
lat1 = lat1 * π / 180 <- lat1 from degrees to radiant.
lon0 = lon0 * π / 180 <- lon0 from degrees to radiant.
Converting into Cartesian coordinate system.
Bx = cos(lat1) * cos(dlon)
By = cos(lat1) * sin(dlon)
Calculate new position reference to sphere and Converting back from Cartesian coordinate system into new latitude and longitude:
lat2 = atan2(sin(lat0) + sin(lat1), (cos(lat0) + Bx)² + By²)^(1/2))
lon2 = lon0 + atan2(By, cos(lat0) + Bx)
On this point it is also possible to use a ellipsoid to increase the accuracy of positions. This may be interesting for long distances. For short ones like from seen wireless networks, it is not really relevant.
Converting back to degrees:
deg = rad / pi * 180 <- Generally conversion from radiant to degrees.
lat2 = lat2 / pi * 180 <- lat2 from radiant to degrees .
lon2 = lon2 / pi * 180 <- lon2 from radiant to degrees.
In the last few weeks, I spent a lot of time on discussing with the current server administrator of openwifi.su to deploy the sgps-core on the server for a test environment. But he did not have much time, so we decided to migrate the openwifi.su to our Nordwest Freifunk infrastructure to make the administration more accessible for other people. In my last report I wrote “I will release in the next few days a first version”. This could not be done because of the above mentioned discussion. After the migration I can test that backend on huge databases and compatibility to the DBS. The current code can be found here [11]. For people who want to try the sgps-core please check out the following URL[12].
gps-share
The Idea at the beginning of GSoC17 was to write a program to provide GPS NEMA-formats over a tty udev device. The information for the GPS NEMA-formats should come from the above mentioned sgps-core. As I told in the first blog post I discussed with some people from the Mozilla Location Service Malinglist and it turned out that something similar was already exist called geoclue. To avoid developing redundant software I decided to drop this idea. Instead of it the new plan was to build support for native GPS in gps-share[13], which is an add-on for geoclue. But during the Google Summer of code I had to focus more on the both other subprojects because they are more important, especially for Freifunk. In my peroration I will tell about the future plans, especially for gps-share.
LEDE Packages
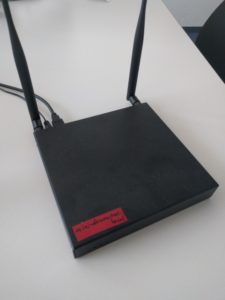
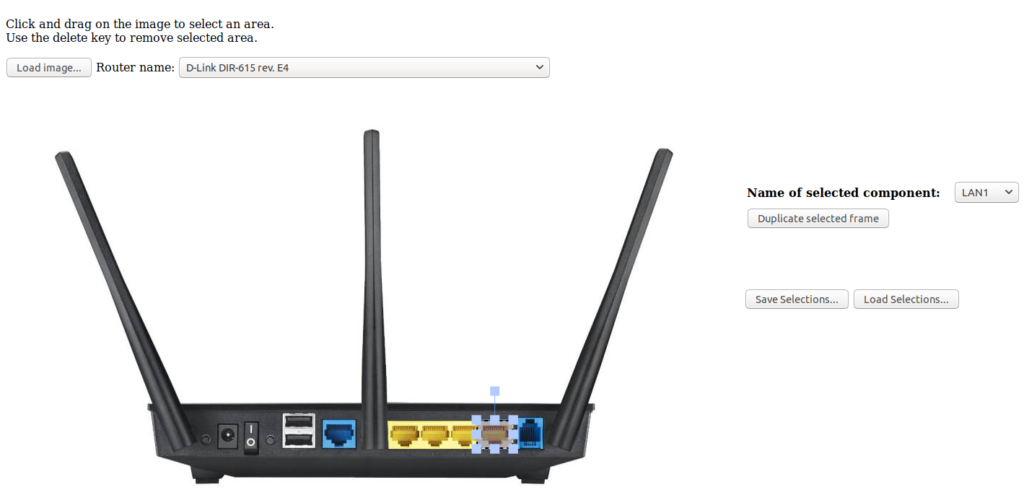
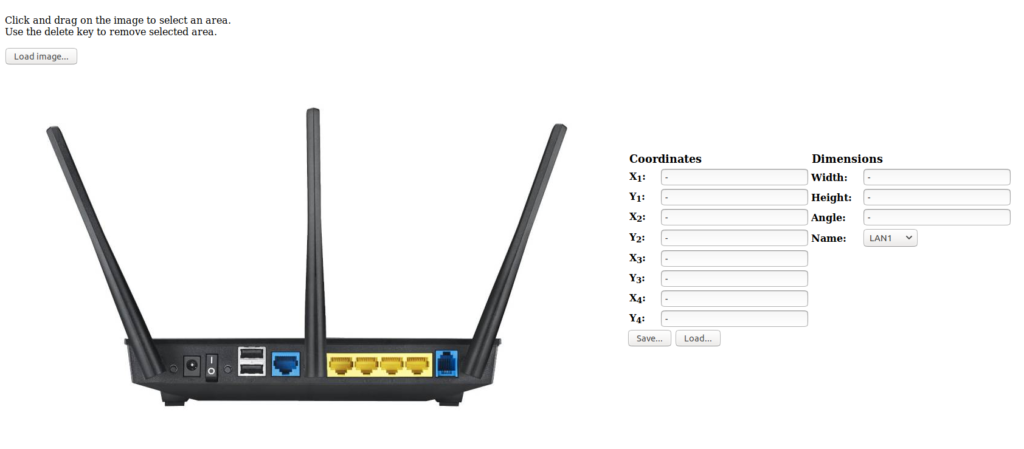
The third subproject was to create some opkg packages for LEDE[14] and similar Frameworks. The main package called geolocator provides the geo position of the device via UCI[15]. Positions should be received from the above explained sgps-core. The 4 other packages are only for Gluon[16], which add the configuration options of the geolocator to the Web-interface.
This month I mainly worked on the LEDE Packeges. At the beginning of the august I sent a merge request to Gluon for integrating the Gluon-geolocator[17]. The containing geolocator program was written in ash shell code. While reviewing and discussing about the merge request, I realized that I had to rewrite the program from shell to lua code because Gluon mainly work with in lua written programs. You can find the shell code here[18] and the Lua version here[19]. At the moment I am waiting here for another review and subsequently merging.
The other packages for the Gluon Web-interface are also already in process. The first idea was to create a detection of installed packages to show related configuration options on the Web-interface. This idea was dropped because I found a better solution. The problem is detecting packages on runtime, which means many extra code on Routers, which only have 4MB Flash for example. So I decided to generate the package with their options on compile time. These packages are:
gluon-config-mode-geo-location,
gluon-config-mode-geo-location-with-geloc-map,
gluon-config-mode-geo-location-with-geloc,
gluon-config-mode-geo-location-with-map
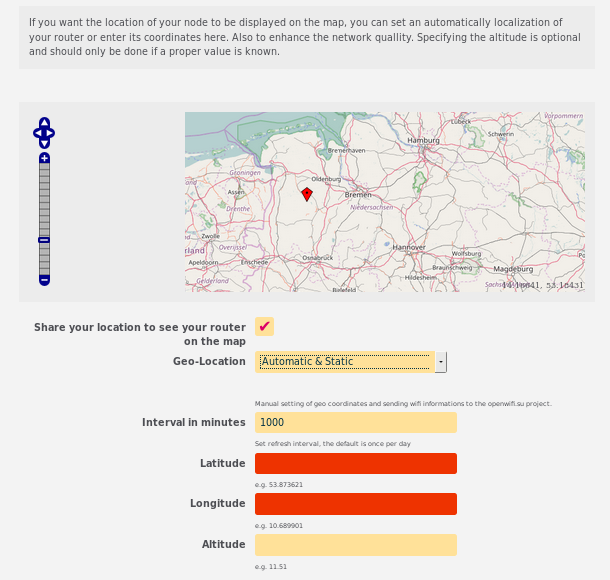
The main package is gluon-config-mode-geo-location, which is already exist in gluon, but with a difference Web-interface. Each package should either integrate an open street map or the geolocator options. Integrating both are also possible. For communities which would like to stay on the currently variety of functionalities, it is also no problem not integrate any of these extra options.
Here is how the new packages look like:
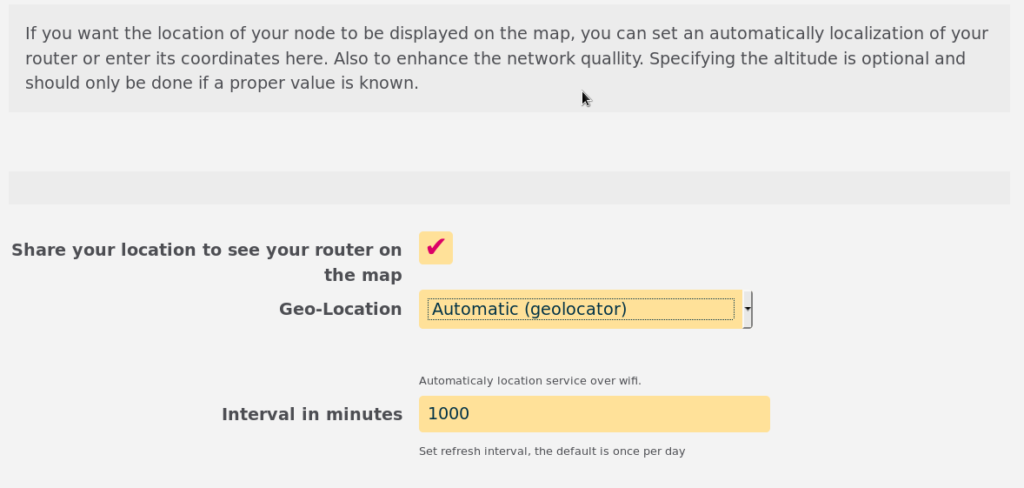
I wrote some C++ programs, which generate me the Lua code for the Gluon Web-interface, which is written in Lua. Base on preprocessor variables, the amount of options for each package will be included into the Lua output from the C++ program. These preprocessor variables will be set by selecting one of the above packages. Also PO files for the translation will be generated in the same way. A merge request of the above new packages can be found here[20] I am still working on it.
Peroration and Future plans
Now I am coming to my peroration.The last 3 months were really awesome, just like last year as a student on the Google Summer of Code. I would love to recommend this great opportunity for not only students but also for open source organizations. Students can not only learn a lot of new things but also meet new great people, make new friends and take part in many events. For example: at the beginning of august I was on the SHA2017[21] (Still Hacking Anyway) and had a meetup with some Freifunk communities there. We had a great discussion about a lot of technical stuffs and a nice time for socializing. The SHA2017 took place in Netherland nearby Amsterdam. Another example is : this week I flew to Spain to start my exchange semester. Coincidentally a student from Germany who I met at the beginning of the GSoC17 in Berlin on the WCW[22] (Wireless Community Weekend) is also doing an exchange semester in Spain. We have already emailed each other and planned to meet up in the next months, probly in Barcelona or any other places. As I said above, this is my second time as a student on the GSoC, which means this is also my last time and sadly I have to say goodbye to GSoC as a student now. But maybe next year I can work as mentor to support other students in their great opportunities.
Back to the projects, as i said I’m still working on it. I will finish the Integration into Gluon and LEDE and continue developing sgps-core integrate new features and migrate the infrastructure to a better server. I would like to contact Zeeshan Ali, the maintainer of gps-share and try to help on this project as well. Also I am still working on the hoodselector which is my Google Summer of Code project from the last yeah. You can read about it here[23]. The hoodselector should also integrated into Gluon but it requires for sure a few weeks of work to integrate VXLAN on it. A merge request for can be found here[24].
Also I would like to say thank you to my Mentors Clemens John from the Google Summer of code 2016 and Johannes Rudolph from 2017 and especially to Andreas Bräu who works so hard on the Freifunk Org for many years to give students these opportunities to be a part of the Freifunk Community.
[1] https://blog.freifunk.net/2017/05/29/geolocator-software-defined-gps/
[2] https://ffnw.de/geolocator-software-defined-gps/
[3] https://blog.freifunk.net/2017/06/28/geolocator-software-defined-gps-first-evaluation/
[4] https://ffnw.de/geolocator-software-defined-gps-erste-evaluation/
[5] https://blog.freifunk.net/2017/07/26/geolocator-software-defined-gps-second-evaluation/
[6] https://ffnw.de/geolocator-software-defined-gps-zweite-evaluation/
[7] https://f-droid.org/packages/com.vwp.owmap/
[8] https://github.com/openwifi-su/sgps-core/blob/master/README.md
[9] https://sourceforge.net/p/libwlocate/code/ci/master/tree/master/
[10] https://location.services.mozilla.com/
[11] https://github.com/openwifi-su/sgps-core
[12] http://runner01.ffnw.de:8082/api/v1/bssids/64700274945A,0018E7DC21BB,30FC681F37A6,F81A673626E8,EC086BA8ED18,8416F9A8E2FA,E894F6A230E4,98DED020D00A,EC086B3349B2,F81A677F5CD8,A0F3C1654BA6http://runner02.ffnw.de/64700274945A,0018E7DC21BB,30FC681F37A6,F81A673626E8,EC086BA8ED18,8416F9A8E2FA,E894F6A230E4,98DED020D00A,EC086B3349B2,F81A677F5CD8,A0F3C1654BA6
[13] https://github.com/zeenix/gps-share
[14] https://lede-project.org/
[15] https://wiki.openwrt.org/doc/uci
[16] https://gluon.readthedocs.io/en/latest/
[17] https://github.com/freifunk-gluon/gluon/pull/1201
[18] https://git.ffnw.de/ffnw-firmware/packages/blob/ba8007e5a6b99306068847ba98f2bb72b7fb2745/ffnw-node-info/files/lib/ffnw/geolocator/geolocator.sh
[19] https://github.com/2tata/gluon/blob/fa935d83a64c27dd23f133bd8cecf5d72ef9281b/package/gluon-geolocator/luasrc/lib/gluon/geolocator/geolocator
[20] https://github.com/freifunk-gluon/gluon/pull/1211
[21] https://sha2017.org/
[22] https://wiki.freifunk.net/Wireless_Community_Weekend_2017
[23] https://blog.freifunk.net/2016/08/22/monitoring-and-quality-assurance-open-wifi-networks-out-client-view-final-evaluation/
[24] https://github.com/freifunk-gluon/gluon/pull/997

 A data entry from the wardriving app is currently BSSID + LATITUDE + LONGITUDE, which is stored temporarily effectively in local disk with 28 bytes (12 bytes for 12 characters of the MAC Address, 8 bytes for each latitude and longitude) before being uploaded to backend. The wardriver can do it manual or automatically. The app respects _nomap Wifi APs and does filter out some mobile hotspots on public transportation in europe. Unfortunately the app is hardly out of date. There are no developers working on the app and no updates for years. It does not run in new android devices. The OpenWifi.su has an amazing community of wardriver, over four thousands people. They have to keep very old phones to be able to run the app. But this community began to shrink in fact because peoples buy new phones which are not able to run the old app anymore.