GSoC 2019 – Import public datasets to Retroshare network second evalutaion

Here again!

This evaluation I spend the work creating an automatically generated wrapper for the API. This wrapper is generated analyzing the Doxygen XML files generated when Retroshare is build. 

Creating the API wrapper

First of all, I modified the python script (made by @sehraf ) that generates the C++ API files, to create a python wrapper for the API. Analyzing the script and the XML files I get my script working generating a first version of the wrapper. Then I test the wrapper, giving support to async functions also. Some features of the wrapper are:

  • Document the code using DocString convention.
  • Parse also ‘manualwrappers’ like attempt login.
  • Requests with authentication and without.
  • Support basic authorization or token auth via ‘Authentication: basic bas64Token’ header.
  • Async methods support and callback implementation.

Here an example of the API wrapper generated: https://gitlab.com/snippets/1877207 . Some tests for the wrapper can be found here:

class TestMultiple(TestCase):
    def test_login(self):
        res = wrapper.RsLoginHelper.isLoggedIn()
        print(res)
        # Do login
        if not res['retval']:
            res = wrapper.RsLoginHelper.attemptLogin(ACCOUNT, PASSWORD)
            print(res)
            self.assertEqual(res['retval'], 0, "CANT LOG IN")
            return
        self.assertEqual(res['retval'], True, "is not loged in")

    def test_authorizedMethod(self):
        res = wrapper.RsGxsChannels.getChannelsSummaries()
        print(res)
        self.assertEqual(res['retval'], True, "Can't get channel summaries")

class TestAsyncMethods(TestCase):
    def cb(self,res):
        print("cb", res)
    def test_asyncMeth(self):
        wrapper.RsGxsChannels.turtleSearchRequest("XRCB", 300, wrCallback=self.cb, wrTimeout=4)

Creating Retroshare Classes wrapper

After that, the problem was that a lot of functions need to have Retroshare classes as parameters. For example, to create a Retroshare forum, are needed classes like RsGxsForumGroup that at the same time need other inner classes like RsGroupMetaData. With the first version of the wrapper all this classes was passed in JSON format that was really annoying to assemble. 
So the next step was parse also this Retroshare classes recursively from the XML files to a Retroshare classes wrapper. On this step it was difficult to parse it correctly: differentiating the different types of classes, and class attributes, translating the types to python, if they are enums, primitive types etc… Finally I created this second class wrapper so when you need to pass a RsGxsForumGroup to the API wrapper you can just instantiate it and the wrapper do all the necessary to transform it to python and call the API. Some features:

  • Parse “compound” classes (structs on C++) recursively.
  • Parse “enums” and get their values.
  • Parse “typedef” and “using” classes and translate it to the appropriate type on Python .
  • Document it using Docstring convention .

Here an example for the class wrapper: https://gitlab.com/snippets/1875153 . Some tests can be found here:

    def test_createChannel(self):
        channelMetadata = RsClass.RsGroupMetaData(mGroupName="TestChdddannelCreation2", mGroupFlags=4, mSignFlags=520)
        channel = RsClass.RsGxsChannelGroup(mMeta=channelMetadata, mDescription="Channel Test")
        res = wrapper.RsGxsChannels.createChannel(channel)
        print(res)
        self.assertEqual(res['retval'], True, "Can't create channel")

For “v2” methods I opened an issue because I can’t communicate with the API. It was resolved as my “retroshare-service” wasn’t updated at all.

Next steps

This script will be adaptable to generate the wrappers for the language needed, for example for an OpenAPI format, TypeScript… Making much easy to other developers to start developing over Retroshare network.

Also it will be very easy to update when new feature is added to the API because it can be generated each time Retroshare is built.

Now will be time to apply the wrapper to the scripts that will import the public datasets!

Unittesting LibreMesh GSoC mid-term update

A few weeks passed and I want to share the progress of the project and what are the next steps 🙂

Unit testing tools and ecosystem

As one of the goals is that it must be easy for developers to write, modify and run the tests I created some simple tools to do this:

  • testing image -> Dockerfiles/Dockerfile.unittests
  • testing shell environment -> tools/dockertestshell
  • running the tests -> ./run_tests script

Testing image

In order to run the tests and have a reliable environment without the it’s working on my computer syndrome I created a simple and very small Docker image. This image is based on an image with Lua 5.1 and luarocks made by abaez. And then it just installs busted and luacov frameworks and bash.

FROM abaez/luarocks:lua5.1

WORKDIR /root

RUN luarocks install luacov; \
    luarocks install busted

# TODO: move into a development dockerfile
RUN apk add --no-cache bash bash-completion

Nixio library

It would be good to have nixio available inside the docker image because this library is widely used in libremesh and also it could be very handy to have it available for the testing also.

I did an effort to add it to the image but many problems arised. The luarocks version of nixio 0.3-1 it is not working mainly because some compilation issues with newer versions of gcc. So I tried to work on a rockspec without this problem but I could not finish it because other problems arised I think that related to the Alpine/musl distribution and libc/linux headers. I will try help the author of nixio to publish a new version to luarocks as this will benefit others too.

Testing shell environment

To provide an easy way to develop or test things within the docker image I created a tool that opens a bash shell inside the docker image that has some features that allows easy development:

  • /home/$USER is mounted inside the docker image so each change you do to the code from inside is maintained when you close the docker container
  • the same applies to /tmp
  • you have the same user outside and inside
  • network access is garanted
  • and some goodies like bashrc, some useful ENV variables, PS1 modification, etc.

To enter the shell environment run:

[san@page lime-packages]$ ./tools/dockertestshell 
(docker) [san@page lime-packages]$

You can see that the prompt is changed adding (docker) in the left part so you can easily remember that you are inside the docker container.

This environment is also used by run_tests script.

Running the tests: run_tests bash script

run_tests

This script is what you should be running each time you want to run the tests. As you can see in the image we currently have 19 tests and all are passing 🙂

For the sake of showing you what to expect when a test fails I modified a test condition to be false and here is the output:

run_tests_fail

now 18 tests are good, and there is one failure. The assertion that is failing is on line 11 and the test is Fake uci tests test simple get and set. Also it is shown that the expected result is the number 2 but the actual result is the number 1.

As it is expected, run_tests returns with 0 when all tests pass and != 0 when there is at least one failure.

The script in detail

The idea behind this script is simple:

  • sets the search path of the tests for buster (the unittesting framework)
  • sets the lua library paths, prepending the fake library and adding the paths to the libremesh packages with packages/lime-system/files/usr/lib/lua/?.lua. This doesn’t work automaticaly for every package if the paths does not use the files/path/to/final/destination. So if you want to test some package without the files convention maybe it would be good to move the package to this convention. Also it does not work if the lua module we want to test does not finish with .lua, in this case the path must be explicitly added (I wrote about this in a previous blog post).
  • runs the tests using the dockertestshell

run_tests also passes the first argument as an argument to busted so you can do things like this:

[san@page lime-packages]$ ./run_tests "--list --verbose"
packages/lime-system/tests/test_lime_config.lua:11: LiMe Config tests test empty get
packages/lime-system/tests/test_lime_config.lua:15: LiMe Config tests test simple get
packages/lime-system/tests/test_lime_config.lua:20: LiMe Config tests test get with fallback
packages/lime-system/tests/test_lime_config.lua:24: LiMe Config tests test get with lime-default
packages/lime-system/tests/test_lime_config.lua:30: LiMe Config tests test get precedence of fallback and lime-default
packages/lime-system/tests/test_lime_config.lua:36: LiMe Config tests test get with false value
packages/lime-system/tests/test_lime_config.lua:41: LiMe Config tests test get_bool
packages/lime-system/tests/test_lime_config.lua:54: LiMe Config tests test set
packages/lime-system/tests/test_lime_config.lua:64: LiMe Config tests test set nonstrings
packages/lime-system/tests/test_lime_config.lua:81: LiMe Config tests test get_all
packages/safe-upgrade/tests/test_safe_upgrade.lua:5: safe-upgrade tests test get current partition
tests/test_fake_uci.lua:4: Fake uci tests test simple get and set
tests/test_fake_uci.lua:14: Fake uci tests test multiple cursors
tests/test_fake_uci.lua:31: Fake uci tests test nested get and set
tests/test_fake_uci.lua:49: Fake uci tests test state not preserved between tests
tests/test_fake_uci.lua:54: Fake uci tests test save
tests/test_fake_uci.lua:59: Fake uci tests test delete
tests/test_fake_uci.lua:73: Fake uci tests test foreach
tests/test_fake_uci.lua:87: Fake uci tests test get_all

Here is the code:

$ cat run_tests 
#!/bin/bash

TESTS_PATHS='packages/*/tests/test*.lua  tests/test*.lua'
LIB_PATHS='tests/fakes/?.lua;packages/lime-system/files/usr/lib/lua/?.lua;packages/safe-upgrade/files/usr/sbin/?;;'

./tools/dockertestshell "busted -v ${TESTS_PATHS} --lpath='${LIB_PATHS}'" ${1}

Integration of unittests with Travis CI

LibreMesh has already a github/Travis integration with two objetives:

  • test that the packages can be built (no Makefile errors, etc)
  • build and publish the packages of the master branch to an external server

The build pipeline of LibreMesh has been broken for a couple of months because the docker image that has been in use is not longer available. This is becaouse there is an ongoing effort by aparcar to create canonical docker images for OpenWrt.
So I did an atempt to fix the current LibreMesh build pipeline using the new infraestructure in this pull request. The build is still not passing but it seems it is something easy to fix as the build is passing but then the deploy is failing.

Travis unit testing

Beside fixing the current pipeline and to integrate the unittesting work I did a refactoring of the build steps to have a unittest stage and a build stage. To do this I installed the Github/Travis integration on my lime-packages fork. In the following image you can see that the two stages are green (tests are passing) 🙂

TravisPipeline

And here is the log of the unittests stage. You can see that it takes less than a minute to run the stage, with 15 seconds building the docker image and 0.011133 seconds to run the tests :100:

Next Steps

Now that the framework is in place and in continous integration we should be doing the following:

  • Add documentation on how to write tests
  • Integrate nixio in the docker image
  • Proofread the core LibreMesh code and inform about its testability
  • Provide some mocks for common functionality (uci already done!)

The first weeks of august I will move to Catalunya to work with a core developer of LibreMesh. So with my mentor NicoP we will adapt the schedule to take advantage of this.

BMX7 Wireguard Tunneling: 1st Coding Phase

It’s a wrap for phase one! We have managed to keep up with the goals we set for ourselves and along with my mentor Paul Spooren we have shaken up BMX7 development all around.

Documentation Refactor

One of this phase’s goals was to understand BMX7 functionality, usage and plugins. With a lot of reading (both in-project documentation and with external sources) this was achieved and I was much more synced. While doing so I refactored some pieces of docs to help me and I found a branch I had created with some generic changes that I made in the Community Bonding phase.

These acted as inspiration and I got together a big batch of changes commited and PR’d to the bmx7 upstream.

The PR can be found here and its purpose is to achieve generic changes to ease the introduction of new developers and users to the project, as well as ease the learning curve of usage.

More info one can found in the following blogpost that describes things in detail:

It’s worth to be noted that this was not a goal per-se of the phase and that changes did take place, but they sparked other changes that are still WIP on the PR.

Testing Infrastructure

Establish the following Testing setups for testing and later on continuous integration:

  • LXC running OpenWrt bridged mesh.
  • Qemu OpenWrt bridged mesh networks

The idea was to establish Linux Containers and Qemu infrastructures to do testing and experimentation. Along with aparcar my mentor “we salvaged from oblivion” a very interesting and well-set project that axn had created named Mesh Linux Containers (MLC) and which takes on its own the creation, configuration and command and control (CnC) of a virtualized mesh network on a Linux host, supporting an abundance of community mesh protocols. Paul took on him the modernization of this project producing the new generation of MLC, which switches mlc’s functionalities from the shell scripting era to LXC and distrobuilder to autocreate and populate an OpenWRT mesh mother and OpenWRT clients.

On the above I also based my testing infrastructure, but being a Qubes OS user and relatively confused with LXC versions (a newb), I kept coming across issues.

The situation was able to be relaxed by investing time on QEMU for love and support (as one may find here). Again though problems like libvirt on Qubes, multiple Qemu interfaces and tricky bridging tricks on a standalone VM didn’t allow me to have the results I was hoping for.

Hence, armboards were chosen. I borrowed boards from the hackerspace.gr common sharing stash of toys and I was able to interconnect a Raspberry Pi 1B, one Raspberry Pi 3B and a BeagleBone Black.

This approach is optimal for me to establish decent OpenWrt routers to test and play, that can painlessly run BMX7 (and Wireguard) and leave to the local community things to use like mesh boxes and on-the-go VPN-configured APs.

(The bmx7 luci app works like clockwork btw.)

BMX7 wg_tun Plugin

The initial goal was to implement wrapper functions to WG and establish a secure tunnel that way. This adds an overhead in the development phase, because making wg binary calls is both costly and requires to place code in places where no further improvements can be achieved.

For this reason, the embeddable wireguard implementation was chosen and we switched from addition(to the current tun src) to the creation of the wg_tun plugin earlier on than what was planned.

The idea is that adhering to the current implementation of the tunneling plugin of BMX7 we can reuse some minimum parts and establish:

  • The creation of a public and a private wg key associated with the current bmx7 session (or persist across sessions).
  • The advertisement of these keys and the network(IP) associated with our interface through descriptive updates for our peers to find us.
  • The establishment of connections with peers that have advertised their public keys and networks (and we’ve caught them), a la tunnel announcements style.

This goal is still WIP as more testing needs to take place and optimal ways and options for bmx7 node administrators to use it. In general, for this part and until further work has been put in, the paradigm of danrl for the luci-proto-wireguard package is being followed in the sense that we want the establishment of bmx7 wg tunnel to be that easy and the static configuration or the randomized UDP ports can help get there faster.

Progress can be found on the implementation’s branch on my fork (https://github.com/luserx0/bmx7/tree/wg_tun_plugin)

Developer Misc

My dotfiles repo has seen a lot of action this first period. The refactoring of my vimrc took place to help me in reading through code (a lot of code). The configs are managed through GNU Stow. If something catches your eye, clone, run the install script, tweak and share back.

My personal Blog saw also some pretty intense developments too to make progress report sharing and tutorial posting humane. It’s based on hexo and hexo-next, it’s static and hosted on gh-pages. Perfect combo for a GSoC student. Feel free to grab it from here and use it under CC.

If you have questions on how BMX7 operates and/or is different from other mesh routing protocols feel free to post them here.

Next Steps

  • Additions of features and options of the wg_plugin. Getting it merged on the upstream is a good milestone.
  • Cleanup and research on reusing cryptographic and networking primitives common to Wireguard and BMX7.
  • Creation of the bmx7 Debian Package.
  • Port mlc functionality to mlc-ng.
  • Finish the second phase of the documentation refactor.
  • Attending Battemesh V12 😉
  • Order hardware to play with

Load-correlated distributed bandwidth analysis for LibreMesh networks – #2: Setting up the LibreMesh test network

In order to use the latest version of everything, I merged the latest commits from the LibreMesh community into my forked lime-packages repository.

To set up the test network was more complex than expected.
I managed to collect a very disperse set of routers: 8 routers of 6 different producers and 7 different models.
Two of these are officially supported by LibreMesh (TP-Link TL-WDR3600, Ubiquiti NanoStation Loco M2) and the others which are supported by OpenWrt but not by LibreMesh (Comtrend AR-5387un, Huawei HG556a-C, Observa VH4032N, Comtrend AR-5315u, Astoria ARV7519RW22-A-LT).

The non-LibreMesh-supported routers either cannot do multi-AP or mesh via IEEE802.11s, but this was not expected to be a problem as I took care to add the support to AP-client networks (no need for the routers to support IEEE802.11s mesh, only the last mentioned router does not have support for wifi at all).
My solution was based on BMX6 which seems will be dropped in the next LibreMesh release in favour of Babeld, and this will require an adaptation of the AP-client solution.

As mentioned in the previous post, I started compiling my LibreMesh firmware based on LibreRouter fork of OpenWrt 18.06 repository.
When I flashed my routers and configured the wireless interfaces for using AP or client rather than the default AP+AP+IEEE802.11s, most of them were showing strongly erratic behaviours.

So I decided to flash the routers with plain OpenWrt 18.06.2 without using LibreRouter fork and to install all LibreMesh packages via opkg.
In order to ensure that the compiled packages will be compatible with OpenWrt 18.06.2 release, the LibreMesh packages were compiled in my local buildroot of OpenWrt branch openwrt-18.06.
Then the openwrt/bin/ directory was served via HTTP from my local machine.
In order to have the routers accept my local repositories I had to install usign, create a key pair, sign the Packages file, push the public key to the routers and add the directions of the local repositories to /etc/opkg/customfeeds.conf
So for example, the customfeeds.conf file of the Observa VH4032N router will look like:

src/gz local_base http://192.168.1.3/packages/mips_mips32/base
src/gz local_libremap http://192.168.1.3/packages/mips_mips32/libremap
src/gz local_libremesh http://192.168.1.3/packages/mips_mips32/libremesh
src/gz local_luci http://192.168.1.3/packages/mips_mips32/luci
src/gz local_packages http://192.168.1.3/packages/mips_mips32/packages
src/gz local_routing http://192.168.1.3/packages/mips_mips32/routing
src/gz local_brcm63xx_smp http://192.168.1.3/targets/brcm63xx/smp/packages

Once completely configured, the network structure planned is represented in black in the following scheme.

Planned test network structure.

In order to better test the on a proper mesh, I ordered 3 additional routers fully supported by LibreMesh: YouHua WR1200JS (see here and here) from here.
They come with OpenWrt pre-installed and they fully support multi-AP + IEEE802.11s.
Once I will receive these two additional routers I will be able to add the mesh part of the test network as indicated in the scheme in red.

Regarding the load analysis of the network, the first approach will be to obtain this value from the number of clients currently connected to the network.
This number will be obtained in at least the following ways:

batadv-vis -f jsondoc | sort -u | wc -l

ip neigh show nud reachable | wc -l

In the meanwhile, a minor enhancement has been suggested and two others were accepted.

OpenWrt Firmware Wizard – Update Phase 1 Completion

Following the introductory post on “OpenWrt Firmware Wizard” project for GSoC 2019, there have been a number of progress updates.
I have been working with Paul Spooren and Moritz Warning on the project for the past couple of months.

Progress Till Now

Achievements so far can be summarized as below:

  1. Appropriate modifications to the build system have been made to produce JSON for each targets and a consolidated one to be read later by the firmware selector.
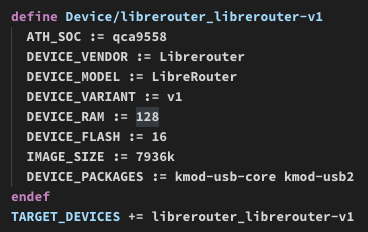
  2. Metadata was stored in the buildsystem’s makefiles. Modifications to the data stored has been carried out. The DEVICE_TITLE variable was split into at most three variables namely DEVICE_VENDOR, DEVICE_MODEL and DEVIDE_VARIANT. In addition to this, DEVICE_RAM and DEVICE_FLASH has been added. We received positive response on the first from the community while the second modification is still under review.
    A sample output of this will look like this:


    I wrote a script to split the DEVICE_TITLE into the required fields which could be found here. It uses Paul’s https://github.com/aparcar/openwrt-devices for DEVICE_RAM and DEVICE_FLASH.
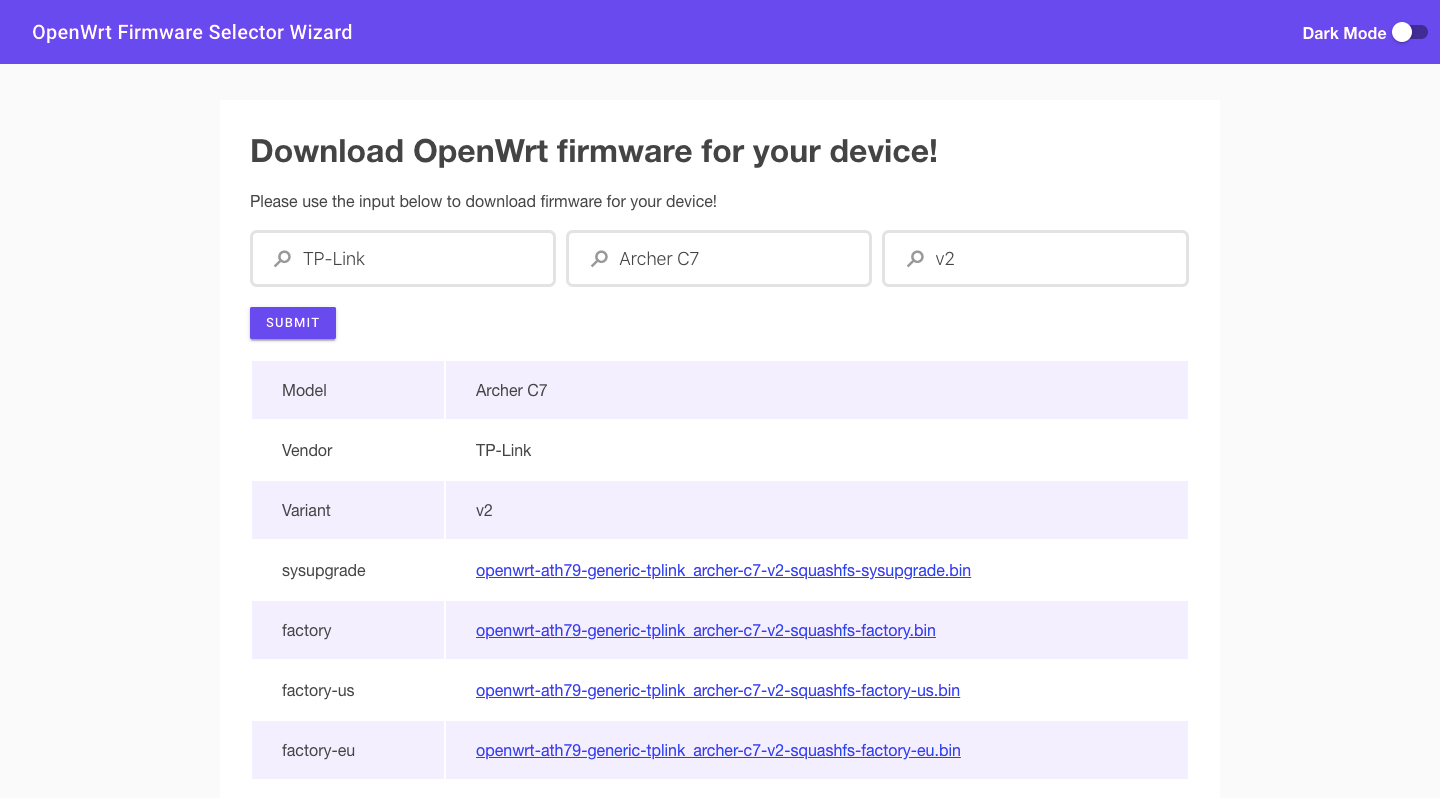
  3. I built a basic version of the firmware-selector for PoC and the source code for the same could be found here. It looks like this:


Next Steps

Through the next phase of the program, the following is to be achieved:

  1. Though almost everything is done regarding the Makefile metadata, but accuracy of the data has to be reviewed. Also, the addition of DEVICE_RAM and DEVICE_FLASH is still under review and is subject to change.
  2. Take community feedback and improve upon the firmware wizard. Functionality to build custom images will be added. A server backend has to be created for the generation of images and serving the same.
  3. Start working on the auto upgrade feature for OpenWrt.

conTest – First Update for GSoC 2019

During the last few weeks I setup the testbed for the wireless connection testing
framework conTest and brought in some new functions
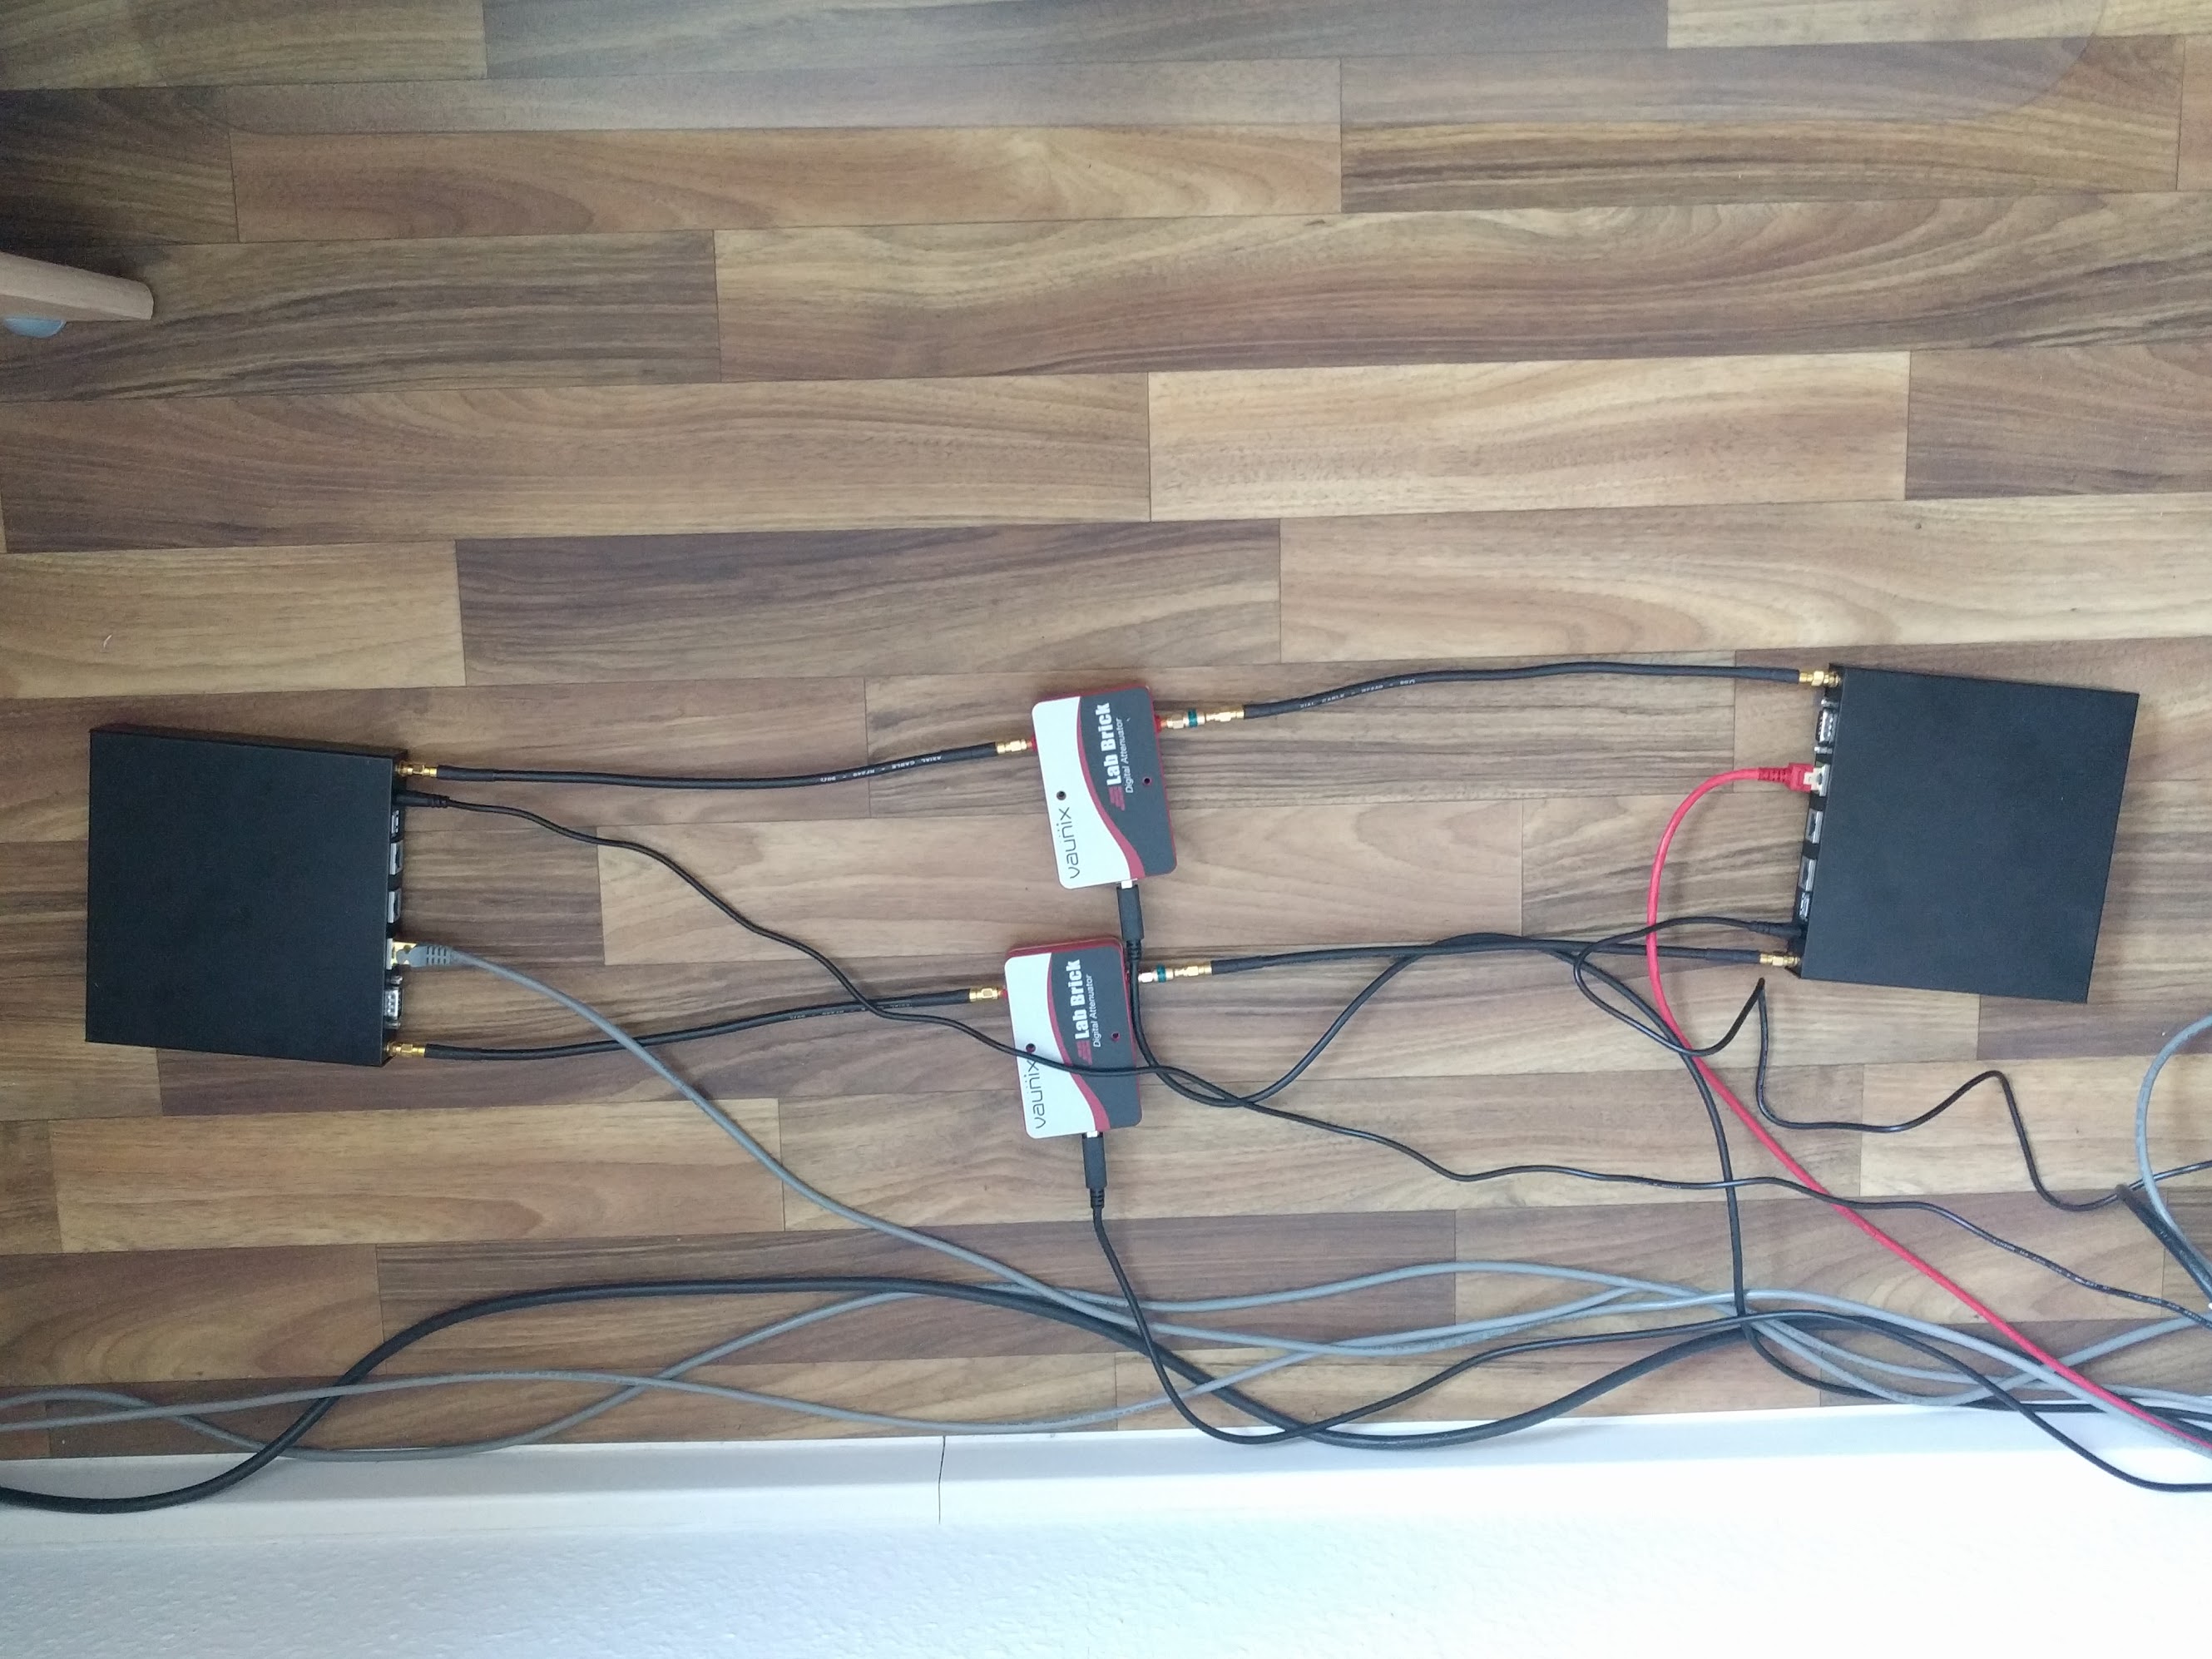
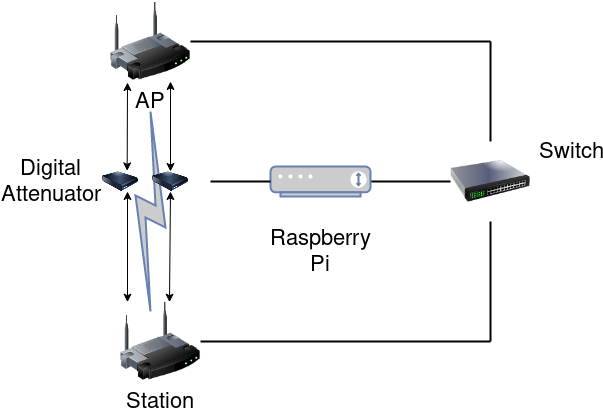
The figure below show the physical setup, followed by a schematic overview.

conTest testbed setup
Schematic overview of conTest setup

The user can now specify which files should be collected by conTest.
Currently there is only an overall collection time adjustable by the user. To
ensure everything is captured, half the time interval the most frequently written
file uses should be set. As a next step I will introduce individual file read times,
as this will reduce network, CPU and storage/memory load.

In addition I added functions to monitor the wireless network interfaces and
capture the traffic using tcpdump. The captured output will be written to the
controlling machine directly over the wired network interface.

I started to improve the overall code quality of conTest to have a solid code base.
To reduce overhead I started sharing code between the monitoring part, which can
be separated from the rest of the conTest framework.

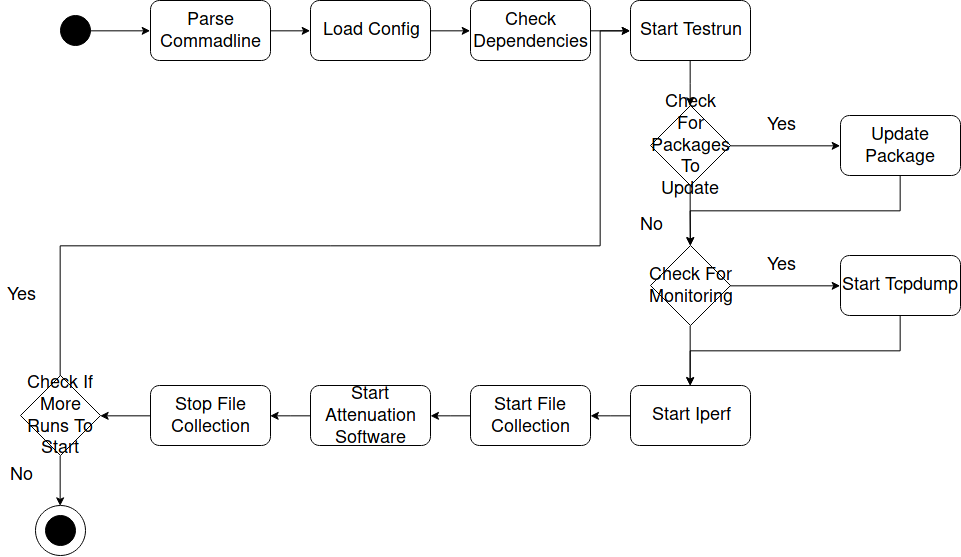
The current reduced flow of conTest can be seen in the figure below. conTest will
check if the necessary dependencies are present, after it processed the command line
arguments and loaded the configuration file. If all dependencies are present, conTest
will start it’s first test run. Before each test run, it will check if there are
packages provided by the user to update and install them. After that the program
will check if the user provided the monitoring flag and start tcpdump accordingly.
Now conTest will start iperf on both sides after killing all running iperf processes.
I’m the next step the parallelized file collection and the attenuator control software
is started. After the attenuator controller returns the software collection
is stopped and the program restarts the loop until the given number of experiments is
finished.

ConTest reduced flowchart

Unfortunately there isn’t anything flashy to show right now. The next steps will
be to create a Makefile and package both applications. Furthermore I will add some
scripts to process the collected data and scripts working on it for data representation.
In addition I will add sane defaults to the config file and add individual file
collection speed.

GSoC 2019 – Upgrading the Meshenger App – Update 1

Meshenger App

In my previous blog post, I gave an overview of the project, that I am working upon. Since then there has been quite a lot of progress in upgrading the Meshenger app.

Progress Till Now

Since the official coding period began, I started with fixing the existing bugs in the app which were crashing the app. There were quite many of them such as a splash screen issue, a night-mode bug, video-call crash issue etc. Apart from this I also made some UI/UX changes in the app such as changing the About activity of the app, matching the app-bar theme with the status bar etc.

The main thing which I did in Phase 1 of GSoC was to establish a secure authentication at the initial handshake between two devices. For this, I followed asymmetric cryptography to do the authentication work. Firstly, I created a new table in the database of the app to transfer all the data such as settings data, keypair, database version, MAC address from SharedPreferences to that database table of the app. For the key pair generation, I used the Lazysodium library to generate a public key and a secret key in both appA and appB. After generating both the keys, I passed the public key into the QR-Code of both the apps, so as to share it between both the parties. Now when appA makes a call to appB, an offer is exchanged between the apps which had to be to be encrypted and decrypted. For that, I used a nonce(random string), public key of appA and secret key of appB to encrypt the offer(signalling blog/SDP offer) in appB and then I decrypted the encrypted offer using the secret key of appA and the public key of appB in appA. Finally, the authentication was secured and voice and video-calling were established.

Next Steps

The next phase i.e. the Phase 2 of GSoC 2019, will be about achieving the Internet feature functionality in the app which will enable the app to contact people over the Internet as a fallback option.

GSoC 2019 – Monitoring of a community network, first results

1 Intro

Like any network, in community networks it is important to know the status of each of the teams that compose it, to track these over time and identify possible problems.
To monitor the routers of the network we need to store the data of all the equipment, centralize, analyze and visualize it. The metrics that we reveal can be divided into two large groups:

  • Numbers such as uptime, sent packets, signal strength, etc.
  • Those that are text like the logs.

In this first stage we are going to concentrate on those of the first type.

2 Collecting the metrics

Prometheus is one of the most used free software for event and alert monitoring. The clients (the routers in this case) expose a http server which Prometheus scrapes with a periodic frequency (HTTP pull model) and saves the data in a time database. Prometheus defines 4 types of metrics that are used to generate each instrument (what we are going to measure).
Grafana allows us to connect with Prometheus and generate different personalized dashboards and extend the existing graphics to our needs. It also allows us to generate a system of alerts.

2.1 The setup for the first metrics

In our experimental setup we will create a mesh network with a router that has LibreMesh. In addition we will have a raspberryPi in the network where we will have installed Promemtheus and Grafana.

2.2 Prometheus client

As mentioned previously, each router will be running a Prometheus client which will serve via http a plain text with the client’s metrics.

2.2.1 Python vs Lua

Prometheus offers a library in python to do the implementation of the client. The problem is that when we are working on routers, the space available to install applications is very limited. The interpreter of python weighs 50MB but the interpreter of Lua only 4kB

2.2.2 A new client

OpenWRT has a client implementation of Prometheus on Lua, but we found two “problems” in this implementation :

  • Use lua-socket to create the server which need install an external package. We are going to use uhttpd which is a server already installed on the router and allow us to execute a Lua script in a custom url.
  • Each instrument is written from scratch. We want to implement 4 basic objects (the possible metrics) so that it is simple to extend to new instruments.

2.2.3 Initial Metrics

Initially we will measure:

  • Uptime
  • Load avg
  • Mem info
  • Package per interface
  • iwinfo
  • Chanel occupation

3 The first results

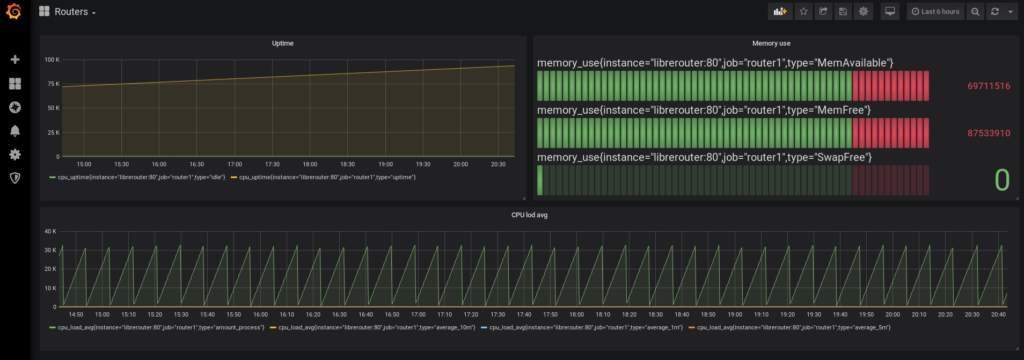
Some metrics collected by Prometheus visualized in a Grafana dash

Next steps

In the next week we will be working on:

  • Add missing instruments
  • Pack the client correctly
  • Testing in a real mesh network
  • Document these steps

GSoC 2019 Import public datasets to Retroshare network – Update 1

After three weeks of code here we have the first evaluation! 
The first week I started to talk with my mentors of how to guide the project. I started a [repo](https://gitlab.com/jpascualsana/retroshare-python-bot) to code a “bot” that will wrap the Retroshare JSON API for better interaction. But I didn’t continue the job because we are looking a way to wrap the API using Doxygen generation (looking at [https://gist.github.com/sehraf/23cbc8ba076b63634fee0235d74cff4b](@Sehraf work)).


So I get a list of different projects, provided by my mentors, and I started to[write different scripts](https://gitlab.com/jpascualsana/public-datasets-import) to import the data on to Retroshare network. Some of this projects are:

  • Wikimedia based projects
  • WordPress blogs
  • Gutemberg project
  • ActivityPub
  • RSS
  • Radio onda Rossa
  • XRCB.cat
  • RadioTeca

So this scripts parse in different ways this sites, and get their information as previous step to publish it on to RetroShare network categorized as channels.This scripts are able to:

  • Parse the site/project getting all “pages” of interest with different strategies.
  • Get updates (the pages that have changed since last time the info has been retrived)
  • Command line executable with argument parse. See -h option to get supported options.

So the next step is to use this scripts to import this information on Retroshare network using a wrapper dynamically generated by Doxygen.

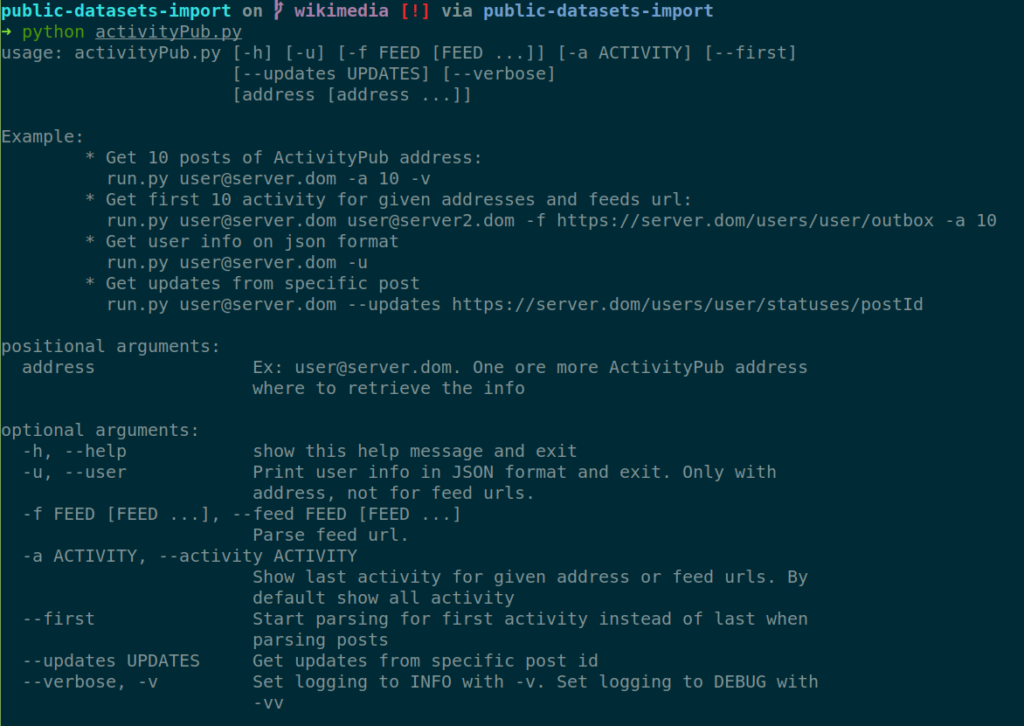
On the next screenshot we can see the help for the script that import from ActivityPub

GSoC 2019 – Unit testing LibreMesh – Update 1

In the last weeks I have been involved in getting deeper into becoming part of the development team of LibreMesh.

During that process, I worked together with NicoPace in writing this blogpost where we build a solid ground for unit testing: https://blog.freifunk.net/2019/06/03/gsoc-2019-evaluating-options-to-do-unit-and-integration-tests-in-libremesh-and-a-first-working-example/

Not covered by the last blog post is the work that I did in a fake/mock implementation of the libuci library in lua. This allows writing a lot of tests for LibreMesh as ucithe most used library in the codebase that make sense to write a mock. The implementation is very small but covers the most used functionality of libuci: cursor(), get(), set(), save(), delete() and foreach(). This was implemented doing TDD with the support of the unittesting framework.

All this work is being done in the following branch of my lime-packages fork: https://github.com/spiccinini/lime-packages/commits/unittest_docker

During the upcoming weeks all this work will be properly released as a PR to the lime-packages repo accompanied by the Travis CI integration in a Docker container to do the tests in a contained environment, and more tests are going to follow 🙂