Implementing Pop-Routing – Final Evaluation

Hello again, for two months I have been working on my project and I have achieved all the goals.

An alpha version of my program was released for the mid-term evaluation.Since then I have fixed all the bugs, packaged the program for OpenWRT, tested the code and written the documentation.

Everything is available on the GitHub repository [0]

I structured my work opening by issues for all the bugs I had to fix and for everything I wanted to improve. Then, I organized the issues in milestones. Milestone 0.1 [1] is the one that I had to complete to finish the project. When that milestone was closed I made the branch “v0.1” [2].

Tests

In order to be sure that my program worked correctly. I wrote a simulator in python. It’s made by a small server, with the same interface as OONF’s telnet plugin, and two python libraries written by my mentor: cn_generator [3] and pop-routing[4]. The first one generates synthetic graphs using the Cerda-Alabern[5] algorithm, the second one is a pop-routing implementation in python. In the server I implemented the commands to push the NetJson[6] topology and the ones to receive the timers values.

When prince requests a topology from my test program, cn_generator generates a random graph and pushes it back; meanwhile using the python implementation of pop-routing, the references values are computed. The values received from prince are then compared to ones calculated using python.

The goal of tests is to verify that the difference between the reference and the measured values is always less than 1%.

Measurements

I’m going to use my work to write my Bachelor Thesis, so I wanted to perform some measurements to check how well it worked.

My goal was to implement the algorithm on an embedded device, so I chose to measure the execution time on a “Ubiquiti Picostation M2HP” to see how well it was performing.

I branched Prince [7], modifying the code to measure the time needed to calculate the betweenness centrality and push it back along with the timers.

I used the graph generator to create graphs from 5 to 500 nodes, and I measured the time needed to compute with a sample every 10 nodes. For each sample I ran 5 tests, then calculating the mean and the standard deviation. The results are shown here:

As you can see from the graphic above, the computation time on the embedded device is quite good if we use the heuristic (8s for 100 nodes), it proved to be unusable without it (100s for 100 nodes)

OpenWRT Package

The last objective I gave myself in the previous post was to write a plugin for OLSRd. Since OLSRd isn’t maintained anymore – and since all the developers are working on OONF – I decided to focus on it while avoiding the plugin. Instead, I wrote a makefile and packaged prince for openWRT / LEDE. The makefile hasn’t been published yet in any openWRT feed, but it is hosted in my repository [8]. Instructions are available along with documentation.

Future Work

I’ll keep working on this project, mantaining the code and fixing the future issues. Since the graph-parser library is the last piece of code implemented in C++ and it depends on the Boost libraries, I’m looking forward to re-implement it in pure C.

One of my goals was also to run prince in my WCN (Ninux Firenze), but switching from OLSRd to OONF is taking more time than expected, so I’m hoping to try it in the future.

Gabriel

[0]: https://github.com/gabri94/poprouting/
[1]: https://github.com/gabri94/poprouting/milestone/1?closed=1
[2]: https://github.com/gabri94/poprouting/tree/v0.1
[3]: https://ans.disi.unitn.it/redmine/projects/cn_generator/repository
[4]: https://ans.disi.unitn.it/redmine/projects/pop-routing/repository
[5]: https://pdfs.semanticscholar.org/4ac8/05e7359c6b20c3cdd5da24284d3826b9609c.pdf
[6]: http://netjson.org/
[7]: https://github.com/gabri94/poprouting/tree/exec_time
[8]: https://github.com/gabri94/poprouting/blob/master/Makefile.openwrt
DynaPoint Final

Hi everyone,

this is the final blog post about DynaPoint. Short recap: I created a daemon which regularily monitors the Internet connectivity and depending on that activates and deactivates the proper access points. That way the handling with APs would become easier as you already could tell the status by the AP’s SSID. I also created a LuCI component for it to make the configuration more easy.

In the past weeks I was able to add some new features, fix bugs and complete the LuCI component. Especially the latter was really interesting and gave me some knowledge about how LuCI works.

In the last post I mentioned that it’s better to verify Internet connectivity by using wget instead of just pinging an IP address.
Consequently I switched from Pingcheck to wget. I also added an option to use curl instead of wget. With curl you also get the option to choose the interface for the connection.
When you provide internet via VPN-interface you can explicitly check the connection of that interface now. The reason why I don’t use curl as default is because of curl’s rather large size. For some routers with only 4 MB of storage it might be too much.

I also added an “offline threshold”, which will delay the switch to offline mode. So for example when you set the interval to 60 seconds and offline_threshold to 5, the switch to offline mode will be made after 5 cycles of checking (=300 seconds).

So how does an example configuration look like?

To use dynapoint just add dynapoint_rule ‘internet’ and dynapoint_rule ‘!internet’ in the desired sections in /etc/config/wireless:

config wifi-iface
    option device ‘radio0’
    option network ‘lan2’
    option mode ‘ap’
    option encryption ‘none’
    option ssid ‘freifunk’
    option dynapoint_rule ‘internet’

config wifi-iface
    option device ‘radio0’
    option network ‘lan2’
    option mode ‘ap’
    option encryption ‘none’
    option ssid ‘freifunk-maintenance’
    option dynapoint_rule ‘!internet’

The configuration of dynapoint takes place in /etc/config/dynapoint:

config rule ‘internet’
    list hosts ‘http://www.example.com’
    list hosts ‘http://www.google.com’
    option interval ’60’
    option timeout ‘5’
    option offline_threshold ‘3’
    option add_hostname_to_ssid ‘0’
    option use_curl ‘1’
    option curl_interface ‘eth0’

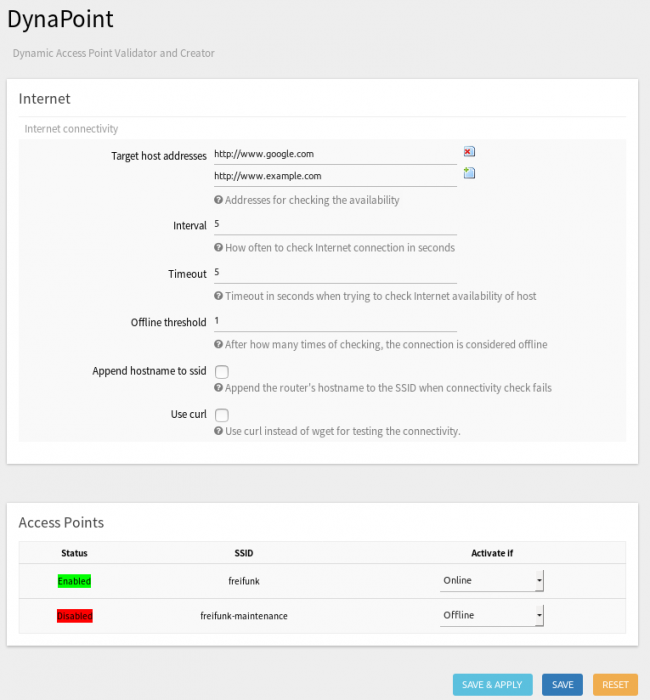
All of that can also be configured via LuCI:

If you want to try out DynaPoint for yourself please visit https://github.com/thuehn/dynapoint for more information.

Future work

Currently there is only support for one AP per state. In the next weeks I want to add support for multiple APs per state.
Also I want to add support for more rules. At this time there is only support for one rule “internet”. I want to make this more generic and provide support for custom rules.

Acknowledgements

I want to thank my mentor Thomas Hühn for his excellent mentoring and great ideas during this project. 
Also of course thanks to Freifunk for letting me realize this project and thanks to Google for organizing GSoC.

SWOON: Simultaneous Wireless Organic Optimization within Nodewatcher – Final steps.

This blog post concludes the work I did during the Google Summer of Code 2016.

Spending the summer on nodewatcher was a pleasantly laborious exercise. Although my proposal concerned a development of a new algorithm, I realized that I also had to prepare various other components so that the algorithm would work. I started by sketching a short plan of different components I had to integrate for my algorithm to work. To remind the readers, SWOON is an algorithm for an efficient allocation of wireless frequencies in a densely populated area where many wireless access points interfere with each other. Before any work could begin, I had to install a local version of nodewatcher. I did not want to interfere with wlanslovenija’s mature network and I needed a small network of my own to run these tests. To find such a network, I collaborated with a non-profit organization based in Berkeley, California. They provided me with access to a building outfitted with more than 10 wireless access points. The wireless access points in this testbed are extremely diverse. They come from various manufacturers and not all broadcast on the 5GHz band. This allowed me to work with issues unique to community networks: software has to be built ground-up to be extremely modular and it has to support a diverse range of equipment, since there is no central planning authority.

I started with writing the data collection module, on which I have reported in my previous blog posts. Once I was able to work with the data, I worked on a different algorithm which detected rogue nodes in networks. This is especially useful for network maintainers who now have information on which nodes are most harmful to their network. They can now significantly reduce interference by working together. Algorithms on this scale have to be extremely efficient: I derived a complexity bound of O(E * log(V)) where E is the number of edges and V is the number of vertices in a graph. This allows the algorithm to scale all the way to wlanslovenija’s network or more, as it is almost linear. In order to achieve such scalability and efficiency, I had to peruse state-of-the-art graph theory research and utilize complex data structures (the one I used is called a disjoint-set data structure) to quickly order datasets in accordance with our needs.

I then moved on to the main algorithm, which took weeks to even rigorously define, let alone code up. I first considered implementing the Beigel-Eppstein coloring algorithm, which is known to run in ~O(1.3^n) time, but the complexity of the algorithm rendered it impractical. It relies on 19 different subcases which are iteratively used to simplify the constraint satisfaction (CSP) instance. Instead, I reverted to a custom implementation of a state-of-the-art greedy approach, which had to be modified from the source code of NetworkX, a leading open-source graph manipulation package. I devised a custom way of ordering the nodes in a graph to correctly prioritize wireless access points. The algorithm starts with looking at all the ‘neighbors’ (other nodes your radio detects) and computes the ‘busyness’ of each frequency band. We then minimize joint interference through the algorithm.

We observed an interesting property when running this algorithm on our wireless testbed. Most frequencies were moved to minimize interference, but some got worse. At first, we thought it was a bug, but we did eventually discover that some nodes must pick up more interference for others to remain noiseless. This perfectly coincides with our goal, which is to minimize the interference over all nodes, not every single node.

Next steps

One major problem with the algorithm is how unreliable ‘signal’ data is. We were thinking of coming up with a better metric to measure link quality instead of using signal strength. We were considering using the number of packet collisions instead. The modular design allows us to painlessly replace the metric without having to understand the entire algorithm.

We also noticed openWRT’s iwinfo doesn’t provide information about channel widths of access points. Adding this data would allow more accurate calculations instead of assuming all channels are 20MHz wide.

Finally, nodewatcher doesn’t yet have support for issuing node-specific warnings. I’d love to use such a warning to let a maintainer know that their node needs to change the channel.

However, I am confident this algorithm will enhance our user’s experience.

All my contributions can be seen on this link:
https://github.com/wlanslovenija/nodewatcher/commits/development?author=CdavM

If you’re interested in the timeline of the development, look at the following pull requests on nodewatcher’s GitHub:
Bug fixes related to a local installation of nodewatcher:
https://github.com/wlanslovenija/nodewatcher/pull/18
https://github.com/wlanslovenija/nodewatcher/pull/20
Data collection module:
https://github.com/wlanslovenija/nodewatcher/pull/22
Command that users can use to export data from the data collection module:
https://github.com/wlanslovenija/nodewatcher/pull/23
Improving the data collection module:
https://github.com/wlanslovenija/nodewatcher/pull/24
Algorithm that detects rogue nodes in one’s network:
https://github.com/wlanslovenija/nodewatcher/pull/25
Additional options for user-friendly data export command:
https://github.com/wlanslovenija/nodewatcher/pull/26
Testing framework for the rogue node algorithm + improvements:
https://github.com/wlanslovenija/nodewatcher/pull/27
Channel allocation algorithm implementation (not merged yet):
https://github.com/wlanslovenija/nodewatcher/pull/28
Updated data in nodewatcher/core:
https://github.com/wlanslovenija/nodewatcher/pull/29

GSoC: The ECE configuration system – summary

The Google Summer of Code is almost over, so in this blog post I’ll give a overview over the targets I’ve met (and those I haven’t).

Code repositories

  • https://gitlab.com/neoraider/ece/commits/gsoc2016 (daemon, client libraries, CLI client)
  • https://gitlab.com/neoraider/pkg-ece/commits/gsoc2016 (OpenWrt/LEDE package feed)
  • https://gitlab.com/neoraider/uci-ece/compare/gsoc2016-upstream…gsoc2016 (UCI ECE backend)

All code in the first two repositories has been developed by me during the GSoC. The third link shows the work I’ve done to integrate a ECE backend into libuci.

What is working

As described in earlier posts, my GSoC project was a configuration storage system for OpenWrt/LEDE, trying to solve various issues of the UCI config system. The principal points of this new system are

    • ubus-based config daemon maintaining a central storage database file
    • JSON-based configuration data model
    • Validation based on simplified JSON-Schema

The Wiki at https://gitlab.com/neoraider/ece/wikis/home gives a good overview of the design and the usage of ECE and describes many features in detail. The pkg-ece package feed can be used to build and install the different components of ECE on OpenWrt/LEDE easily.

If you’ve worked with OpenWrt/LEDE, you probably know the UCI config system. A UCI config file looks like this:

config system
        option hostname 'lede'
        option timezone 'UTC'

This format is very simple: Each file (called “package”) has a number of sections (named or unnamed) of different types (this example from the “system” package has a single unnamed section of type “system”). These section contain options with single values or lists of values.

Unnamed sections are usually accessed using indices, for example a command to set the hostname would look like this:

uci set system.@system[0].hostname='betterhostname'

With the simplicity of UCI, there come various issues and missing features; these are only a few of them:

      • The fixed data model (package/section/option) makes some kinds of configuration very awkward: In the example above, the index 0 must be given for the system section, but having a second section of this kind would not make sense. In other cases, deeper configuration trees must be flattened to be stored in UCI, making the configuration harder to understand
      • All values in UCI are strings, which often causes inconsistencies (booleans are usually stored as ‘0’/’1′, but several other pairs like ‘false’/’true’ and ‘off’/’on’ are supported as well; different users of UCI sometimes parse numbers differently)
      • UCI doesn’t have built-in validation. Frontends like LuCI usually validate the entered data, but as soon as the CLI client is used, no validation is done.
      • UCI always stored the whole configuration file and not only changes from the defaults, making the storage inefficient on overlay-based filesystem setups as they are common on OpenWrt/LEDE
      • In some situations, upgrades to default values should also affect the effective values; but only if the user didn’t change the values themselves. With UCI, this is not possible, as it doesn’t store the information if a value was changed by a user.
      • UCI allows comments in config files, but they are lost as soon as libuci or the CLI tool is used to modify it

The configuration given above could be represented in ECE as this JSON document:

{
  "system": {
    "hostname": "lede",
    "timezone": "UCI"
  }
}

Note that this is only the external representation of the configuration; internally, it is stored in a more efficient binary format.

JSON gives us a lot of features for free: arbitrary configuration trees with proper data types. Existing standards and standard drafts like JSON Pointer and JSON Schema can be used to reference and validate configuration (the JSON Schema specification is simplified for ECE a bit though to allow more efficient validation on embedded systems).

The command for changing the hostname would look like this in ECE:

ece set /system/hostname '"betterhostname"'

The quoting is currently necessary to make the string a valid JSON document; this may change in a future version.

The whole configuration is saved in a single JSON document, but the specific format is not defined by a single schema; instead, each package can provide a schema, and the configuration tree is validated against a merged schema definition.

The schemas also provide default values for the configuration. Adding documentation for the configuration options to the schemas is planned as a future addition and might be used to support the user in configuration utilities and automatically generate web-based or other interfaces.

This gives only a small example for the usage of ECE, the abovementioned ECE Wiki contains much more information about the usage of ECE and the ideas behind it.

In addition to the daemon and a simple CLI utility, I’ve developed libraries for C, Lua and Shell which allow to access the configuration. While there are still some features missing (some points for future work are given in https://gitlab.com/neoraider/ece/wikis/todo ), I think most of the missing pieces can be added in the near future.

The UCI/ECE bridge

When I proposed my project for the GSoC, I didn’t aim at making it a full replacement for the current UCI system, at least not in the near future. While the possibility to move some of UCI config files into the ECE config database had been my plan from the beginning, my ideas for backwards compatibility didn’t go further than a one-time import from UCI to ECE, and one-way generation of UCI config files from ECE.

After talking to a few LEDE developers and package maintainers, it became clear to me and my mentors that many people are interested in replacing UCI with a better system in the not-too-far future. But for ECE to become this replacement, a real two-way binding between UCI and ECE would be necessary to allow gradual migration, so configuration utilities like LuCI (and many other utilities somehow interacting with UCI) don’t need to be adjusted in a flag-day change.

An incomplete design draft for this UCI/ECE bridge has been outlined in https://gitlab.com/neoraider/ece/wikis/design/uci-bridge . The code found in the UCI ECE backend repository linked above implements a part of this bridge (it can load “static” and “named” bindings from ECE into UCI, and commit “static” bindings back to ECE) and has been implemented as an API- and ABI-compatible extension to libuci. The development of this bridge has taken a lot of time (much more time than I had originally scheduled for UCI compatibility features), as the data models of UCI and ECE are very different.

Future work

Of all points given in https://gitlab.com/neoraider/ece/wikis/todo , finalizing the database format is the most important, as any future change in the storage format will either break compatibility or involve some kind of conversion. When it is clear the format won’t be changed anymore, ECE should be added to the OpenWrt community package repository to make it easily accessible to all OpenWrt and LEDE users.

After that, other points given in the TODO should be dealt with, but none of those seem too pressing to prevent actually using ECE for some software (but some of the points given in the first section of the TODO page would need to be addressed to properly support software that requires more complex configuration).

Last, but no least, I’d like to express my gratitude to my mentors and all people in the OpenWrt, LEDE and Freifunk communities who have helped me develop ECE by giving guidance and lots of useful feedback, and to Google, who allowed me to focus on this project throughout this summer.

GSoC2016 Wrapping up: A crypto module for qaul.net

The last weeks

So it’s been a summer. Wow. It was an amazing experience taking part in this project, I feel like I have learned a lot and I hope that my work will be useful to others.

I want to take this opportunity to highlight what I set out to do and what I achieved in the end. The last weeks were probably the most satisfying bit of the entire project as modules that I had written weeks prior were slotting together seemlessly and things suddently just started to work. At the same time they were also the most frustrating with my code having two bugs that took me almost 2 weeks to finally track down.

Most of my work can be found in this repository, on the qaul_crypto branch.

I did some work on a different project, mildly related to qaul.net which might become useful soon.
Most of what I have done is backend work but there is an example application you can run. The source code compiles and has been tested under Linux (Ubuntu 14.04 and Fedora 24). By running the qaul-dbg binary (under src/client/dbg/qaul-dbg you will create two users (to emulate a communication between two nodes), add their public keys to a keystore and then exchange and verify a signed message. Feel free to play around with the code for this demo, that can be found under src/qaullib/qcry_wrapper.c.

In this final blog post I will talk a bit about what I have done, what it means for the project and how my ~2.2k lines of c-code contribution will affect the future of qaul.net.

What I have done

The basic idea behind my project was to provide a cryptography submodule to qaul.net to make it a safer and more verifiable place to communicate in. Part of that are of course ways to sign and verify messages but at the same time a core aspect of that are also user identities.

The two biggest parts of the crypto module are internally referenced as qcry_arbit and qcry_context. As I have already explained in previous blog posts, those are the Arbiter (which provides a static API to use in the rest of the library) and the Context which holds the actual “magic” of signatures, identities, keys and targets. In an earlier diagram there was a dispatcher. However due to testing the functions, it was deemed “overkill” and the functionality was integrated into the arbiter, meaning less abstraction layers and more flat code (which is always easier to understand and maintain).

With the arbiter in place it is now possible to create unique users with a unique fingerprint that can be shared on the network to identify people as well as sign and verify messages. What has also been done is provide new message types for OLSR (the routing protocoll used in qaul.net) to propagate this new information among nodes.

What I haven’t yet done

Unfortunately there were some delays due to problems with the main crypto library in use in the project as well as a few bugs that really slowed down progress in the last few weeks. Due to that the entire encryption part has been delayed. There are functions planned and partially provided to take care of these tasks however no code behind them yet to implement it.

The feature is currently in planning and will land in a later patch, probably after the initial merge of the module has gone through as there are a lot of things to be taken care of.

Current state

Initial User signup dialogue

As said above, it is currently possible to create users, sign and verify messages and to flood the users fingerprint as well as public key to other users. However this doesn’t address a few problems that we have had while integrating the arbiter API into the rest of libqaul. Due to technical limitations in the communication system it’s currently not possible to sign private messages. This is due to how the communication subsystem works; which is currently being redesigned from scratch.

This means that any merge that will go through now will need to be adjusted to work with a new communication backend in a few weeks. As such, it is a bit unclear when exactly and how the crypto code will be merged. I am looking forward to working with the team on resolving these issues. And am also looking forward to a new shiny communication backend. But for now it means that merging the code I’ve written for the Summer of Code might be difficult.

New message types were added as well to provide a way to exchange these new payloads (signatures, public keys, fingerprints, etc) without breaking backwards compatibility with older nodes. What happens is that new nodes send out both a new and an old hello message. Other new nodes ignore the old hello message and can address the new node via it’s fingerprint and use verifiable channels of communication while old nodes are oblivious to any change. Until they are updated 🙂

In conclusion

The Google Summer of Code brought qaul.net a very big step closer to being a more safe and secure place to communicate on. The crypto submodule is tested and easy to use. What might happen is that parts of the code get merged (the crypto submodule itself) without merging any of the code that hooks into the communication stack.

There are still things to be optimisised, probably some hidden bugs to be fixed and there definately is some work needed to make private messaging actually private.

This might be the end of the Summer of Code and a “final evaluation” for this part of the project but I am by no means done. I was interested in open source software before, wrote my own projects, contributed small chunks of code to other people. But this is the first time I have been deeply involved in a large community project and the first time I learned to deal with integrating with other peoples code. And it is very largely due to the Summer of Code, Freifunk and my mentor.

I had a lot of fun working on this project and I am looking forward to more contributions. Even if it was frustrating and very stressfuly at times I’m glad to have participated. The experience tought me a lot about communication in teams, software development and funnily enough signature alignments 🙂

Acknowledgements

First of all I want to thank my mentor Mathias Jud to have introduced me to qaul.net and the Google Summer of Code. I also want to thank him for his support and guidance with problems I had while interfacing the arbiter with the rest of libqaul.

In addition I want to thank saces, another member of the qaul.net team who helped me in resolving dependency issues as well as problems I caused in the build system which prevented my code from building on Windows (woops).

Lastly want to thank Freifunk for providing me with this opportunity as well as Google for organising and sponsoring the Summer of Code projects.

Google Summer of Code 2016: External netifd Device Handlers – Final Milestone

TL;DR

FINISHING THE PROJECT

The past weeks have felt very satisfying in terms of coding. With the main structure in place, all that I had to do was add features, test, iron out the wrinkles and prepare my code for submission to the maintainer. Adding features was fun because it felt like taking big steps forward every day with immediate feedback.
There were a few stubborn bugs, though. Despite taking the better part of a week to find, they were — luckily — easy to fix. They usually required little more than changing the order in which code executed which meant swapping a few lines of code.
Rebasing the netifd source code on to the current version went very fast and resulted in three separate commits; two small ones to prepare the existing code base for my additions and one pretty big one adding my ~2000 line .c-file.

As this is the blog post wrapping up my Google Summer of Code, I am going to summarize the entire project. This probably means that I will repeat some of the points I have already explained in my previous posts.

GOALS MET

I set out to implement a way to open up OpenWRT/LEDE’s network interface daemon (netifd) for new device classes.
Until now, netifd was only able to handle device classes for which a handler was hard-coded into the daemon. I added a way to generate the necessary device handler stub from JSON descriptions and interface them over ubus with another process that handles all device-related actions such as creation and configuration. Netifd is more open to experimentation and does not require maintenance from someone introducing a new device class.
Configuration of these devices still happens in the familiar /etc/config/network file.

Along with the ubus interface in netifd, I wrote ovsd, an external device handler for Open vSwitch. Together with ovsd, netifd can create and configure Open vSwitch bridges without any Open vSwitch-specific code added to it. It simply parses the configuration in /etc/config/network, sees that there is an interface on a device with type ‘Open vSwitch’, uses this name to look up the corresponding device handler from a list and calls the ‘create’ function that is part of the device handler interface.
The Open vSwitch device handler stub then relays the command along with the configuration blob to ovsd via ubus.

Ovsd processes the command asynchronously and answers using the ubus subscription mechanism. Netifd can then bring up the device as usual and attach protocol handlers and interfaces to it.

My work on netifd is not likely to get included upstream before GSoC ends which is why I have created a patch with my changes and put it in a repository here. The repo includes the LEDE source code as a git submodule and is easy to build.
The ovsd source code is hosted at GitHub along with instructions on how to install it.

DETAILS OF THE SUBMITTED WORK

This example file demonstrates all the available configuration options for Open vSwitch devices in a possible scenario featuring an Open vSwitch bridge with interface eth0 and a fake bridge on top of it:

# /etc/config/network
config interface ‘lan’
    option ifname ‘eth0’
    option type ‘Open vSwitch’
    option proto ‘static’
    option ipaddr ‘1.2.3.4’
    option gateway ‘1.2.3.1’
    option netmask ‘255.255.255.0’
    option ip6assign ’60’

    option ofcontrollers ‘tcp:1.2.3.2:9999’
    option controller_fail_mode ‘standalone’
    option ssl_cert ‘/root/cert.pem’
    option ssl_private_key ‘/root/key.pem’
    option ssl_ca_cert ‘/root/cacert_bootstrap.pem’
    option ssl_bootstrap ‘true’

config interface ‘guest’
    option type ‘Open vSwitch’
    option proto ‘static’
    option ipaddr ‘1.2.3.5’
    option netmask ‘255.255.255.0’

    option parent ‘ovs-lan’
    option vlan ‘2’
    option empty ‘true’

The lines set apart are Open vSwitch-specific options. They configure OpenFlow settings, control channel encryption and the nature of the device itself, which can either be a ‘real’ or a ‘fake’ bridge on a parent bridge and VLAN tagging enabled.

This is the JSON description from which the device handler stub is generated:

# /lib/netifd/ubusdev-config/ovsd.json
{
    “name” : “Open vSwitch”,
    “ubus_name” : “ovs”,
    “bridge” : “1”,
    “br-prefix” : “ovs”,
    “config” : [
        [“name”, 3],
        [“ifname”, 1],
        [“empty”, 7],
        [“parent”, 3],
        [“vlan”, 5],
        [“ofcontrollers”, 1],
        [“controller_fail_mode”, 3],
        [“ssl_private_key”, 3],
        [“ssl_cert”, 3],
        [“ssl_ca_cert”, 3],
        [“ssl_bootstrap”, 7]
    ],
    “info” : [
        [“ofcontrollers”, 1],
        [“fail_mode”, 3],
        [“ports”, 1],
        [“parent”, 3],
        [“vlan”, 5],
        [“ssl”, 2]
    ]
}

The first four fields tell netifd the type of the devices and the name of the external handler to connect to via ubus. “bridge” and “br-prefix” signal the bridge capabilities of the devices and give a short prefix to prepend to devices of type Open vSwitch creating devices named “ovs-lan” and “ovs-guest” for the interfaces “lan” and “guest”, respectively.
The “config” and “info” field detail the configuration parameters and their data types for device creation and for responses to the ‘dump_info’ method of the external device handler (see my earlier blog post).
I have created a manual on how to write a JSON description of an external device handler that goes into greater detail. You can find it here.

POSSIBLE LIMITATIONS AND OPEN WORK

Because of the nature of the device handler I implemented, I could only test scenarios that arise from using Open vSwitch. These are bridge-like devices by design and not every device class someone might want to integrate with netifd will behave like them. I had to anticipate much of the behavior for non-bridge-like devices trying to make the ubus interface device class agnostic.

Also, while I tested ovsd with all the complex setups I could think of using fake bridges and wireless interfaces, there are probably edge cases where my implementation is insufficient. Ovsd may have to become stateful at some time.

At the moment, the JSON files from which the device handler stubs are created are a bit “human-unfriendly”. Parsing the JSON objects fails unless they are written on a single line with proper EOF termination. Allowing pretty-printed JSON would greatly increase readability. What’s more, the parameters’ data types are cryptic enumeration values from libubox. Another translation layer turning numbers into readable types like “string” would also help users read and write description files.

IMPROVEMENTS TO MAKE

In the future, I would like to add a way for external device handlers to send detailed feedback about requests they receive back to netifd within the context of the request. This way authors of external device handlers could provide device-specific information such as specific error messages when a command fails.
All the building blocks for such a mechanism are there:
  – ubus replies that are logically connected to an ongoing request and
  – the possibility to tell netifd what messages to expect via an entry in the JSON description file.

This way, messages and their formats could be defined by the authors of external device handlers on a per-device-class — and even a per-command — base. Netifd would then be able to handle these messages and write them to the logs along with information about the context of the ongoing transaction.

MY EXPERIENCE WITH GSOC

All in all, GSoC was a blast. Although challenging and frustrating at times, I am happy to have done it. This was the first time I had to read other people’s code to this extent and at this level of — for lack of a better word — sophistication. It took me the better part of a year to really get a grip on the code base when I was working with it as part of the student project at TU Berlin but once I had a feeling for its structure, playing around with the features I added was fun. It feels rewarding to have worked on and contributed to “real world” free software.
From the organizational, side I am very happy with both Freifunk’s and Google’s way of managing the process. I always knew what was expected of me and was provided the necessary information in advance.

ACKNOWLEDGEMENTS

Now that my first GSoC is over, some thanks are due. First and foremost, I would like to thank my mentor and advisor Julius Schulz-Zander for introducing me to GSoC and for his counsel throughout the summer. Thanks to Felix Fietkau, original author of netifd and its maintainer, of whom I’ve learned a lot both indirectly by working with his code and directly when receiving feedback on my work. Finally, I want to thank Freifunk for letting me do this project and — of course — Google for organizing GSoC.

Sharable Plugin System for qaul.net – Midterm Updates

Hi everyone, 

As we are on the midterm evaluation process, I would like to share what I have done so far. I created a small HTML5 application to share the location of a user, it uses geolocation API for this purpose. This will work online but, if we are offline it will work only if the device had a browser which communicated directly with the GPS hardware. This is how the application looks like when the location is found out:

As per my plan I was supposed to create a JSON API the application can use to send the request to the web server of qaul.net and a new message type for all the plugins in general. But it is not yet completed, so I have created a button in the message page of qaul.net GUI which will invoke the Javascript function to get the location of the user and it will be sent using the existing message type. There’s more work to be done for the proper working of the plugin mechanism in the qaul.net. Currently the location of the user is sent as longitude and latitude manner in the messaging system as shown below.

Cheers,

Anu

Provide a cryptographic implementation for Qaul.net – midtern update

It’s been almost a month since official coding started for Google Summer of Code 2016. And it’s definately been an interesting experience.

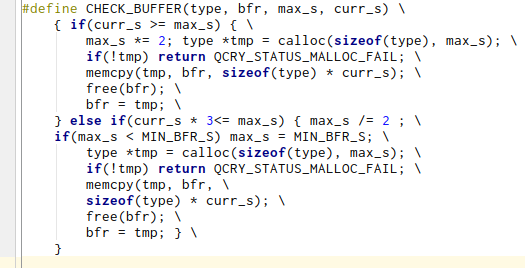
When I was told to write this article some sugestions for content were “pictures” and to “provide links to prototypes”. Unfortunately with my subject (especially at this point in time) that’s not as easily possible and I’m not sure how many of you want to see source code in the form of glorious macros in a blog post.

But I will try 🙂

Qaul.net is building it’s crypto on a small, embeddable crypto library maintained and mostly developed by ARM called “mbedtls”. Unfortunately the project just went through some massive refactoring and the API has completely changed. Thus a lot of documentation online is out of date or just plain out doesn’t work. Most of my time so far I’ve spend crawling through the source code of the library components I need and learning how they link together in the background to understand which files I need to compile into the project and which are optional. The goal here is to make the end binary and the memory footprint of qaul.net as small (and as embeddable) as possible.

Next up was the general structure of the crypto module. In libqaul I added a new folder and thus function/ field namespace called “qcry” which is short for Qaul CRYpto. Following is a quick graphic of the layout of the module.

qaul crypto structure

All orange modules are part of the crypto-package, yellow modules show heavy modification to their code base where as grey modules will require very little modification. As you can see the crypto module is structured into five parts: Arbiter, Dispatcher, Context, Targets and Utilities. Following a quick description of what they do, if you’re interested in more in-depth documentation, check out my wiki.

  • Arbiter: Provides abstraction layer to the rest of libqaul and handles “disputes” between different threads or application states.
  • Dispatcher: Acts as a load balancer between the non-threadsafe functions of the crypto and the multithreaded environment of libqaul. Also optimises CPU overhead for context switching.
  • Contexts: Contains raw data for crypto tasks (private keys, mode of operation, targets, etc..). Is created by the arbiter but most handled by the dispatcher.
  • Targets: Contain data required for public key crypto. Mostly contains metadata and public keys of other users. Get created by the arbiter.
  • Utilities: Base64 encodings, hash functions, verifications, creating user avatars, lots of stateless functions that are used throughout libqaul go here.

One thing I have started to work on too (but haven’t gotten far enough yet to show something off in the UI) is user verification. So…users have private keys and with the fingerprint of that key it is possible to tell if they really are who they say they are. But how to communicate that to users? Showing people a long number is very unintuitive and will just cause people not to care.

So instead of a longer number (or maybe additionally), on a new user profile screen we will show an image generated from the username of the person, their fingerprint and a signature (public key encrypted with private key). This way users will be able to quickly see if the person they are talking to is who they say they are.

To do so there are several libraries:

 – https://github.com/Ansa89/identicon-c
 – https://github.com/stewartlord/identicon.js
 – https://github.com/spacekookie/librobohash (My C re-implementation of https://robohash.org)

 Which of these solutions will be used is not clear yet (Personally I like robots, who doesn’t like robots? Wink ). But that should give you an idea of what is to come in the UI department.
 Coming up in the next week is the arbiter and a rudimentary dispatcher. The arbiter needs to be hooked into the rest of libqaul and provide access to all the low level functions the crypto module provides. From there on out test with the rest of qaul.net can be conducted.

 I hope I didn’t ramble on for too long. And I’m looking forward to the next few weeks of coding.

 Cheers,
 spacekookie

GSoC: The ECE configuration system – midterm update

Hi,
the GSoC is nearing its midterm evaluation, so let’s have a look at the current state of the “Experimental Configuration Environment” (working title)!

I started the project with defining models for configuration data, configuration diffs (that are used to modify data and store modifications) and schemas. All of the design documents I wrote can be found at: https://gitlab.com/neoraider/ece/wikis/design

I tried hard not to re-invent things that already exist in a more or less standardized way:

  • My configuration model is just JSON (without support for floating-point numbers right now, as the libubox blobmsg format ubus uses to represent JSON doesn’t support them – I plan to fix this)
  • JSON Pointers (https://tools.ietf.org/html/rfc6901) are used to refer to elements of the configuration tree
  • The schema format uses a subset of JSON Schema (http://json-schema.org/)

Based on this design, I’ve started implementing the configuration management daemon eced. The page https://gitlab.com/neoraider/ece/wikis/implementation gives a good overview of the current features and usage of eced. Quite a lot is already working:

  • Multiple schemas can be loaded and merged
  • Default configuration is generated from the schemas
  • A ubus interface allows to query and modify the configuration
  • Config modifications can be loaded from and stored into a diff file

There’s still a lot missing, so here’s what I plan to do next:

  • Make something use ECE! UCI is well-integrated in OpenWrt/LEDE and can be used from C, Lua and shell scripts; all of these languages should also be supported by an ECE client library. An example schema to replace /etc/config/system does already exist and could be used to experiment with partially replacing UCI with ECE.
  • Support schema upgrades: When schemas are updated, this can partially invalidate config diffs. A way to deal with such inconsistencies must be defined.

Discussions and feedback have also led me to the decision to put a stronger focus to UCI interoperability. While I had only planned import and export of UCI configuration at first, I’ve realized that a two-way binding between UCI and ECE (i.e. an API-compatible libuci replacement/extension that will use ECE as backend) will be necessary for ECE to find acceptance. This will also allow to continue to use existing configuration tools like LuCI with UCI configuration converted to ECE.

I also plan to have OpenWrt/LEDE packages for ECE ready soon, so you can play around with the current implementation yourselves. Maybe I’ll also set up a public host with ECE Laughing

DynaPoint update

Hi everyone,

here are some updates regarding DynaPoint. The idea was to create a daemon, which regularily checks the Internet connection and changes the used access point depending on the result. That way the handling with APs would become easier as you already could tell the status by the AP’s SSID.

A daemon with basic functionality is already working. After installation, there is one configuration step necessary.
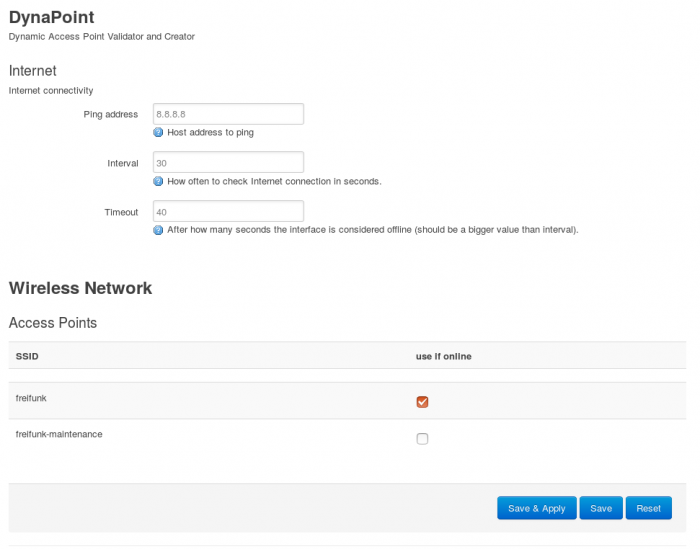
You have to choose in /etc/config/wireless which AP should be used, if Internet connectivity is available and which one if the connectivity is lost. You can do that by adding “dynapoint 1” or “dynapoint 0” to the respecive wifi-iface section.

You can also configure dynapoint via LuCI, although it’s not yet complete.
I was struggeling a bit with it, because the documentation of LuCI is a bit minimalistic…
Here is a screenshot of how it currently looks like:

Next steps

To verify Internet connectivity, it is probably better to make a small http download than just ping an IP address.
Using “wget –spider” should be suitable for that.

Also, I will see if I can get rid of the required configuration step in /etc/config/wireless in the next weeks and provide fully automatic configuration.

If you want to test dynapoint for yourself, just go to https://github.com/thuehn/dynapoint.