VRConfig Final

Hi,

this is the final blog post about my project VRConfig.
VRConfig aims to improve the accessibility and usability especially for inexperienced users of OpenWrt and its Webinterface LuCI.
It achieves this by introducing a graphical configuration option. The users can configure their router by interacting with a picture of the router model they are using, instead of digging through menus full of technical terms they do not understand.
In order to be able to present to every user the correct picture of the more than 1000 different supported router models, the help of the community is needed.
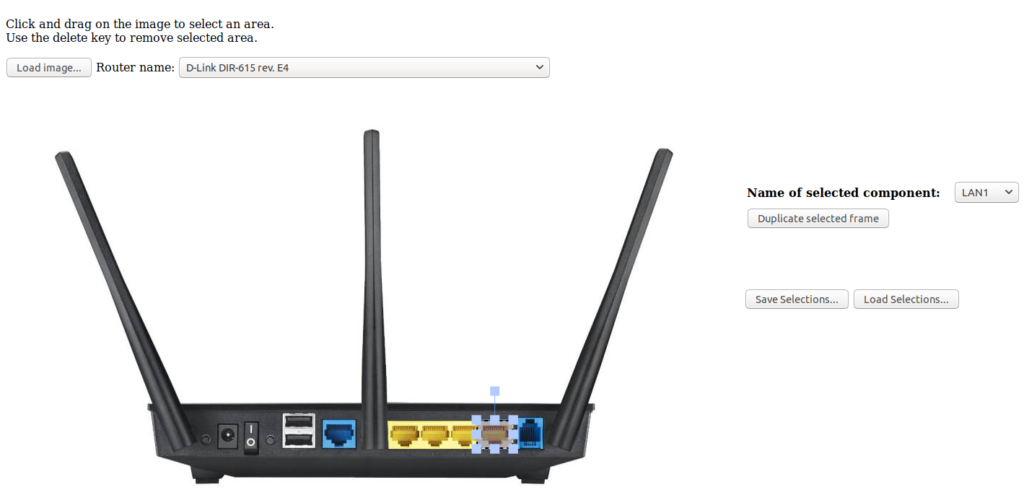
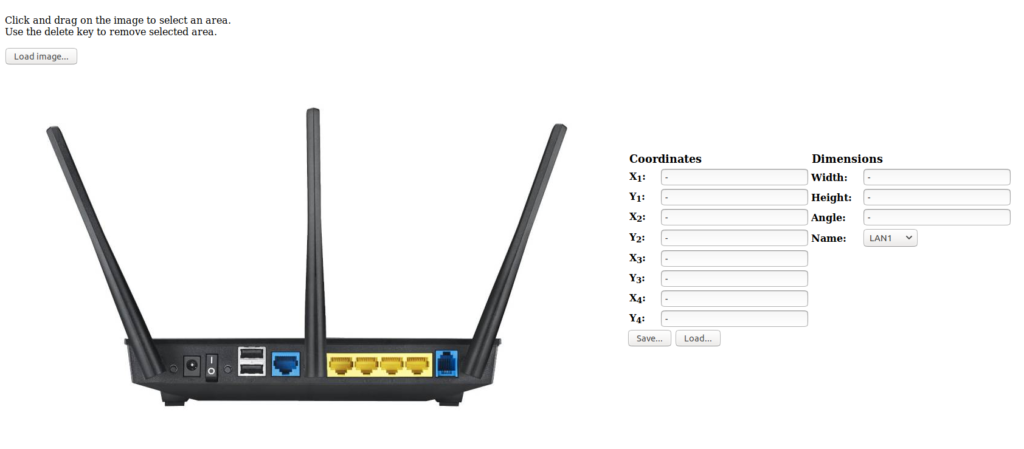
Everyone can take a picture of the backside of their router and annotate the ports on that picture using the annotation-app, I developed (https://vrconfig.gitlab.io/annotator/).

The annotator can be used to mark the location of all ports of the router


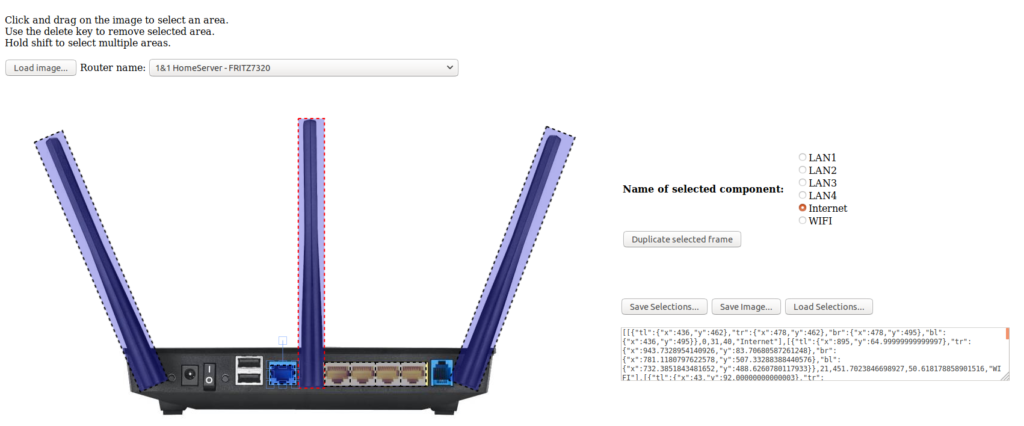
You could then send in the jpg-file together with the annotation file (which is a json-file) to the luci app via a merge request here: https://gitlab.com/vrconfig/luci-app-vrconfig.
The makefile will automatically choose the right jpg/json file based on their file name during the build process.

The luci application is currently a demo application, which will be improved in the future.
Currently, it looks like this:

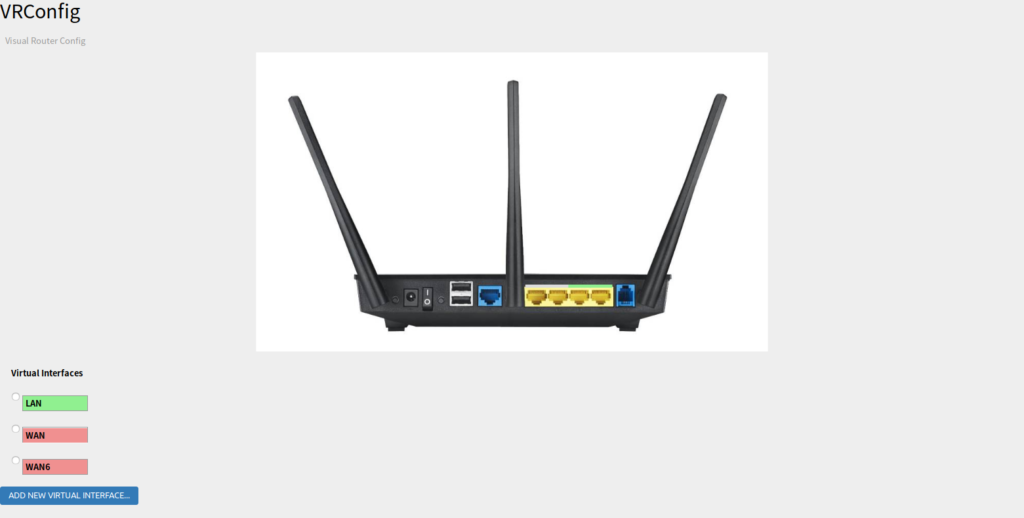
You can hover over the different ports, a click will bring you to the corresponding configuration. It also marks those LAN-ports green, which are currently connected with a LAN cable.
For that I developed a lua demon which monitors the corresponding ports in real time and provides the interface with their status.
Also there is list of all currently configured virtual interfaces. Clicking on them will mark the associated physical ports on the image.

Future Plans

In the future I plan to continue to polish the Luci interface. One extension could be to marks those ports, which currently have Internet access. Other extension could revolve around making it possible to configure some setting via drag and drop on the image.

Acknowledgments

Thanks a lot to my mentor Thomas for his excellent support and his long term visions that made this project possible in the first place.
Also thanks to my colleague Benni for his extremely helpful suggestions throughout the project.
Also thanks to Freifunk for letting me work on this project and thanks to Google for organizing GSoC.

The full source code of everything related to this project can be found here: https://gitlab.com/vrconfig

VRConfig Update 2

Hi,

I spent the last weeks mainly developing the LuCI Application for VRConfig. As soon as you want to do advanced things with LuCI, it gets cumbersome.
As the API is mostly undocumented, you have to dig through the LuCI’s source code trying out functions which could be useful according to their name.
It’s a bit of a trial and error game.
Currently the LuCI app does the following.
It displays an image of the router and parses the JSON file, which contains the locations of the components.
With this information it can mark the associated physical ports to the currently selected network interface and display those network ports, which are connected to a cable. You can also hover over the components and click on them, which leads you to their respective settings page.

I also improved the annotation app. It now lets you choose the router name from a list of all currently supported router models of OpenWrt. I got that list with a series of grep and sed commands from the OpenWrt git repository.
For your information, there are currently around 1100 different router models supported. 🙂

In the next weeks I will polish the LuCI Application and try to integrate VRConfig into the openwrt build system to be able to select the correct router image and JSON file at build time.

VRConfig Update

Hi,

I have some quick updates about VRConfig for you.
Short recap: VRConfig aims to introduce a graphical configuration mode for OpenWrt’s Webinterface LuCI.
For that need to collect pictures of the backside of all supported routers. The idea is to do this in a crowdsourcing manner. The community can submit pictures of their routers together with a metadata file which contains the locations of the components on the picture.

I spent the last weeks developing a web application to provide the annotation functionality of the router components.
A working prototype is now ready and can be tested at the following URL: https://vrconfig.gitlab.io/annotator/
Source code: https://gitlab.com/vrconfig/annotator

The annotator produces a JSON file which in turn can be parsed by the LuCI Application to provide the graphical configuration mode.

The LuCI application is being developed right now and will be provided shorty under the following URL: https://gitlab.com/vrconfig/luci-app-vrconfig

More info about that in the next blog post.

VRConfig – Visual Router Configuration for OpenWrt

Hi,

I am Tobias, a Computer Science student at the TU-Berlin. This is my second time participating in GSoC for Freifunk.
I am excited about this project as it helps to reduce the entry barrier for inexperienced users of OpenWrt and its web interface LuCI.

When you look at the current LuCI Webinterface you will notice that it looks fairly decent, especially with the Material Theme.
However for an inexperienced user without a technical background it surely looks scary. All the text full of technical terms with few pictures can look like a book with seven seals.

This project aims to introduce a graphical configuration mode.
To make the configuration interface more connected to the actual router the user owns, we want to display an image of the backside of the ports in the web interface.
The user shall be able to interact with this graphical representation of the router by hovering and clicking on the different parts like LAN ports, antenna etc.

What are the necessary steps to archive this goal?

First, we need pictures of the backside of all the different router models. Here the idea is to collect them via crowdsourcing by the community. Everyone can take a picture of their router and upload it to a Git repository. Also, the location of of the router components must be marked on every picture. For that I will develop a small application which allows the user to annotate a router picture and generates a metadata file.
Second, the annotated pictures need to be integrated into the OpenWrt buildsystem.
Third, a LuCI application needs to be developed to display the result as an interactive graphic in the web interface.

In the next blog post I will go into more detail on the individual steps as well as update you about the progress.

DynaPoint Final

Hi everyone,

this is the final blog post about DynaPoint. Short recap: I created a daemon which regularily monitors the Internet connectivity and depending on that activates and deactivates the proper access points. That way the handling with APs would become easier as you already could tell the status by the AP’s SSID. I also created a LuCI component for it to make the configuration more easy.

In the past weeks I was able to add some new features, fix bugs and complete the LuCI component. Especially the latter was really interesting and gave me some knowledge about how LuCI works.

In the last post I mentioned that it’s better to verify Internet connectivity by using wget instead of just pinging an IP address.
Consequently I switched from Pingcheck to wget. I also added an option to use curl instead of wget. With curl you also get the option to choose the interface for the connection.
When you provide internet via VPN-interface you can explicitly check the connection of that interface now. The reason why I don’t use curl as default is because of curl’s rather large size. For some routers with only 4 MB of storage it might be too much.

I also added an “offline threshold”, which will delay the switch to offline mode. So for example when you set the interval to 60 seconds and offline_threshold to 5, the switch to offline mode will be made after 5 cycles of checking (=300 seconds).

So how does an example configuration look like?

To use dynapoint just add dynapoint_rule ‘internet’ and dynapoint_rule ‘!internet’ in the desired sections in /etc/config/wireless:

config wifi-iface
    option device ‘radio0’
    option network ‘lan2’
    option mode ‘ap’
    option encryption ‘none’
    option ssid ‘freifunk’
    option dynapoint_rule ‘internet’

config wifi-iface
    option device ‘radio0’
    option network ‘lan2’
    option mode ‘ap’
    option encryption ‘none’
    option ssid ‘freifunk-maintenance’
    option dynapoint_rule ‘!internet’

The configuration of dynapoint takes place in /etc/config/dynapoint:

config rule ‘internet’
    list hosts ‘http://www.example.com’
    list hosts ‘http://www.google.com’
    option interval ’60’
    option timeout ‘5’
    option offline_threshold ‘3’
    option add_hostname_to_ssid ‘0’
    option use_curl ‘1’
    option curl_interface ‘eth0’

All of that can also be configured via LuCI:

If you want to try out DynaPoint for yourself please visit https://github.com/thuehn/dynapoint for more information.

Future work

Currently there is only support for one AP per state. In the next weeks I want to add support for multiple APs per state.
Also I want to add support for more rules. At this time there is only support for one rule “internet”. I want to make this more generic and provide support for custom rules.

Acknowledgements

I want to thank my mentor Thomas Hühn for his excellent mentoring and great ideas during this project. 
Also of course thanks to Freifunk for letting me realize this project and thanks to Google for organizing GSoC.

DynaPoint update

Hi everyone,

here are some updates regarding DynaPoint. The idea was to create a daemon, which regularily checks the Internet connection and changes the used access point depending on the result. That way the handling with APs would become easier as you already could tell the status by the AP’s SSID.

A daemon with basic functionality is already working. After installation, there is one configuration step necessary.
You have to choose in /etc/config/wireless which AP should be used, if Internet connectivity is available and which one if the connectivity is lost. You can do that by adding “dynapoint 1” or “dynapoint 0” to the respecive wifi-iface section.

You can also configure dynapoint via LuCI, although it’s not yet complete.
I was struggeling a bit with it, because the documentation of LuCI is a bit minimalistic…
Here is a screenshot of how it currently looks like:

Next steps

To verify Internet connectivity, it is probably better to make a small http download than just ping an IP address.
Using “wget –spider” should be suitable for that.

Also, I will see if I can get rid of the required configuration step in /etc/config/wireless in the next weeks and provide fully automatic configuration.

If you want to test dynapoint for yourself, just go to https://github.com/thuehn/dynapoint.

DynaPoint – A dynamic access point validator and creator

Hi everybody,


I am Tobias, a Computer Science student at the TU-Berlin. I am glad to have the opportunity to participate at GSoC for Freifunk this year.


My project aims at making the handling with access points in OpenWrt/LEDE easier. The goal is defined as follows: Find an easily configurable solution (with reasonable defaults) for making the wireless access SSID in OpenWrt/LEDE dependent on a set of network conditions.


What does that mean? Consider the following example. You have a wireless access point with SSID “Freifunk”. Suddenly for whatever reason the AP looses Internet connectivity without anyone noticing it. When users now connect to this AP, expecting a working Internet connection, they get frustrated, because they can’t check their emails or surf the Internet.


With DynaPoint I want to develop a daemon, which regularly monitors the Internet connectivity. When it’s lost, the SSID will automatically be changed. In this example it could be changed to “Freifunk-offline”. When Internet connectivity is re-established, the SSID would automatically be changed back to “Freifunk”.

This way users as well as admins get informed about the state of an access point just by looking at the SSID.


To verify Internet connectivity the first obvious step would be to do a ping. For this purpose there already exists a package called pingcheck, which I am planning to use. Further steps could include DNS-Queries and HTTP-Downloads.


Speaking about easy configuration and reasonable defaults, I want to require as little configuration steps as possible, but also provide enough configuration options to be adjustable to different kind of setups. Ideally the configuration will also be possible via the LuCI web interface.


Until next time,


Tobias