As a next part of my work, I want to start with a client capacity measurement.
I want to find out how many of my Wifi clients support the different standards like 802. 11v / 802. 11k / 802. 11r etc. Since the access points know which features the clients have, I just have to be able to read out this data.
The heart of the Accesspoint is the interconnect system uBus which is used by most services running on an OpenWrt setup. UBus works as a message bus between different daemons in OpenWrt. The user space daemon software hostapd ensures that the network interface card functions as an access point. Furthermore, the OLSR protocol is installed on the Accesspoint to always ensure the shortest route between the individual Accesspoints.
To find out which clients support which standard I will write a new LUA script and install it on a virtual machine. This script is used to ask the hostapd via uBus for the clients that support 802. 11v. Since I want to evaluate the data and also want to display this graphically, I will install the Prometheus Exporter as monitoring software.
After I have evaluated the collected data with Prometheus, I can start the further implementation of the 802. 11v standard within the network.
Hey community 👋 This is the first update on the GSoC 2021-Freifunk Digital Twin Project.
Recap
The goals for the first phase were:
determine a management tool for 100+ VM´s and OpenWrt Devices
figure out how to fetch and prepare topology information from routing daemons
So let´s see how that went…
Achievements
After testing and playing around with Qemu, the next step was to find a suitable VM-Management tool that is able to manage 100+ VMs. After several hours of reading and testing, i finally chose libvirt, because it´s open source, lightweight and CLI-controllable. But because it´s so extensive, i needed plenty of time to read in an get up a proper OpenWRT-VM but now it works quite well. After that, we decided to migrate our test environment from my local computer to our lab-server, which is more powerful. After some technical issues, which cost us plenty of time, the environment was finally up an running and it is now able to start and host 100+ OpenWRT VMs. Because of the stated problems, i doesn´t have much to show to you at the moment, so i´m going to update this post in the next few days.
Next steps
figure out how to fetch and prepare topology information from routing daemons
Write a script that combines VM management and network management
See you in the next few days with a new update post. ✌️
Hi! I’m Tomás. This post is a brief of the work that we did in the last few weeks. The prototype of a network capability app was achieved, and we’re starting to test it on communities. The app is still a prototype: it has only three functions (connect to a webpage using the WiFi, check if you’re in a LibreMesh network, and check the private IP of the device) and the front-end consists of only these three buttons, but it has now all the logic that was needed to start working on the rest of the app.
Basic functions
The first approach was to check if the user was able to connect to the LibreMesh local address by checking it with a ping, and then we decided to move forward to an HTTP GET instead. With this idea in mind, we prepared a new version of the application that sends a command to the device (a curl command) instead of a Java method with a previously developed android interface (for the ping version).
public boolean httpGetToLibreMesh() throws InterruptedException, IOException {
    //FIXME: modificar google por la IP de LibreMesh
    String[] cmdLine = {"sh", "-c", "curl --head --silent --fail google.com"};
    Process p1 = java.lang.Runtime.getRuntime().exec(cmdLine);
    int returnVal = p1.waitFor();
    return returnVal == 0;
}
This simple code solves the problem. It returns true if the HTTP GET to google.com worked, and false if it didn’t. It can be easily modified with the LibreMesh IP Address.
The next objective was to inform the user if the device wasn’t connected to the WiFi. In order to do so, we have to get the WifiManager from the ApplicationContext, and then check if the wifi is working.
Then, we needed a web navigator (WebView) inside the app with the capability to run the LibreMesh router website (On the first approach, to a google.com website).
Using a WebView object with the shouldOverrideUrlLoading overridden we can show a webpage in the app without the requirement of showing an external navigator (Android provides the Android WebView App that does this inside the LibreMesh app).
So with this simple code, we can configure the WebView to enter to a site inside the app.
Choosing through which network interface to send data to
Once having the WebView, the next step was to control through which network interface the application sends the network requests. In order to do that we have to access the ConnectivityManager. It was created as a class variable and defined on the function “onCreate” of the activity that holds the WebView. The connectivityMaganer isn’t a new instance but a reference to the object that controls the connections in the context of the App.
Then we needed a function that can request to use the WiFi. The idea is to make a NetworkRequest and send it to the connectivityManager, but it also needed a NetworkCallback to specify what to do when the Network was available to accomplish the request. So as a second parameter of the request there’s an anonymous class that overrides the methods needed.
@RequiresApi(api = Build.VERSION_CODES.LOLLIPOP)
private void requestWifi() {
    final NetworkRequest networkRequest = new NetworkRequest.Builder()
           .addTransportType(NetworkCapabilities.TRANSPORT_WIFI)
           .build();

    connectivityManager.requestNetwork(networkRequest, new ConnectivityManager.NetworkCallback() {
        @Override
        public void onAvailable(Network network) {
            if(Build.VERSION.SDK_INT >= Build.VERSION_CODES.M)
                connectivityManager.bindProcessToNetwork(network);
            else
                ConnectivityManager.setProcessDefaultNetwork(network);
        }

        @Override
        public void onLost(Network network) {
            if(Build.VERSION.SDK_INT >= Build.VERSION_CODES.M)
                connectivityManager.bindProcessToNetwork(null);
            else
                ConnectivityManager.setProcessDefaultNetwork(null);
        }

        @Override
        public void onUnavailable() {
            super.onUnavailable();
        }
    });
}
The last thing that I needed to do was a function that runs the WebView.
The next step was to move forward with getting the LibreMesh IP address. On the other hand, that’s not more than just an algorithm or a gateway, either way, does the same results. This can give us an alternative way to see if the user is connected or not to the LibreMesh server (we get the IP through the algorithm and compare the gateway version).
The idea was pretty simple and only required a int to ip auxiliar function. So we decided to collect all the methods that returned wifi information and send them to a new WifiInformationManager class. So, this class sends all the information that we need from the WiFi:
The function getGateway solves in an elegant way the problem of the LibreMesh Local-Address. The rest of the job was simply to change the address of the WebView to this one.
Using logcat to find bugs
The logic step then was to try the application and test if it worked okay, but when we did that the WebView that shows the Lime-App showed a white screen instead. Using the logcat inside the Android Studio we were able to easily find the error, showing the importance of using this type of debugging tools.
Using the logs it’s easy to see that there’s a TypeError when trying to get the property ‘getVoices’. The problem comes with the plugin ‘window.speechSynthesis’ that isn’t available for some browsers.
The Lime-App is the graphical interface that LibreMesh uses for the configuration of community networks. We found the .js that was calling the function:
let synth = window.speechSynthesis; let voices = synth.getVoices();
It can be seen that in the line 2 the variable voices is set to a synth.getVoices, but if synth is undefined, then that line will not succeed. The solution was pretty simple, with a control structure we check if the speechSynthesis was available or not. So the fixed code is:
Hello! Good to see you here : ) This blog is mostly a summary of work done till now under the first coding phase of summer of code of ’21. Picking from the end of previous blog post, we planned implementing chat feature in the application module, but due to the aforementioned massive refactor in the entire codebase and upgradation of existing modules to support modern hardware the chat API has been deprecated, and some components, because of not being part of CI, got broken : ( To implement features in the module the very first step was to get the project build properly, previously (maybe) due to migration from different version control system to GitLab and that massive refactor there were some unidentified problems that did not let the application codebase build properly, also the main lead of the picture `android-support` crate, not being a part of our GitLab CI workspace too, wasbroken. We fixed all this entire stuff in multiple different steps, each solving a mini problem and writing CI for each missing component so that we or anyone joining the project never encounter similar problem(s) in the future.
I. Fixing the Android Application Codebase
The application codebase was considerably broken and for the very first time when I built the application, it instantly said build failed in10ms, which is really very weird as when for the very first time you build an android application, it takes noticeable time(~6 minutes), this time is for fetching the dependencies that are declared in the dependency management file of android codebase(the ones with the build.gradle name) followed by compiling the android project codebase. It was quite astonishing at first sight,but on closer look to the files present in the android codebase the cause was observable. It was the presence of dependency archives in the android codebase and their corresponding XML files too, and since these dependencies were already present, studio didn’t take the pain of fetching them from maven. So the question arises, When the dependencies were already present still then application didn’t compile, why? Actually what happens is that these dependencies’ XML files are editable so even the slightest edit in them renders them useless and studio doesn’t even report any kind of problem with them, another thing that happens under the hood is that studio stores these dependencies in its local cache so that when user re-compiles the application, no time is taken in fetching the dependencies and it can perform the real build. Also, by time these caches get corrupted and usage of very old cache does not let the project work in the way it should. Okay, now let’s come to the point how we fixed it. As by now it should’ve been clear that the problem was the existence of binaries and XMLs of dependencies present in the android codebase, so the solution that I anticipated was the deletion of these files. It was not sufficient. After doing this dependency management did go as expected, but still the build failed : ( After some more inspection, I found there was some problem with gradle executable scripts as well and the gradle-wrapper.properties too. So I just referred these scripts from my previous working projects and it finally started working, a moment of joy 🥳, after many days + nights of pain ; ) As this problem was fixed, after working on some other crucial matter(see next section, II one), we wrote a CI pipeline specially for our android application codebase so that it doesn’t break again ever in the mainstream. The android-application pipeline comprises of the 3 stages, in which its lint is checked, followed by build and then the tests are run. In the upcoming coding phase we plan to make this CI pipeline even more robust and enforce stricter formatting rules, introduce Static Analysis and run android Integration Tests on GitLab CI, well we’ll discuss it the next time we meet, leaving some topics for then 👀 You can find the corresponding MRs here: * Fixing the android application codebase: we/irdest/!21 * CI for android application codebase: we/irdest/!23
II. Fixing the FFI Layer
After the previously mentioned refactor, everything was working fine, only android specific components of the codebase were broken. A part of which, was our FFI layer, the android-support crate. This layer still held references of several deleted and deprecated APIs, therefore compiling this crate too gave a bunch of errors. Fixing them took much more time as this crate was written in Rust and then I was not that fluent with it. So fixing it included updating/modifying existing functions or we had to remove functions as well because of the deprecations. A nice challenge that we encountered was saving the state across multiple platforms(supported hardware), because the crate we used for saving state provided support for almost all the operating systems other than Android. So what we did was using the knowledge of android that an application has access to its own private storage which no other application/service can see, so all we needed to do now was to find this directory in android device file-system, this path we achieved using the ADB, now we investigated where our crate went wrong, so for this we dived deep into the crate’s API and read how it achieved similar behavior for other platforms, which was that, it first of all found the HOME(environment variable) for the OS and then located corresponding path(s) for saving state in dir/file(s), turned out, that the crate was identifying HOME wrong only for android file-system. After this was diagnosed, we wrote a custom API that found HOME env var on all platforms irrespective of their OS (see this patch), by this API we were able to access the app-specific private directory and save state there. It was quite challenging, but we figured it out! Everything related to FFI layer, after this fix was quite easy. We eliminated the problems that existed in FFI layer via refactors and some modifications in functions and then, it built green! After fixing the FFI layer we wrote the CI for it that makes sure it builds each time a commit is pushed to any MR or branch and we can see the build status in pipelines too. Writing the CI for android-support crate was not a cakewalk,actually the application needs cross-compilation of our Rust library in order to function, so we need to make sure that the library which application is going to use on android devices is really compatible with android platform and by virtue we compile it on our PCs directly so that doesn’t work quite, to make expected behavior happen there are two options: * Compiling the Rust library codebase on android-device(less feasible), or * Cross-compiling the library on our PC/CI runner via providing support tools for android components So quite obviously we went with the second option, for this we installed rust and android compatible components in our runners during the CI runtime and then compiled the library via checking out to the correct directory. But since, for compiling Rust library in each CI run we had to install the components and this specific pre-compilation part(or better to say setup portion) consumed a considerable portion of our CI script(and made it look a bit daunting too), so we packaged these components to our custom docker image and pulled it each time in our CI runs, this made our life easy and scripts beautiful : )
NOTE: If you don’t have much idea of cross-compilation, then you can have a look at this awesome blog-post by Milan✨. It gives a clear understanding to the reader what cross-compilation is, irrespective of their previous knowledge on the same(yes, but basic knowledge on compilers is needed a bit). Spoiler alert: That someone in the opening of blog post is me 😛
Also, since the refactor was incomplete in our android application codebase and the android-support crate so between these to big tasks, I fitted this small refactoring, as a light break 😛 You can see the MRs for them here: * Fixing the FFI Layer: we/irdest/!31 * Refactoring the android-components: we/irdest/!32 * Adding the android-support crate in our CI Pipelines: we/irdest/!33
III. UI Improvements
After fixing issues in android application and our Rust library, and writing a robust end-to-end CI for them we moved forward towards improving the UI of the application. Previously, the application used legacy design components and ideology, under this task we modernized these UI components and followed the material design guidelines(material.io), that improved the overall look of our Authentication screens. There is nothing much to explain in it as it was really quite easy to achieve and also we didn’t encounter any problems. You can see the related MR here: we/irdest/!26
Acknowledgements
Well, by far it has been the most exciting summer for me and I had interesting experiences working on the project. Fixing components, was very difficult at the beginning due to many reasons one I would mention is the huge codebase which we have and it is not easy to learn about the functionality of each component present in it in short time, and also everything is intertwined too at many places. Going through it and fixing issues would definitely not have been possible without the immense support from my mentor, Spacekookie, who was always there to help me out and direct what to do. Their advice greatly helped in speeding up the development process and they are also a source of inspiration to me. Most importantly, Milan, who is not officially my mentor but has helped me a ton of times in technicalities of CI and setting up Nix environment(which I initially used for cross-compilation) about which I knew nothing, and many more instances. It won’t have been easy for me to accomplish aforementioned tasks without direction and help from Spacekookie & Milan. Thanks again to both of them : ) and I’m more excited to work on the project with them further!
Cheers Until next time we meet! ~Ayush Shrivastava
After having spent several weeks inquiring into the LibreMesh project, I have continued working with my mentors Santiago and Germán to think about some improvements for the Pirania plugin. For this reason, the main idea of this post is to expose the functionalities that we have thought about implementing to improve this Captive Portal for Community Networks.
Also, after having been chatting and reading about the needs that arise in the communities to adopt the use of the captive portal in the LimeApp, we defined that some of the functionalities to implement in the Pirania administration interface are:
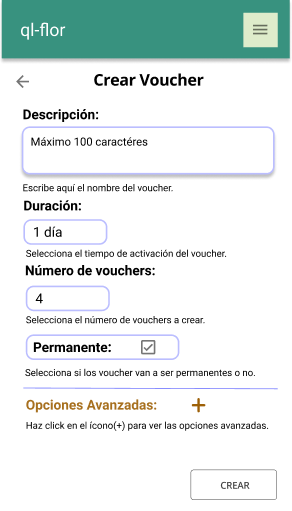
For the creation of vouchers:
– Description field, to identify who the voucher is for or what it is used for.
– Choice of the duration time since the voucher activation.
– Choice of voucher permanence, to establish whether a voucher can be used for “unlimited” time or not.
– Possibility to choose how many vouchers to create.
– Possibility to edit a voucher created to correct any typo in the description or to “delete” a voucher so that it can no longer be used.
– And set the possibility of choose some other advanced options such as setting an expiration date to activate the vouchers.
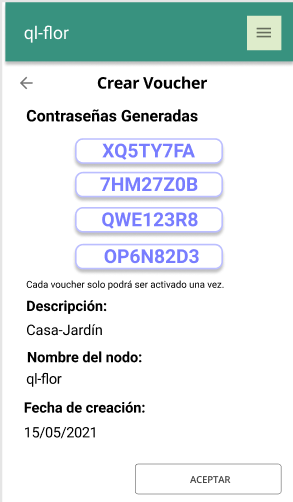
– At the end of the voucher creation, generate a metadata page to deliver the voucher passwords and other data of interest such as the description and the voucher creation date.
In the following images you can see some of the interfaces I have designed for this project:
Voucher creation screen.
Metadata creation screen.
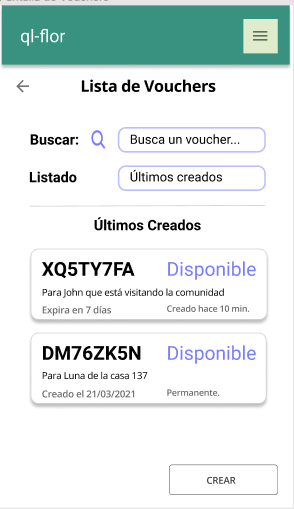
For Voucher Administration:
In a general administration page, to be able to have some functionalities such as:
– Establish a search field for vouchers.
– View the last vouchers created.
– View active vouchers.
– View vouchers that are in “Permanent” or “Not Permanent” status.
– View vouchers that were created from the current node.
An example for voucher administration:
Vouchers list interface.
These interfaces were designed in Figma, so they can be modified in the future and the final implementation.
The next challenge is to start writing the tests of the proposed interfaces in a Test Driven Development framework to later implement the functionalities in the LimeApp.
Welcome back!, This blog is for the first evaluation of the project.
Recap
In the prev section, we saw a viable way-out for the inconsistency of the generator tool for the latest version of the schema(2020-12) by mentioning some frameworks and also some targets.
Frameworks Review
I have tested the frameworks with the draft 7 version of the schema and I evaluated the framework by noting down the pros and cons of the results by each framework.
UI schema for react: This framework supports very advanced features of the schema, but has less UI integration. Also the framework supports the 2019-09 version of the schema but sadly UI schema cannot be segregated from our original JSON schema.
React JSON schema forms: This framework supports basic features of the schema and also has good UI customization, but has less integration of validation UI.
Restspace schema forms: This framework supports basic features of schema, but misses proper documentation.
JSONForms (eclipse source): This framework supports basic features of the schema and also has good UI customization with limited options.
A full document of the pros and cons of the frameworks can be found here.
Summary
By considering all the pros and cons of each framework, my mentor Andi and I have decided to work on with JSONForms (eclipse source).
Ongoing Status
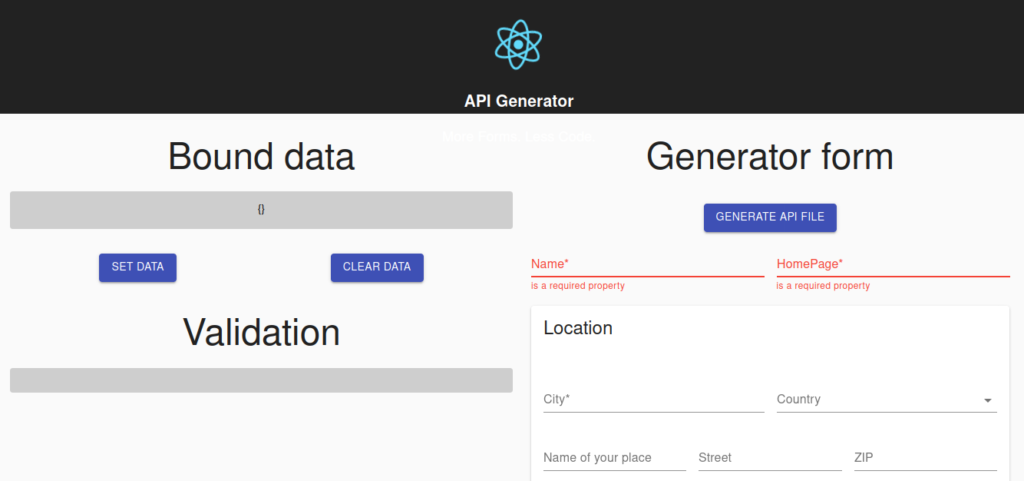
I rewrote the schema for the API generator tool to the draft 7 version of JSON schema also I have added formats to the schema. And generated the forms from the schema. I have been using React library (JSONForms) to generate the forms. Also, I developed the UI schema which is required to generate the form.
I have rendered the form, and also the bounded data of the form, which is the current data of the in the form and will be updated on change of the form data. Also, I have rendered the validations errors to show all the validation errors at one place before and after submission of the form.
Validation and Submission.
The JSONForms only emits errors through an event. So I have added a state to track the errors emitted by the event and on the event emit I recorded the errors into the state.
And for the submission of form we have to consider there are no recorded errors and the form data should not be empty because I have recorded errors into state only if the forms data is not empty. Errors are emitted by the event even before starting to fill the form. By validating all this checks, I have generated the output JSON file.
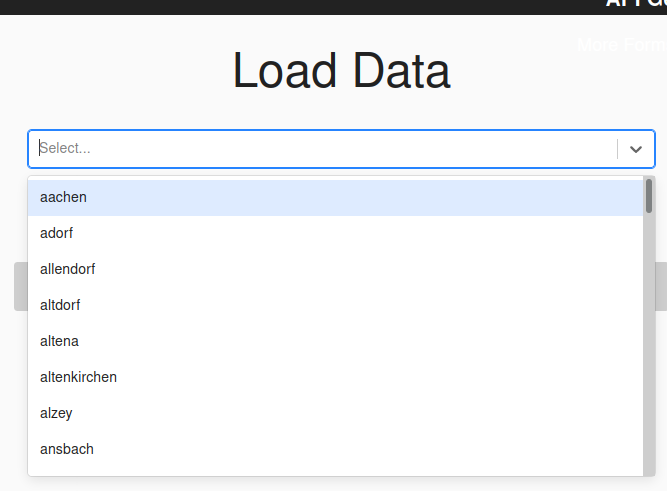
Loading data
For the testing purposes, I have added a button to load the weimarnetz API file data into the forms. I have fetched the ffSummarizedDir.json file from api.feifunk.net which consisted of all the communities API file data and rendered all the communities into a select field. So then I can add a on change event to load the data into the form.
References
A full document of the pros and cons of the frameworks can be found here.
Greetings! I am Aditi, and I am at the end of fifth week of my ten week “summer of code”.
Experience So Far
The first five weeks have been really amazing. When I started working on the device page project, it seemed as if there was a clear set of tasks that need to be done. Everything felt pretty straight-forward!
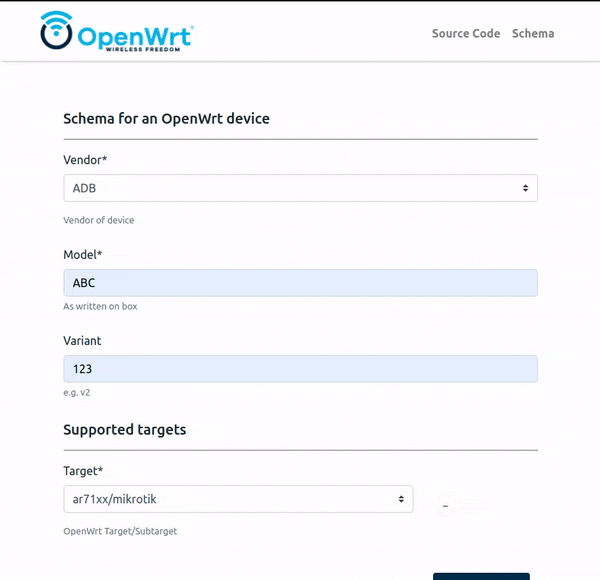
But while working hands-on, I realised I’ve learnt so much along the way. My first task of the project included improving the device data form, allowing easier input of data.
The form is designed in React with the help of React-JSON-Schema-Form. The hardest part of form implementation was to use Custom Components to facilitate onChange events. Due to asynchronous behaviour of React.useState(), it was challenging to manage form states. The project allowed me to do a plethora of exploration on React Hooks. In addition to it, it compelled me to read extensive documentations, find out a lot of ways in which React Hooks don’t work fine. To quote, Thomas A. Edison,
In addition to that, the project gave me an opportunity to engage with open source communities, raise some issues, discuss it with maintainers!
Progress
The project essentially involved two tasks:
Creation of input form from a JSON Schema to simplify the process of adding device metadata to the github repository.
After creation of input form, the second step is to render the device pages with search masks, allowing users to search specifically for devices with certain features like USB port, WiFi6 etc.
The step one of the project is done i.e., creation of an input form: with the autocomplete functionality and saving the device data in form of YAML, A demo of which can be seen here:
Now, after the completion of step 1, for the next few weeks, we’ll be focusing on working on rendering of device data for device pages.
Looking forward to another half full of learnings and new experiences! 🎉
As we have come a long way from the start of the program, here I have compiled everything that I done till date regarding my project.
It has been rightly said that open source development is a continuous process and I for one have been learning a lot with the help of my mentor. Some of my learnings are :-
Learnt more about the SDK provided by OpenWRT.
Setting up of FTP servers
Learnt more about Docker
Explored K3d as well as K3s.
Setting up local registries ………………………… and may more.
Current Status & Workaround
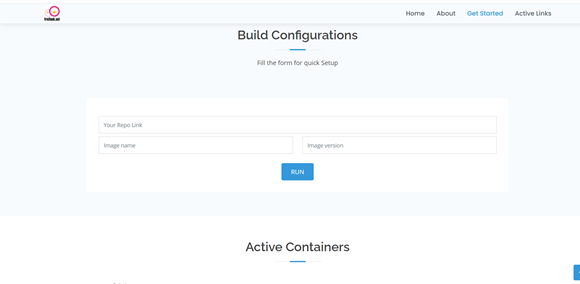
In order to get started with the project , you would be required to have some basic setup and configuration. For this one can run the following :-
> chmod +x ./setup.sh
> ./setup.sh
This will configure k8s cluster and setup local registry . Then you can start your flask web server which looks like below :
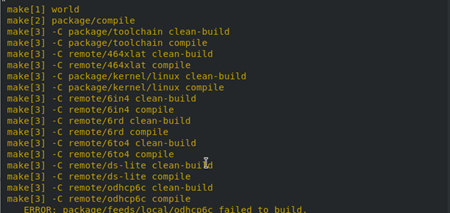
Starting the project required understanding all the process that goes into successfully creating packages and targets from given files and configuration. In order to achieve that, the process I followed was :-
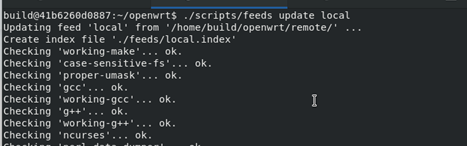
Updating feeds.default.conf to locally stream its feeds from local folder
Running the update and install script for local feed.
Finally creating packages and targets by running make.
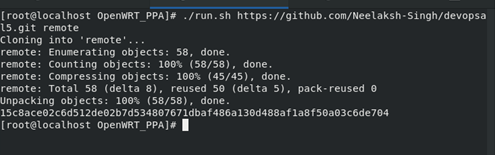
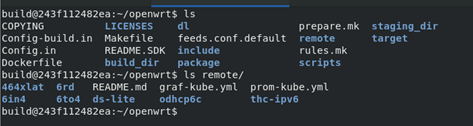
The run.sh script is invoked when the user provides with repo-url (contents of which are cloned and then mounted to local feeds folder on container of neelaksh1/custom-owrtppa )
At present manual run of the above process needs to be done on bash-shell of the running container.
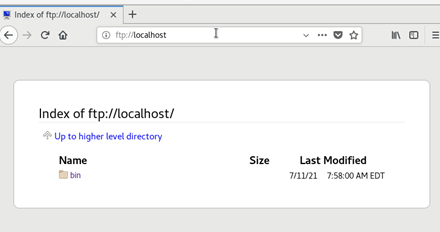
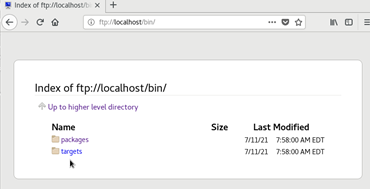
After the packages and targets are generated, we can expose it to the outside world by running ftp server using neelaksh1/custom-ftp .
For that we can use htp.sh script which will be copying the generated bin/ folder and mounting it on the ftp container from the sdk container.
We can access ftp://localhost/ on our browser, which will look like below :-
Final Thoughts
The current project meets half of the promised work. It still is under development. Some of the stuff I would be working on in the upcoming days are :
Improving Front-End
Having provision for incremental builds, wherein the user can change his/her source multiple times for the same running container.
Working on running the SDK scripts automatically without the need for running them manually on the bash-shell
Creating deployment and services for the exposing final build packages and targets for the world.
Repository Link
The work is being updated on OpenWRT_PPA in the dev branch.
I am Avinash Kumar an undergraduate student of Indian Institute of Technology, BHU. As coming from the Tech-Field, I am using lot of open source software in day to day life. That always fascinate me towards open source and always wanted to be the part of open source community. Finally, I got a chance to work with great open source community.
About Retroshare :
RetroShare provides a decentralized, encrypted connection with maximum security between nodes where they can chat, share files, mail, etc. Retroshare uses GXS (Generic eXchange System) that provides Asynchronous distribution, authentication, privacy, security of generic data.
About Retroshare Mobile Project :
RetroShare Mobile is the android app which provides features of RetroShare using retroshare json api. RetroShare Mobile depends upon the retroshare_service app that creates a local environment inside app and provides all the retroshare json api. This project was initiated in GSoC’19 and added some features of RetroShare at that time. Techstack : flutter.
GOALS :
As I mentioned above this app was made in GSoC’19, there are lot of improvements is needed inside the app like :
Upgrading app with new version of flutter
Bundling of retroshare_service app inside the Retroshare Mobile using QT dependencies.
Adding Methode channel which helps to start, stop and restart the retroshare_service apk.
Solving bugs.
Working on state management tool.
Adding forums and circle feature of RetroShare.
The first week of GSoC :
I am working according to the timeline that i proposed in my proposal. I have integrated retroshare service apk inside the Retroshare Mobile using Qt android dependencies and also added Methode channel code that will help to start, restart and stop the retroshare_services from the flutter. Currently, I am working on upgrading the app with newer version of flutter and solving bugs that are available on the app.
The goal of this project is to create a light-weight user-space daemon to enables IEEE 802.11v client handovers between OpenWrt APs.
About me
My name is Valerius Begau and I´m in my second year studying Bachelor of Internet-Technology and Applications at the University of Applied Sciences Nordhausen (Germany). I’m a big fan of open source because I think it’s a quicker and more efficient way to solve a problem. I am very happy to be part of the GSoC 2021 and hope to work together well.
Freifunk Client Steering (ff_steer)
Current Access network lack fast client handovers and roaming. Lately the client handover daemon “usteer” was released and focuses on none-standard client handovers by disassociating client and manage an intra AP communication to enable roaming. More recently the DAWN project uses a decentralized WiFi controller approach to disconnect clients based on RSSI measurements and statistics. Apart from this the IEEE 802.11v amendment is very promising. It allows a better handover of 802.11v enabled clients between APs. Instead of disassociating, the client can be guided to the next AP using a BSS TMR frames.
The procedure
distribute the neighbor hearing map between relevant WiFi APs within a L2 domain
manage client roaming with a new OpenWrt UBUS based interface
validate and evaluate ff_steer with experiments
current status
I must say to my regret that due to many exams at the university I could not finish the project in the prescribed period. However, since I have posted my thoughts and ideas for implementation here, someone who is interested in this is welcome to pursue this further.
You can find my approach to Client Capability Measurement here