This first month on GSoC where totally exciting! Toghether with my mentors we faced a lot of challenges implementing the unit testing for elRepo.io. In the following lines I’m going to describe all the work done!
Milestones acomplished:
– Refactor of retroshare-dart-wrapper to be more testeable and implement null-safety to it.
First steps, obviously, where familiarize myself with elRepo.io stack, the libraries, making my Flutter environment working, compiling elRepo.io for first time… The interaction with my mentors where key for this steps, deciding what libraries to use for testing.
Once I started to develop tests on this branch we realized that, for Dart language, static and top level functions where not easily mockable, my mentors suggest me to do a refactor of the retroshare-wrapper was needed in order to make the tests because we had to mock the API calls.
So we designed a new wrapper, trying to bring compatibility with the other pieces of the elRepo.io. We used Dart http.client as inspiration to create the new RsClient and we implemented it.
This refactor constrained us to upgrade Dart minimum SDK version and migrate all the code to null-safety, which, subsequently, made us to upgrade Dart SDK and migrate to null-safety all the other projects.
On the way, we solved some “Todo’s” on the code and fixed a few bugs. And write some simple tests to check that with the refactor, the API calls can be mocked as we need.
After this big refactor we manually tested the app until everything works properly and it have no more null safety errors.
Finally, I started to write unit tests for elRepo-android, starting from the login screen, and magically, first test passed!
But tests are a whole world and I had to study how to test stuff like the Navigator, how to don’t test platform related tests (which should be tested on the integration tests), I learned how to mock classes using generated code, or how to mock the providers etc…
A lot of interesting stuff! 🤓
Some thoughts
This first phase bring me some conclusions or ideas I would like to share.
The test for the login success history where very difficult to implement for me: a lot of API calls made, with a lot of spaghetti code: a function on elRepo-android call a function on elRepo-lib that call a function on the retroshare-dart-wrapper. All this architecture is needed for the app, but some questions rised:
– If we mock only the API calls, tests are larger and more difficult to implement, but it also tests elrepo-lib and the retroshare-dart-wrapper.
– elRepo-lib is still using top level functions, which are not mockable. To mock elrepo-lib directly could boost our test implementations on the app side, but it need a big refactor, i have to discuss with my menthors if this is prioritary now.
– This difficult-to-test-histories are flags that point where the code could be improved and splitted. This will improve performance, scalability and maintainability.
Now, I’m waiting next meeting with my mentors for instructions to push forward the development.
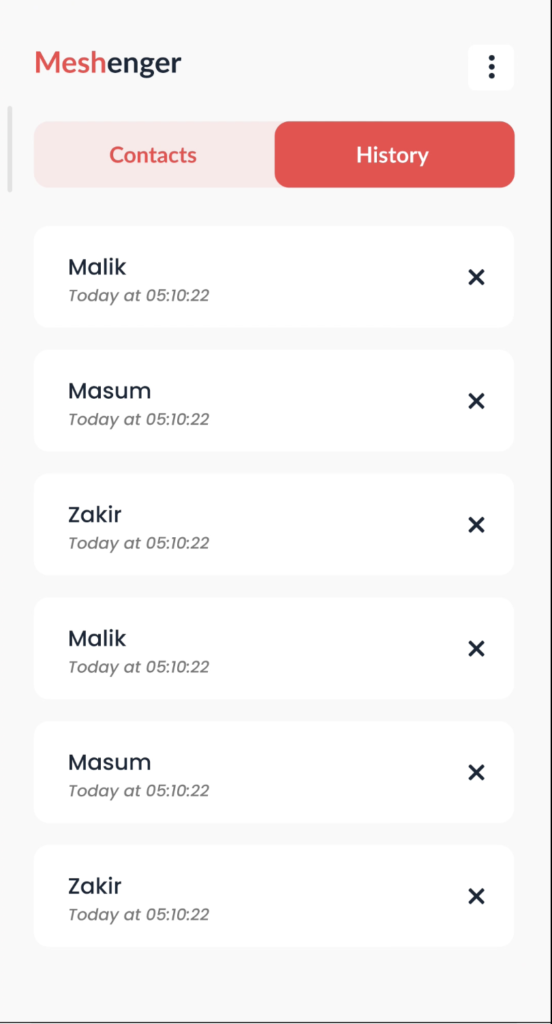
Starting off with the Meshenger app, we have a Master branch with all the features working and a Development branch with added stability and necessary changes but a broken call feature.
The goal of GSoC’22 was to fix the call related issues, convert the codebase to Kotlin, design and implement a new UI and make a new release for the App.
Progress so far:
Working on the first phase of GSoC’22, I started off with reading the required documentations and existing code, understanding the architecture and workflow of the app.
After completing the UI design in Figma, I worked on converting the Master branch and Development branch codes to Kotlin, so we can easily understand how the calling feature work and fix it for the Development branch. I currently try to investigate how the WebRTC library works in the Master branch so I can follow up the same for Development branch to fix the call feature.
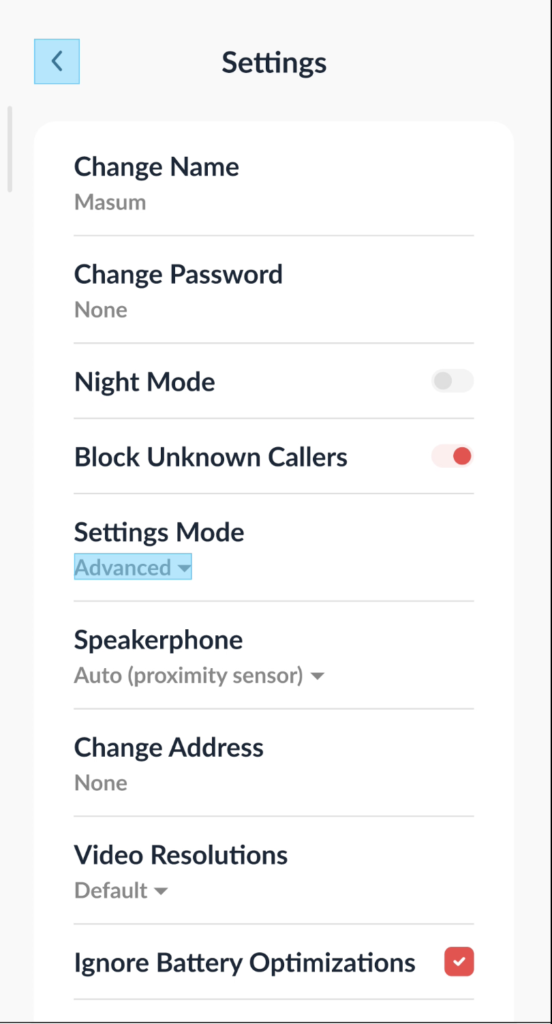
Later on I implemented the New UI in the source code of the Development branch and added a feature so if the user skips the add-a-name option, he’s given a random username.
Then I fixed the app crashes along with the Dark theme.
Currently I am debugging the app to figure out why the calling feature isn’t working.
In the next phase I would be working on fixing the call feature, go for testing and then make a new release on F-Droid and even on the Play Store.
Hi, Jonas here again! The first period is over and thus it’s time for an update about my GSoC’22 project ‘TX-power control in WiFi networks’. In this blogpost I will cover what I have done and achieved so far, some initial testing and evaluations, and what are the next steps for the remaining project time.
(1) Linux kernel structures for TPC
Major objective of the past weeks was to create a foundation for TPC in the Linux kernel. As I already explained in my first blog post, the Linux kernel, i.e. the mac80211 layer, has only rudimentary support for TPC per virtual interface, but not per packet or per MRR stage.
To create this foundation, it is necessary to both modify existing kernel structures and develop new structures for TX-power annotation and related information. Although the project just aims at providing TPC per packet, I decided to be more-or-less future-proof and extend this to TPC per MRR stage. There are several wifi chipsets supporting this already, and there will be more in the future.
Preliminary considerations
A major challenge when trying to implement new extensions in the network stack is the existing sk_buff structure. This structure represents a socket buffer (SKB), meaning anything related to network packets, their control and status information, the data etc. For historical and performance reasons this structure has a fixed size, has fixed-size members and is aligned properly for cache lines. But this makes it pretty hard to introduce any extensions, e.g. new members per packet as this would violate the size-constraints and lead to either a huge performance loss or a not-working network stack. This applies to both the control path and the status path. A solution for this and how this is handled is provided in a).
Another aspect that needs to be considered are the different TPC capabilities of wifi chipsets. They often differ in:
TPC supported? / per packet / per MRR stage
TX-power levels and power step size
Instead of using a ‘smallest common denominator’ solution for all wifi chipsets, which would not make use of the extended capabilities of some chipsets but just a common subset for all, another approach was chosen. To achieve the best coverage of all different capabilities, the structures and annotations for TPC are designed as abstract as possible.
(a) TX-power annotation
To annotate TX-power per packet and per MRR stage, the kernel structure ieee80211_sta_rates is used. This structure was introduced several years ago to overcome the limitations of sk_buff and the fixed-size control buffer for each network packet. In contrast to the control buffer, this structure is not attached to each sk_buff but rather attached to an STA and can be filled by RC algorithm and read in the TX path of a driver asynchronously. Prior to this method, the driver had to call the RC algorithm each time to retrieve the rateset for a packet.
To the internal rate array, which already allows to pass information per MRR stage, a member for the TX-power is added. The data type unsigned 8-bit is large enough at the moment but can be easily widened if necessary.
For backwards compatibility and supporting TPC with probing, a modification of the previously mentioned control buffer per packet is also necessary. Although this does not allow an annotation per MRR stage, it is still required for compatibility reasons as some drivers still do not use the new rate table, and for probing. Probing still uses the information directly embedded into the control buffer instead of the rate table for the first rate entry / MRR stage or applies this information to the whole packet. To support this, a new member for TX-power is added to the control buffer structure:
To support different TX-power levels, ranges and step widths, the TX-power in the mac80211 layer is always specified as an index into a list of TX-power levels. This way, the mac80211 layer and RC algorithms can handle different capabilities in an abstract way, reducing code complexity and keeping possible performance effects to a minimum.
The list of supported TX-power levels is provided by the driver at time of initialization. Instead of populating a dynamically sized list with all possible TX-power levels, which would require space for each level, a driver needs to provide so-called ‘TX-power range descriptors’. A corresponding C implementation of such a descriptor for wireless TX-power was developed:
With this structure, the driver can define several TX-power level ranges by specifiying an starting index, a starting power, the number of levels in this range and a step width. TX-power levels are always specified in 0.25 dBm steps to be able to define fine-grained power levels. Drivers can define several TX-power ranges with each a different step width, ascending or descending power with ascending indices, etc.
A pointer and a length indicator are added to the ieee80211_hw structure which must be filled by a wireless driver before registering a new wifi device in the mac80211 layer. This changes modify what was introduced by one of the commits I mentioned in my first blog post. After some implementation progress we realized, that this is much more optimal than what we initially planned to use, which was in fact a dynamically sized list containing all supported power levels.
(c) Other modifications
Some wifi chipsets do not even allow any kind of TPC, thus it should be avoided to perform calculations and keep statistics for such interfaces. To achieve this two new support flags were added. One of these also needs to be set before registering the wifi hardware to indicate TPC support. These flags are called IEEE80211_HW_SUPPORTS_TPC_PER_PACKET and IEEE80211_HW_SUPPORTS_TPC_PER_MRR. If both flags are not set, the driver and / or the wifi hardware does not allow or support TPC. TPC algorithms then do not need to be initialized or, in case of a joint rate and TX-power variant, the algorithm can deactivate its TX-power part.
Due to the changes that were introduced in with the commits mentioned in my first blog post, the usage of rate_info is preferred over the usage of ieee80211_tx_rate. But most parts of mac80211 and also most drivers still use ieee80211_tx_rate. And there was no utility function for the conversion between ieee80211_tx_rate and rate_info so far. Thus, this implementation provides such an utility function for this purpose, especially as it is required in the TPC implementation in ath9k. It is included in the mac80211 layer und thus available to all parts of the wireless stack, including other drivers.
(2) TPC support in ath9k for Atheros 802.11 a/b/g/n chipsets
To verify the implementation and to provide a first step towards TPC supported by several wireless drivers, the ath9k wireless driver, which is responsible for Atheros 802.11 a/b/g/n AR9xxx chipsets, is extended to make use of the new mac80211 capabilities. TPC support in ath9k was already partially implemented before, but has been disabled up to now.
ath9k has a fairly easy power range. It supports 0 dBm up to 32 dBm in 0.5 dBm steps, thus the power range is linear and the range 0 … 63 can be directly used as indices for TX-power, making it easier to set and read TX-power. This range can be easily described with a single instance of the aforementioned TX-power range descriptor. Overall seen is TPC in ath9k rather easy to implement in the control path.
A bit more challenging was the status path, especially after receiving an ACK for a packet and before the TX status is reported. For performance reasons, this is already done asynchronously. Completed SKBs are filled with information, attached to a queue and then later asynchronously dequeued and processed for TX status report. Due to the already mentioned size limitations in the SKB, TX-power could not be easily reported the same way as rates are. As a workaround, a new structure was created for this purpose but also for future extensions.
struct ath_tx_status_ext {
    u8 tx_power_idx[4];
}
In the status buffer in SKB, the driver can place pointers to internal data for several purposes. Thankfully, ath9k didn’t make use of all these pointers, thus a reference to an instance of this structure can be placed in the SKB and is then available when the TX status report queue is processed. The structure can be extended in the future and has no size limitations.
(3) Setting fixed TX-power with debugfs
Appropriate structures for minstrel_ht and a TPC algorithm have not been yet implemented as this will be part of the following weeks. To be able to already test TPC and to provide a way for setting a fixed TX-power for other purposes, minstrel_ht was modified to already accept a fixed TX-power for all packets set via debugfs. Following the Unix philosophy ‘everything is a file’, debugfs is a simple way for kernel modules to interact with user space applications by providing debug information or accepting parameters. Debugfs can be used like a filesystem, reading from file to get debug information or writing to a file to set e.g. a fixed rate or a fixed TX-power for wireless drivers. Many kernel modules make use of debugfs, e.g. minstrel_ht RC algorithm or the ath9k driver.
The fixed TX-power set via debugfs is written to the rate table of an STA on each update and then used by the wireless driver. minstrel_ht already uses a debugfs-file to support fixed rate setting, thus another file is added to support the same for TX-power.
By writing, e.g., 63 to the file mentioned above, the TX-power will be set to the maximum possible power for ath9k in all packets that retrieve the TX-power from minstrel_ht. Similarly, when writing 0 to the same file, all affected packets will use the least possible TX-power. This may not be the final path of the file, there will likely be a file per STA, not per PHY, and it may be located in a slightly different subdirectory.
(4) First tests and evaluations
Some tests were already performed with an APU board with ath9k wifi chipsets acting as the access point. This is a very basic but rather realistic setup, the clients are not exactly close to the AP, there is one wall and around 3-6 meters distance between. Three clients were then used:
iPhone 11
Xiaomi MiR 4A
Xiaomi Redmi AC1200
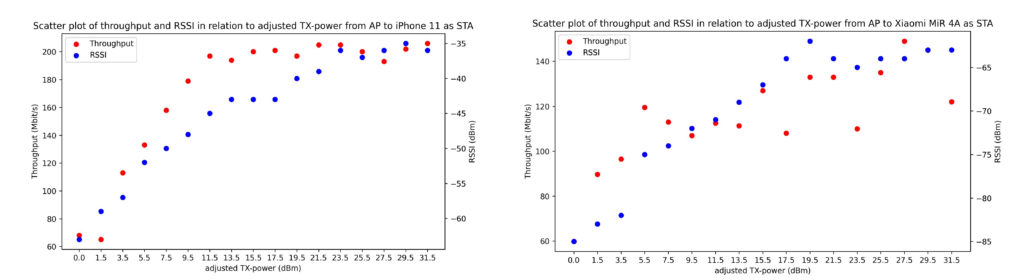
iPerf3 is used to generate traffic and measure throughput depending on the currently set TX-power. tcpdump is used on a monitor interface to measure the RSSI for all captured packets depending on the currently set TX-power. Below you can see two measurement plots of the experiments with iPhone 11 and Xiaomi MiR 4A. For the Redmi the measurement did not lead to any remarkable change in throughput.
Plots of throughput and RSSI in relation to adjusted TX-power from AP to client (left: iPhone 11, right: Xiaomi MiR 4A)
Both plots show an increase in RSSI when the TX-power is increased up to a specific point. Also the throughput usually increases, but this also depends on the actual noise, connection quality and other disturbances. Especially in case of the MiR 4A, the connection was rather bad and the throughput fluctuated more often due to instabilities, etc.
For all clients, it can be seen that after reaching a TX-power index above 45, the measured RSSI won’t increase anymore and just fluctuates due to noise. This is likely because of TX-power regulations, e.g., in Germany and many other countries the maximum TX-power for channel 36 in 5GHz band is limited to 23 dBm which would be a TX-power index of 46. Although a higher index can be set, the actual TX-power is limited by this regulatory. This will later also be included in the TX status to avoid any confusing or incorrect information.
Another observation can be made when the increasing TX-power index still leads to a higher RSSI, but the throughput stays at a level. In fact, this means that further increasing the power has no positive effect, does not lead to more throughput. It just leads to more interference in a network consisting of multiple devices and thus decreasing the overall network performance and “wasting” energy. This of course heavily depends on the capabilities of AP and STA as seen in the tests. The throughput with smaller devices, which have, e.g., less and smaller antennas, decreases much more with decreasing TX-power than with bigger device which have, e.g., more and larger antennas. For the Redmi AC1200, for example, no remarkable decrease in throughput measured could be measured while decreasing the TX-power.
(5) Conclusion and outlook
After this first period, the project achieved some remarkable progress. A mac80211 implementation with appropriate modifications and new structures was developed. By making use of this implementation in ath9k driver and performing some tests with different clients, it can be seen that it works, the TX-power can be adjusted and has an immediate effect. Also the major point of TPC could be observed: TX-power in wifi networks can be decreased for several STA without a remarkable decrease in throughput, but lower overall interference in the whole network and thus higher overall network performance.
For the second period, there are several goals:
optimization of the mac80211 and ath9k implementations
implementing TPC in mt76 driver for Mediatek wifi chipsets
propose changes as patches to the Linux kernel mailing list
testing and validation of TPC
implementation of TPC algorithm
minstrel_ht will be used as the starting point to implement a joint rate and TX-power control algorithm that tries to find the best rate-power combination for an STA. For this, some structures and calculations inside minstrel_ht have to be modified. In addition, setting a fixed TX-power will be possible per STA, in the current state it is only possible to set it per interface. This requires some further adjustments to the debugfs usage inside minstrel_ht.
As the implementation progress goes on, tests and evaluations are becoming more and more important to see whether the implementation performs as expected and which performance and/or stability gains are possible by using TPC in combination with RC. There will be extended tests with appropriate TX-power and signal measurements, also covering overall WiFi network throughput.
The Retroshare Web Interface is being developed as a part of the Google Summer of Code Program. Weekly Meetings with Mentor Cyril Soler and community involvement have led to steady progress of this project. Primary focus is to provide as many features as in the Retroshare QT interface.
Initial Weeks:
Solved some of the previous existing issues with Mail Tab.
Got familiar with the workflow and setup.
It took me some time to be familiar with MITHRIL JS framework for frontend due to limited documentation.
Here are some key developments done in the Web Interface:
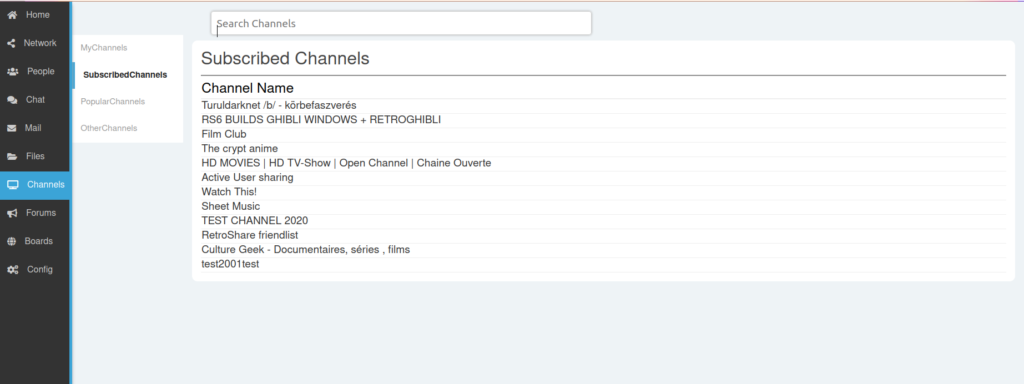
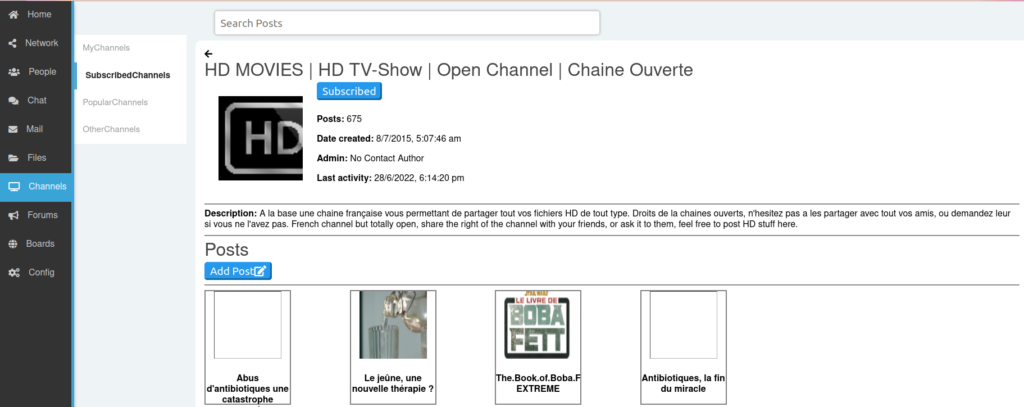
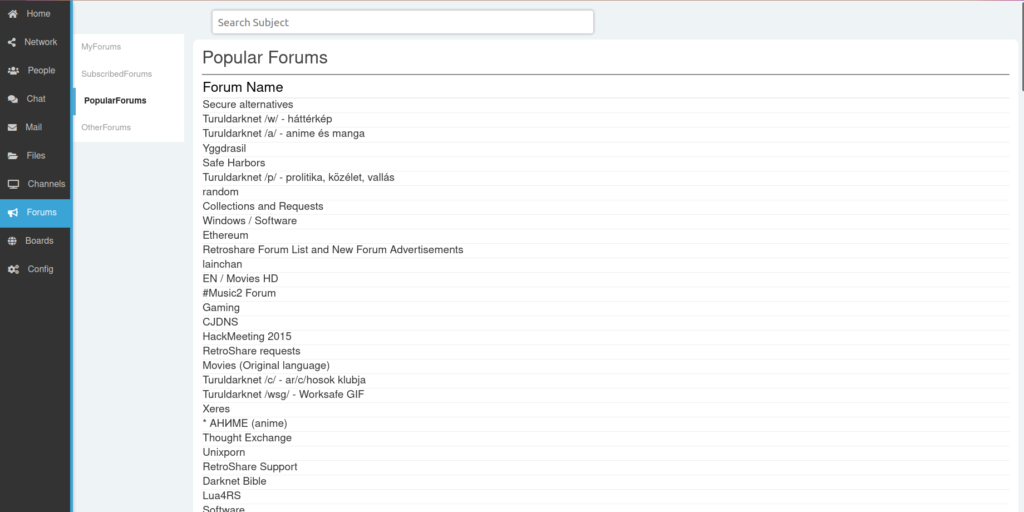
Channel Tab: Navigation for My, Subscribed, Popular channels and Other Channels. Search for any channel is also provided.
Channel Tab
This is Channel View: Here you can view all channel details and the posts and add posts.
Subscribe and Search facility is also provided.
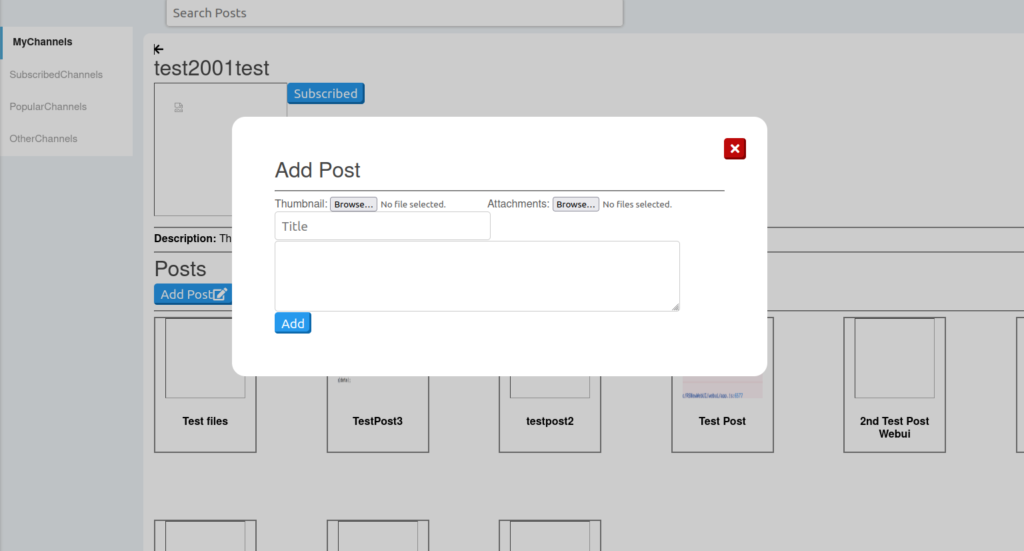
Channel ViewAdd Post with Files.
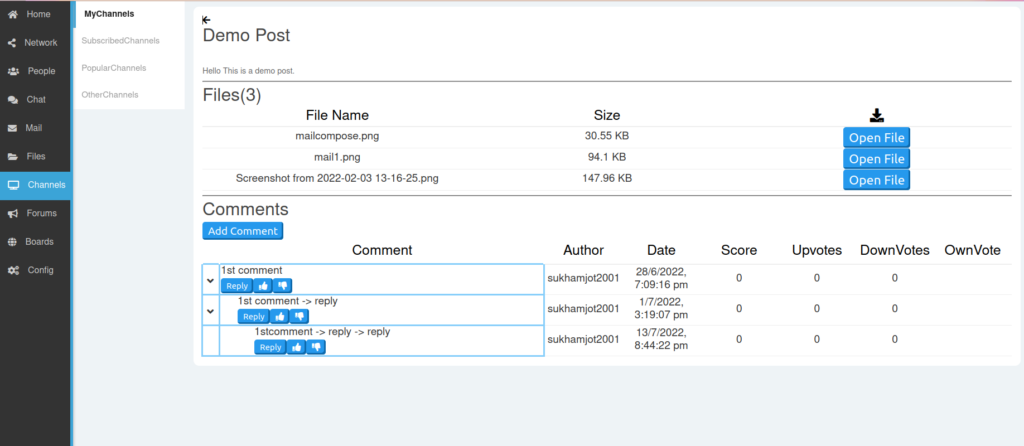
This is Post View:
View/Download all the files. Add/View comments and their replies with all details.
You can upvote/downvote and reply to any comment. The replies are also displayed in a staircase manner.
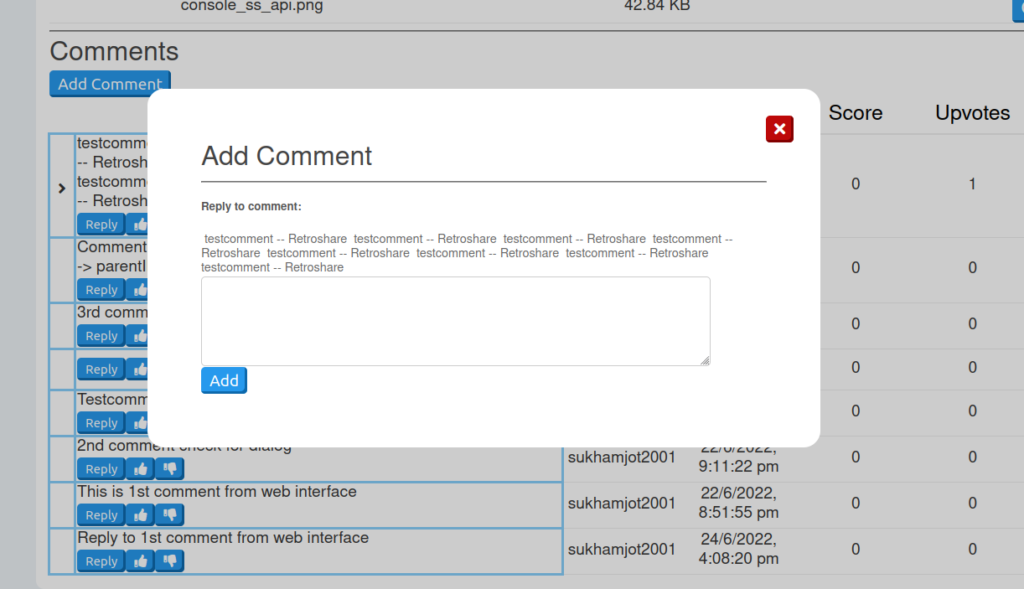
Post ViewAdd Reply/Comment
Forum Tab(Under Progress)
Navigation for Subscribed, Popular and My forums is provided along with Search forums Option.
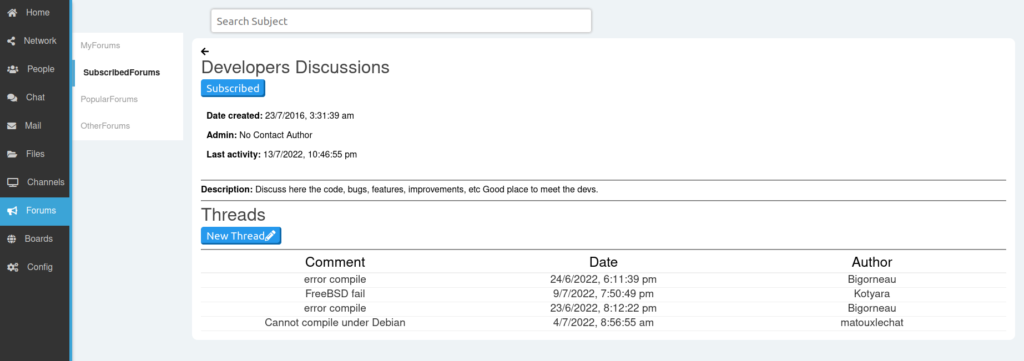
Forum View: View all the details about the forum. Add New Thread and view all the threads.
Subscribe Option is also provided.
Forum View
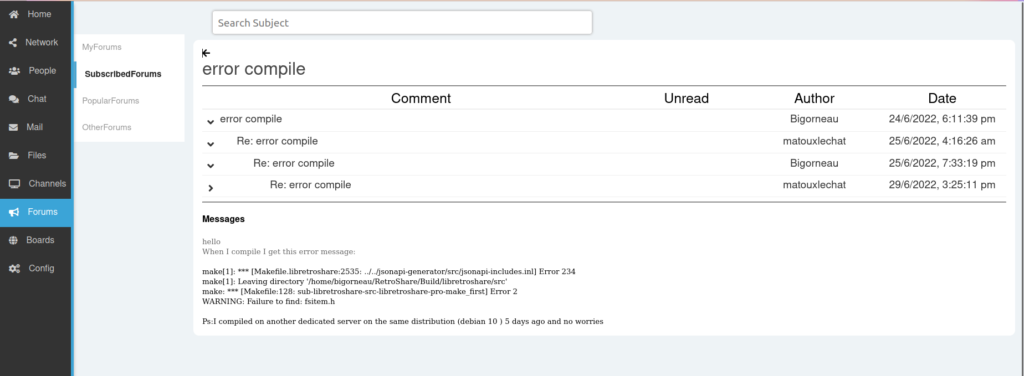
Thread View (under Progress)
Here you can view all the threads and the replies.
Further work (to be done) : Add thread/reply. Mark read/unread facility.
Thread View
Due to the structured, clean code and similar facility the Boards Tab is also being developed by the community member @Defnax based on Channels Tab.
Work to be Done
The second phase of GSOC’22 will see the following developments:
The Forums Tab will be developed primarily in the next phase of the Program.
After Forums, Files Tab will be fixed and some functionalities will be added.
If time permits, focus on Configuration Tab will be necessary to provide facility to change config options from the web interface itself.
Concluding Thoughts:
The mentors and I feel the progress for this project has been steady. The first phase of GSOC’22 has been fruitful and has led me to learn many new things and technologies which I would have never explored on my own. There were obstacles and difficulties in the start but slowly with constant communication and availability of my mentor and the community, the development is now stable.
Hi everyone! As the first evaluation of GSoC ’22 is almost here, I’m writing this blog post to provide a detailed update on the progress of the Minstrel HT WiFi rate control in user space. If you are unfamiliar with WiFi rate control, then you can have a look at my first blog post.
1) Addition of new estimators
WiFi rate controls usually comprise of averaging filter/estimators to update the packet transmission statistics with respect to the newer packet counts in real-time. As such, the Minstrel HT rate control also has an estimator which is currently a variant of the Butterworth Filter.
Butterworth Filter
Previously, the user space Minstrel HT consisted of only the Exponentially Weighted Moving Average (EWMA) filter. However, the current kernel Minstrel HT algorithm has replaced EWMA with a new estimator based on the SuperSmoother (Butterworth) filter developed by John F. Ehlers. As such, the Butterworth filter has now been added to the user space Minstrel HT with the period set to 16.
The image above shows the formula of the Butterworth filter used to calculate the average success probability of a data rate in Minstrel HT. The curr_prob denotes the success probability of a data rate in the current update interval (50 milliseconds) and, for the first success probability data, the new_avg is set to the first success probability as no previous average probability exists.
Exponentially Discounted Averaging and Variance
In addition to the Butterworth filter, an exponentially discounted filter has also been implemented in user space Minstrel HT for research purposes. Consider two data rates with the given statistics, during the last ‘t’ timesteps, as packet counts: rate1 with 4 attempts and 5 successes, and rate2 with 280 attempts and 350 successes. The success probability of both these rates is 80%, however, rate2 seems to be more reliable as it has more observations.
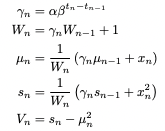
This new filter can discount with respect to the number of observations and also with respect to the time of these observations, using two different discounting parameters: α, β ∈ [0,1]. The formula of the Exp. Discounted filter shown below is for incremental calculation and, at time t0, the following values are initialised to 0: μ0 = s0 = W0 = t0 = 0.
By choosing α and β we can trade-off between emphasizing the number of observations and how recent these observations are. Extreme cases are ignoring the number of observations (α = 1) and also ignoring the time steps (β = 1). Currently, the value of β is set to 1 in the user space Minstrel HT and the value of α is dynamic. The value of alpha depends on the number of observations in the current update interval.
2) Changes to the output
Prior to GSoC ’22, the output of the user space Minstrel HT was a simple printout of the rate statistics dictionary during every update interval which wasn’t easy to read or interpret. The output has now been changed to match the kernel Minstrel HT debug output.
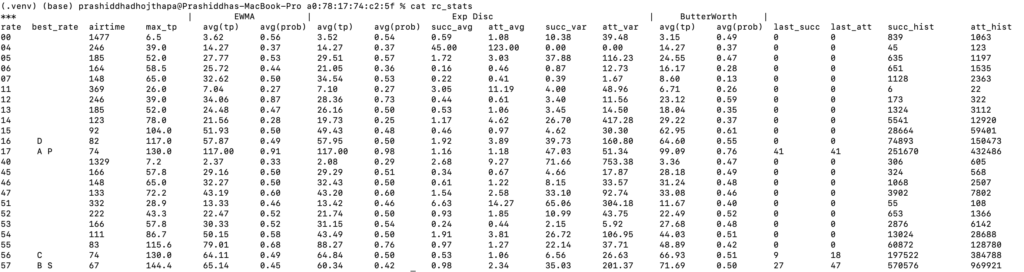
Human Readable Statistics (rc_stats)
The human-readable rate statistics table shows the average success probability and average throughput for each data rate using the three filters implemented in user space Minstrel HT, namely Exponentially Weighted Moving Average (EWMA), Exponentially Discounted filter, and the Butterworth filter.
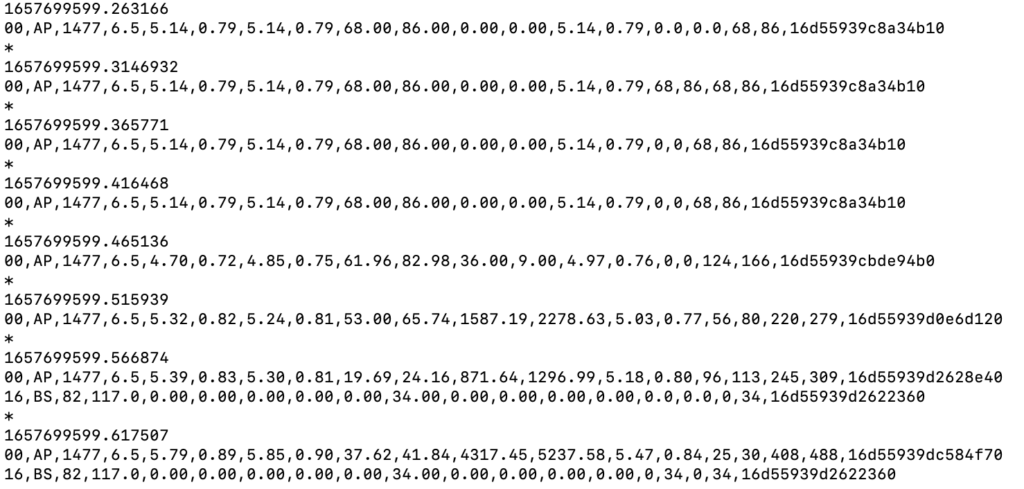
Statistics as CSV file (rc_stats_csv)
Along with the human-readable statistics, at the end of every update interval, the user space Minstrel HT also stores the rate table in a CSV format to the ‘rc_stats_csv’ file. The CSV file can then be used to analyze the performance of different filters and also compare the user space Minstrel HT with its kernel counterpart.
The rate table is separated by the delimiter ‘*’ between each update interval. Furthermore, along with the rate table, the CSV format also consists of a timestamp, at the top, to indicate when the rate table was printed to the CSV file.
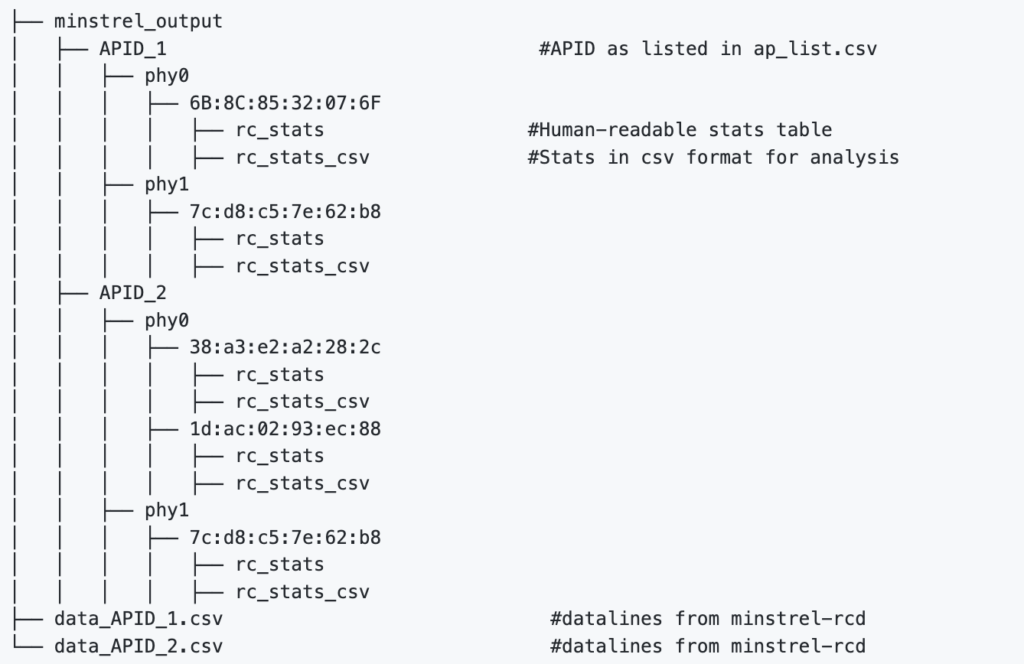
File Structure for the output
By default, the output of Minstrel HT in user space is saved to a “data” folder inside the same directory which contains the Python-WiFi-Manager driver script. Running the manager and Minstrel HT on two access points, for example, would result in the following output structure inside the “data” folder:
3) Compatibility with the updated Python-WiFi-Manager
As described in the first blog post, the user space Minstrel HT relies on the WiFi-Manager to perform rate control functionalities in the user space. At the end of June, the WiFi-Manager package was restructured resulting in Minstrel HT being incompatible with the updated version. As such, the user space Minstrel HT has been reprogrammed for compatibility.
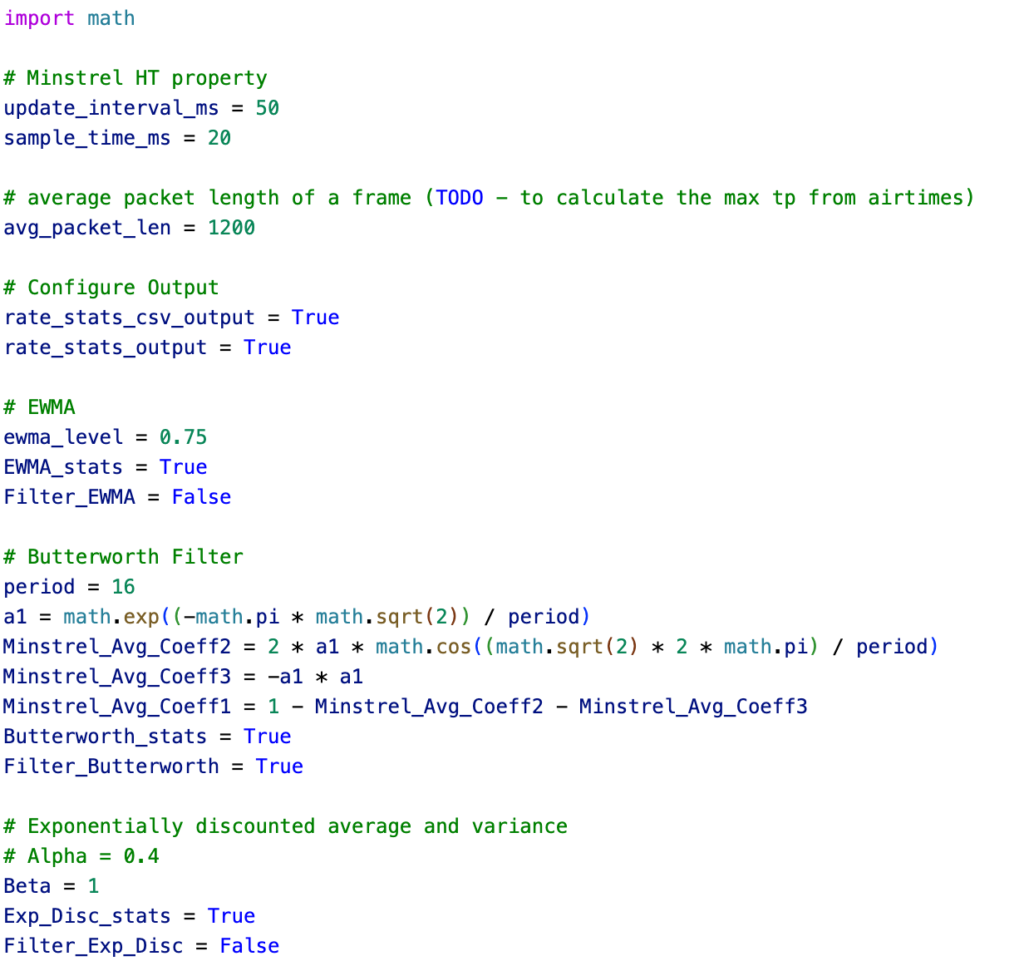
4) Configuration File
The user space Minstrel HT package now consists of a configuration script named ‘config.py’ which can be used to modify the settings of the rate control such as disabling output, changing the property of Minstrel HT, and also the parameters of the different averaging filters.
Additionally, the configuration script lets the user select the filter to use for rate control. The table below describes some of the configuration parameters:
Config Parameter
Description
rate_stats_csv_output
Denotes whether to save rc stats as CSV
rate_stats_output
Denotes whether to save rc stats as human-readable table format
EWMA_stats
Denotes whether to show EWMA stats in rate table output
Butterworth_stats
Denotes whether to show Butterworth Filter stats in rate table output
Exp_Disc_stats
Denotes whether to show Exponentially Discounted Averaging and Variance stats in rate table output
Filter_EWMA
Denotes whether to use EWMA for rate control
Filter_Butterworth
Denotes whether to use Butterworth filter for rate control
Filter_Exp_Disc
Denotes whether to use Exponentially Discounted Averaging and Variance for rate control
Note: Only one of Filter_EWMA, Filter_Butterworth, and Filter_Exp_Disc can be True at once and the user space Minstrel HT will not execute if this constraint is not fulfilled. In the case of this constraint not being fulfilled, user space Minstrel HT will give control to the kernel Minstrel HT.
5) First analysis of the estimators
After the implementation of the two additional filters described in (2), an experiment was conducted for 10 minutes and the rate stats output collected in the CSV file was analyzed using the ‘seaborn’ visualization tool in Python. The goal of the experiment was to compare the estimated throughput of the three filters: Exponentially Weighted Moving Average, Exponentially Discounted, and the Butterworth filter.
Description of the Experiment
The experiment was conducted on a custom Banana Pi router, Mediathek 7622 WiFi chip to be exact. The user space Minstrel HT was run from Macbook Pro 13’ 2020 (base model) using the wireless link. Furthermore, an iperf3 connection was also set up between the Macbook Pro and the custom Banana Pi router for the entirety of the experiment. The experiment yielded rate statistics for a total of 24 data rates.
Results
For conciseness, this sub-section only consists of a few handpicked results from the experiment. The average throughput achieved by each data rate was plotted against time in a line graph, box plot, and scatter plot.
Plots for the analysis of different filters on the four data rate indices: 54, 53, 47, and 14 (starting from top left to bottom right)
Concluding Thoughts
The first phase of GSoC ’22 has been mostly about making the user space Minstrel HT compatible with the updated WiFi-Manager, implementing new filters/estimators, and also making the output more readable and convenient for analysis. Furthermore, the user space Minstrel HT has been added with a configurable script allowing users to customize the rate control to the desired settings. The first phase ended with the first analysis of the estimated throughput using the three different filters: Exponentially Weighted Moving Average (EWMA), Exponentially Discounted, and Butterworth filter.
The second phase of GSoC ’22 will mostly entail research and analysis of the user space Minstrel HT. Along with that, the user space Minstrel HT will be further extended with functionalities from the kernel variant such as calculating the number of retransmission, random sample tables, and reducing the number of spatial streams.
Hello everyone, my name is Irina and I am working in this edition of GSoC 2022 on the project “Try LibreMesh without having a router” with Altermundi. I will start this post by explaining what LibreMesh is, what are some of the obstacles that appeared when we were testing it, some solutions that we did to those problems, the knowledge acquired in community bonding, and what objectives are in the next weeks.
What is LibreMesh?
LibreMesh is a framework for creating OpenWrt-based firmware for wireless mesh nodes. LibreMesh works in a decentralized way and is used as a base for community networks. These mesh networks allow the connected nodes to route each other’s traffic.
Problems when testing LibreMesh
In the first steps, it was necessary to install QEMU, download the LibreRouterOS images and its dependencies,. LibreRouterOS has an automatic configuration to be able to run virtual mesh networks on any computer. Then the LibreMesh test was based on the following steps:
1. Run a node: this has been made without major issues.
However, we discovered a bug when we were running the node: if you want to close the virtual node the network interface isn’t removed from the network configuration of the host. This is because the script that closes it does not eliminate that network interface.
2. Set up a node with internet access: for this it was necessary to install dnsmasq. In this case there were some inconveniences since giving this access required to use a port that was occupied by a dnsmasq process and a systemd-resolve, so it was necessary to free that port by killing those processes. By doing that, the host loses its DNS capabilities so we’re planning to solve this bug by allowing the user to give the node internet access without killing the processes.
3. Set up a cloud of nodes: it was necessary to install ansible and clusterssh.
When running the node cloud, it threw an error because it couldn’t find the location where the image files should be. To solve this, we modified some lines of the qemu_cloud_start.yml script:
rootfs: files/generic-rootfs.tar.gz
ramfs: files/ramfs.bzImage
placing as suffix “./” to each one
rootfs: ./files/generic-rootfs.tar.gz
ramfs: ./files/ramfs.bzImage
also in the same script it was necessary to change the following lines to use the LibreRouterOS Images:
Since ifconfig is not installed in versions later than Ubuntu 18.04, we have to install it through this commands:
sudo apt-get update
sudo apt-get install net-tools
Period Community bonding
During this period I had a first approach to my mentor Germán Ferrero and an accompaniment from my advisor Tomás Assenza, who helped me in understanding and solving the different problems mentioned.
Each meeting has been very effective and useful since I was able to familiarize myself and learn about virtualization. The goals to be met in the following weeks were very clearly set out in the plan to achieve all the goals by the end of the project.
That is why I appreciate the kindness, predisposition, accompaniment, and pleasant help of both of them.
Goals for next weeks
– Explore different virtualization and containerization technologies such as Linux Containers, Docker, Virtual Box.
– Run some node on these tools in order to compare which of them turns out to be easier for such a fact.
Hi everyone! I’m Prashiddha. I have recently graduated from Jacobs University Bremen with a BSc. Computer Science and minors in Robotics and, Global Economics and Management. For the past year, I have been involved in the research and development of open-source software at SupraCoNeX, primarily focusing on facilitating rate control in user space, which will soon be public.
For GSoC’22, I’ll be working on implementing and testing Minstrel HT, the default WiFi rate control for Linux-based OpenWRT OS, in user space. This first blog post intends to cover details on the necessary background to understand the project and its implementation.
What is WiFi Rate Control?
A typical WiFi network consists of at least a sender and a receiver that communicate through the propagation of radio frequencies within the license-free ISM band. The radio waves carry information in binary as an encoding, and the sender devices can choose from several modulation and transmission parameters such as coding rate, bandwidth, and guard interval. The choice of a transmission scheme between the WiFi devices determines the theoretical network throughput or data rate. A metric called the Modulation Coding Scheme (MCS) Index has been defined to help better understand the WiFi data rates and the RF environment of the network. The MCS index is based on the parameters of the transmission schemes mentioned above.
With newer IEEE 802.11 standards such as IEEE 802.11ax, there are hundreds of available MCS rates for transmission. At first glance, it may seem like maximum data transmission could be easily attained using only those rates which yield the highest theoretical throughput. However, the modulations which achieve high data rates only work best when the link between the WiFi devices is robust. Furthermore, compared to wired-based communication, the wireless communication channel demonstrates higher dynamics and is prone to interference, especially if multiple wireless devices share the medium uncoordinated. As such, the performance of WiFi networks is far from optimal, and there have been significant efforts to develop WiFi rate control algorithms that dynamically adapt transmission data rates in response to the varying wireless channel conditions.
Motivation
In Linux-based OpenWRT WiFi devices, the mac80211 subsystem in the kernel space is responsible for rate control. This includes the implementation of rate control algorithms like the Minstrel HT in the kernel space. The kernel space provides full access to the device’s hardware and memory. Development of modules is hence subject to the risk of complete system failure due to bugs or failure in particular modules and submodules. Additionally, development in kernel space is restricted to the use of integer value operations. Due to the instability and risk involved in accessing the floating-point unit, floating-point operations are avoided in kernel space. Lastly, capabilities for prototyping and debugging required research and development are highly restricted in this space.
Given the limitations and lack of ease of development in kernel space, the need for a user space rate control algorithm is apparent. With this, my GSoC’22 project will focus on implementing a user space variant of Minstrel HT with experiments designed to compare the performance with its kernel space counterpart.
Deliverables of the project
The end goals of my GSoC ’22 projects are as follows:
Software Architecture of the user space Minstrel HT implementation in Python.
Proper Documentation and Guide on working with the Minstrel HT package.
Ready to run demo script to showcase the potential of user space Minstrel HT.
Detailed analysis of WiFi rate control experiments for performance comparison between kernel and user space Minstrel HT.
What’s been already done?
Prior to GSoC ’22, I had already been heavily involved in the implementation of Python-WiFi-Manager, which acts as an intermediary to provide necessary information and functionalities for WiFi rate control in user space. The WiFi-Manager package is still under development and will soon be released as an open-source OpenWRT package. Furthermore, as a part of my bachelor thesis, I’ve already implemented a working version of the user space Minstrel HT in Python using WiFi-Manager.
Since the rate control algorithm in user space needs to be designed such that it can work on multiple access points simultaneously, initially, multiple experiments were conducted to evaluate various methods of parallelizing rate control from the WiFi-Manager, namely async task, thread pool, and process pool. The results have indicated async task to be the best scheme for parallelizing rate control from WiFi-Manager.
With this, the user space Minstrel HT in Python has been developed to be executed as an async task and the first results seem to indicate towards a comparable performance with its kernel counterpart. However, the first experiments were far from foolproof and require better-designed experiments to yield a concrete result.
What’s next?
The user space Minstrel HT is not complete and still requires implementation of additional features in order to be identical to the kernel Minstrel HT in terms of functionality.
Changing the output of user space Minstrel HT to a live printout of the rate statistics table.
Adding option to store the output in a CSV file to aid in comparison with the kernel Minstrel HT.
Extending user space Minstrel HT with functionalities from the kernel variant such as calculating the number of retransmission, random sample table, and reducing the number of spatial streams.
Adding a new estimator called Butterworth Filter which is currently used by the kernel Minstrel HT.
Modifying user space Minstrel HT to accommodate for various WiFi rate control experiments if needed.
Concluding Thoughts
With the start of GSoC ’22 coding period, I’ll begin with modifying the output of user space Minstrel HT to the printout of live rate statistics along with the option to save it in a CSV file, identical to the kernel Minstrel HT. This will be followed by extending the user space Minstrel HT with the remaining functionalities from the kernel variant. In the end, the project will mainly focus on experimentations for performance analysis of Minstrel HT in user space.
With this, I’d like to conclude the first blog on the user space Minstrel HT GSoC ’22 project with freifunk. Please feel free to reach out and connect with me. 🙂
I’m Qijia Zheng, my major is Cyberspace Security, a graduate student now studying in University of Science and Technology of China.
About me
My name is Qijia Zheng. Recently, I have conducted research in the field of wireless sensing. It is a interdisciplinary subject of wireless communication and computer vision(deep learning). Now I come to Freifunk to learn the knowledge of wifi to gain a deeper understanding of wifi communication. Also, I was attracted by the concepts of P2P and ad-hoc when I began to learn computer network. I am glad to see and be a part of such a community who brings them to reality, not just on the Internet.
About the project
Why XDP/eBPF?
eBPF can be seen as a way to bypass most kernel stacks like network stack, I/O stack and etc. Using eBPF to get information in kernel could bring less overhead and run customized programs. Also, existing eBPF projects like BCC, bpftrace provide a higher-level framework to write eBPF code, which make life easier.
What I have done?
With my mentors’ advises, I got my hands dirty with the project from a survey.
After surveying tens of wifi analysis projects, I got a list of wifi statistics and created a repo to record the survey.
I evaluated XDP and BCC on my x86 laptop equipped with AX200 NIC, but I encountered lots of barriers when implementing it.(see next section for detailed)
In addition to do a survey of some open source projects, I checked some papers about Rate adaption for mac802.11 wireless networks. The statistics of wifi traffic for transmission rate control could be classified into three groups ACK, SNR and BER, specifically they are packet loss ratio, transmission time, frame receptions, SNR, bit errors and etc.
As I got nothing from mac80211 based on AX200, I focused on collecting statistics from higher layers which basically provided by BCC and XDP project.
Official XDP repo provides a xdp_loader program. By leveraging xdp_loader, I succeded to load my XDP program on my wireless adapter to get the receiving bytes per second and other basic statistics of ethernet frames.
About MAC80211 subsystem
For some reasons, I just test XDP programs on AX200 NIC.
Obviously, we don’t have native XDP support for the driver of AX200.
I put my attention on generic XDP. After runing XDP-TCPDUMP tool provided by XDP-PROJECT repo, I got a “.pcap” file containing packets of wireless traffic captured by the tool. And the payload recorded in the file are all from struct xdp_md *ctx. However, the packets show nothing about IEEE80211 header even the wireless NIC working at monitor mode, which probably means AX200 NIC removed IEEE80211 header before XDP staff getting involved. As a result, we will not get any information about mac80211 header by implementing generic XDP on AX200.
Also, I tried bare tracing tool like kprobe, function graph to trace functions of mac80211 like ieee80211_xmit. Unluckily, I still got no output in TRACE file. That is to say, running eBPF programs attaching to kprobe to on AX200 is infeasible. But we still have some tracepoints of cfg80211.
Next step
Switch AX200 to Atheros series to evaluate XDP on ath9k driver to unlock the potential of eBPF attaching to dynamic tracing
Keep surveying papers related to transmission rate control topic
Select proper machine learning algorithm to implement features and measure the model based on Precision, Recall and F1 score
Goals of the project
By leveraging the statistics collected using eBPF, we could create a fingerprint for STAs to identify different types of devices.
Implementing a dedicated use case that demonstrates the benefits of eBPF/XDP.
Providing the foundation for further research in the direction of network research.
Finally
I would like to thank my mentors for offering the helps for me till now.
I’m Vijay. In this summer I will be working on the project ‘Videoodyssee System Refactoring’.In this first blog post I would like about my project and little bit about me.
About me
I’m Vijay Reddy , a Computer Science undergrad from India. I’m interested in Web application security, Computer Architecture and Blockchain Security. I do play CTF’s in my free time to learn about the latest security vulnerabilities and to learn new skills.
I’m new to the open source world and I found it really fascinating to work with communities around the world which are making the world a better place.I’m also fascinated by the idea of writing code which will be used by thousands of people around the world .Open source contributions will allow me to work with new people and make connections with cool people around the world which will be helpful for my career.
About Videoodyssee
In 2017 we started our video portal for freifunk at media.freifunk.net. To get videos online we have a more or less complicated upload workflow:
Upload video file to a processing server.
Correct video file settings.
Convert video to target formats.
upload to CDN and Youtube.
Publish the video to the media portal.
The following systems are involved:
Videoodyssee Uploader – a web portal to upload video files built with Spring Boot, Thymeleaf, CSS, JS, Ansible, and Maven
Videoodyssee – the processing server, built with bash scripts and python
lambdacd pipeline – controls the workflow, built with Clojure, Leiningen, and LambdaCD
voctoweb – the media portal, built with Ruby, HTML, CSS, JS and puma
As of now, it is possible to upload new videos, but the process is not comfortable. So we need to improve the software.
Problems with the current Videoodyssee System:
With current lambdacd pipeline we can’t have multiple workers to enable parallel video processing.
The current lambdacd pipeline isn’t maintainable anymore and it has got a lot of dependency issues.
Currently we don’t have any video verification steps in our publishing workflow which leads to publishing of unwanted videos.
Currently there isn’t any feedback mechanism implemented in the front-end part so whenever a user uploads a video using Videoodyssee uploader, the user will not get any feedback on whether the video is uploaded , processed and published or not.
Project Milestones
Reimplement the video processing pipeline using a better and maintainable CI/CD tool which supports multiple workers for parallel processing:
Replace lambdacd pipeline with a better-maintained work flow system.
Update the processing pipeline scripts to make them work with the newest versions of tools like FFmpeg.
Reimplement the video processing pipeline with those updated pipeline scripts using the new CI/CD tool.
Add publishing workflow to prevent the publishing of unwanted videos.
Implement video processing feedback mechanism in the Videoodyssee uploader so that the user will get notified when each step of the video processing pipeline is finished.
Community Bonding Period:
In the community Bonding Period I have familiarised myself with my mentor Andi Bräu and discussed a lot about the project.
In this 3-week community bonding period , I evaluated different CI/CD tools with my mentor to find out a perfect CI/CD tool that fits best for our video processing pipeline and found out that GoCD and Jenkins will be perfect for our usage.
In the first week of the coding period, I will implement a sample pipeline using both of these tools to evaluate the performance and convenience of these tools , then I’ll choose one for implementing our video processing pipeline.
And finally , I would like to thank my mentor Andi Bräu for his incredible support and feedback.
My name is Andrea and I am participating implementing elRepo.io unit testing project for GSoC 2022 edition!
I just finished a full stack developer bootcamp, and I’m now inmersed on the never-ending world of opensource programming! I would like to participate acitvely with communities that build this world to learn a lot, have fun, and get involved on a big opensource project!
I feel really lucky to have been selected and start coding as soon as I can!
What is ElRepo.io?
ElRepo.io is an Android app that combines the RetroShare JSON API with a Flutter frontend aimed to share content into the RetroShare F2F network. Actually elRepo.io is on alpha stage and need a series of features implementation and unit testing to improve the both developers and users experience and scalability of the project. With the help of my mentors I expect to implement desired features and unit testing, learning how Flutter works together with a first landing into RetroShare decentralized world.
And, how I will do that?
Before all, I did a series of crash courses about Dart and Flutter, just to don’t get stuck on the first days!
On this first period the objective is to code a set of unit tests for elRepo.io, but, according with my mentors, additional jobs may be necessary done:
– Library refactoring to make them more testable
– Null safety migration to bring compatibility with new versions
– Bug fixing and other todo’s fixing
Together with my mentors and their recommendations, I will check how to fix and go forward to the objective… So, let’s start coding!