Hello! This week the my project for Google Summer of Code 2024 ends, and this blog post is a final report of everything that I have done toward its goal. (Report 1) (Report 2)
During this project, I had the opportunity to attend and organize multiple events to present LibreMesh to a new public.
In August, I was invited in an open-source radio program called “radio source”, on Radio Source. During this, I had one hour to talk about and explain LibreMesh to a huge public. Being on the wave was an incredible experience where I could explain the usefulness of mesh networking, and how LibreMesh and Pirania solve many issues encountered by a community interested in setting up this kind of network. The recording of this session (in French) is available here: https://libremesh.org/news.html#2023_09_06_libremesh_on_the_waves.
The following Saturday and Sunday, I held a workshop at the Caldarium in Brussels (https://caldarium.be/en:start), where people brought their unused routers, flashed them and we built a mesh network together. Multiple people came because they heard about it from the radio event. We spent two days flashing various routers and setting them up around as far as they could in the Caldarium’s huge space, to setup a community mesh network, which is still up and being worked on.
I also organized, recorded and uploaded a QnA session which many senior members of LibreMesh attended, on how to start development on LibreMesh. This video is useful to developers as a supplement to the “development” page on the LibreMesh website. Having the opportunity to understand the project in a deeper way, and organizing these were to me the highlight of this GSoC project. The recording of this session is available on Guifi-net/eXO’s Peertube https://media.exo.cat/w/4o9xgZ65so6d5i1vmVd35z.
To finish this blog post, I will address the main goal of GSoC. During the many hours I spent understanding more and more the codebase, I didn’t manage to write functional code, only snippets that weren’t able to be integrated in the main LibreMesh code. Many of these hurdles were documented in the half-point update I made in July. As a result, I don’t have complete code to show off as a result of this project, but this GitHub repository contains code that works as an example of structure and commands that will hopefully be useful for the future of this module, and of ideas that have been shared and thought over in the mailing list.
My presence during this project started many more discussions on the topic in the mailing list and meetings, and I hope that this subject has been broadened and explored again for another go at this implementation!
I would like to thank everyone in the LibreMesh project for your time and your patient explanations, and especially Ilario for mentoring me during it, and for your sage advice. I would also like to thank Andi Bräu for managing the Freifunk role in this project, and allowing this project to happen. A gigantic thank you to everyone who reviewed this document and code on a short notice towards the end of GSoC!
If you have any questions please reach out to me at panouillot.mael@lesoiseaux.io.
Hi everyone! Welcome back to the final blog post in this series on Throughput-based Dynamic WiFi Power Control for Real Networks. In the introductory blog, I provided an overview of our project’s goal and methodologies. In the mid-term blog, we introduced the foundational elements of the power control algorithm, integrated it with Python WiFi Manager, and evaluated its early performance.
As we reach the culmination of this journey, I will summarize the latest developments, share insights from our data analysis, and discuss the probable next steps for future advancement.
1. Goal of the Power Controller
The main objective of this power controller is to achieve power adaption for Commercial Off-The-Shelf (COTS) hardware, where we lack full access to detailed feedback information.
In any setup or system where we have an estimate of the expected throughput and a mechanism to adjust power settings, this power controller can be implemented to optimize performance. Its primary focus is on real-world scenarios, making it adaptable for various use cases where full system control is unavailable.
2. Development of Power Control Algorithm
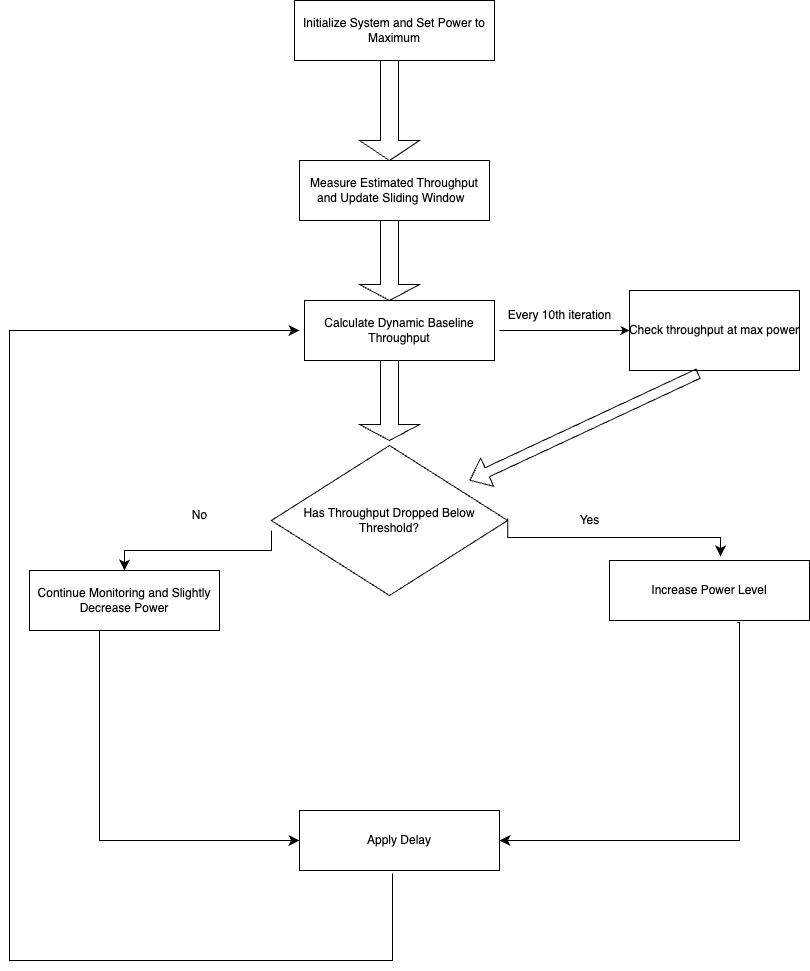
In this phase, we focused on refining the power control algorithm to dynamically adjust transmission power levels based on throughput measurements. Here’s a breakdown of the key steps and logic incorporated into the algorithm:
Supported Power Levels: Each router or station has a list of supported power levels. This list is provided by the Python-WiFi-Manager, which serves as a critical component in our algorithm.
Initial Assumption: We start with the assumption that the highest power level will yield the highest throughput. This serves as our baseline for evaluating other power settings.
Algorithm Initialization: The algorithm begins by setting the transmission power to the highest level available. We then measure the expected throughput at this power level.
Power Decrement: After measuring the expected throughput, we decrement the power level by one and take another measurement.
Throughput Comparison: We assume a certain threshold that the throughputs at lower power can be below (for example 10% of) the previous throughput. If the expected throughput at the decreased power level falls below this threshold, we revert to the higher power level. This threshold ensures that the power is only decreased if the performance impact is minimal.
Continued Decrease: If the throughput remains within an acceptable range, we continue to decrease the power level, repeating the measurement and comparison process.
Iterative Process: This process is repeated iteratively, adjusting the power level based on throughput measurements until we reach the lowest supported power level.
Periodic Maximum Power Check: Every 10th iteration, we re-evaluate the throughput at the maximum power level for a brief 60 ms. This ensures that the throughput at the current optimal power level, monitored for around 140 ms, remains within the threshold of the throughput measured at maximum power. Since we only stay at the maximum power for 60 ms, this approach minimizes the time spent at higher power levels, avoiding unnecessary power consumption.
Adjust Based on Maximum Power Check: If the throughput at the optimal power level is still within the threshold of the maximum power throughput, we continue with our usual power adjustment process, either decreasing or maintaining the lowest power level.
Fallback Strategy: If the throughput at the optimal power level falls below 90% of the throughput measured at the maximum power level (i.e., deviates by more than 10%), we restart the process using the second-highest power level to reassess and potentially find a better balance. All thresholds, including the deviation percentage and comparison intervals, are fully configurable.
This algorithm ensures a dynamic and adaptive approach to power control, optimizing network performance by continuously evaluating and adjusting based on real-time throughput data.
3. Determination of Expected Throughput
To effectively implement the power control algorithm, determining the expected throughput was crucial. Here’s how we enhanced the Python-WiFi-Manager to facilitate this:
Extension of Python-WiFi-Manager: Extension of Python-WiFi-Manager: We extended the Python-WiFi-Manager package to include functionality for estimated throughput, which is derived from the Kernel Minstrel HT rate control algorithm. Minstrel HT maintains a rate table with expected throughput based on success probabilities for each transmission rate. The estimated throughput, obtained via Netlink, is calculated using the best rate (i.e., the expected throughput of the first rate in the MRR stage) determined by Minstrel HT. The reporting of estimated throughput from both the Python-WiFi-Manager package and Netlink is consistent and identical. By integrating this information, the Python-WiFi-Manager can now monitor and utilize these throughput estimates to optimize power control decisions in real-time.
Extracting Optimal Rate: From the ‘best_rates’ lines provided by the Python-WiFi-Manager, we extracted the transmission rate that corresponds to the highest estimated throughput. This rate is a key indicator of potential performance at different power levels.
Average Throughput Measurement: Using the optimal rate identified, we then referenced the ‘stats’ lines to extract the field for average throughput. This measurement represents the expected throughput at the given transmission rate and is essential for evaluating the effectiveness of different power settings.
Integration into the Station Class: The extracted average throughput was integrated into the Station class of the Python-WiFi-Manager. We introduced a new property, ‘expected_throughput,’ to store this value. This property became a fundamental component of the power control algorithm, allowing real-time adjustments based on the estimated throughput.
By extending the Python-WiFi-Manager in this manner, we were able to leverage real-time throughput estimates effectively. This enhancement played a critical role in the development of our dynamic power control algorithm, enabling precise adjustments to optimize network performance.
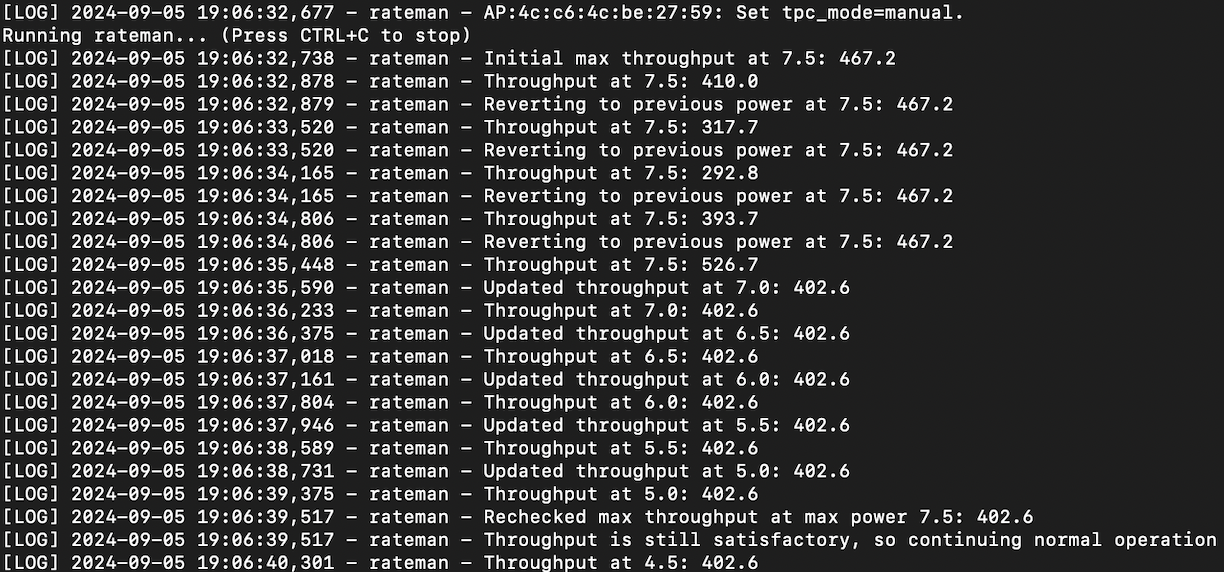
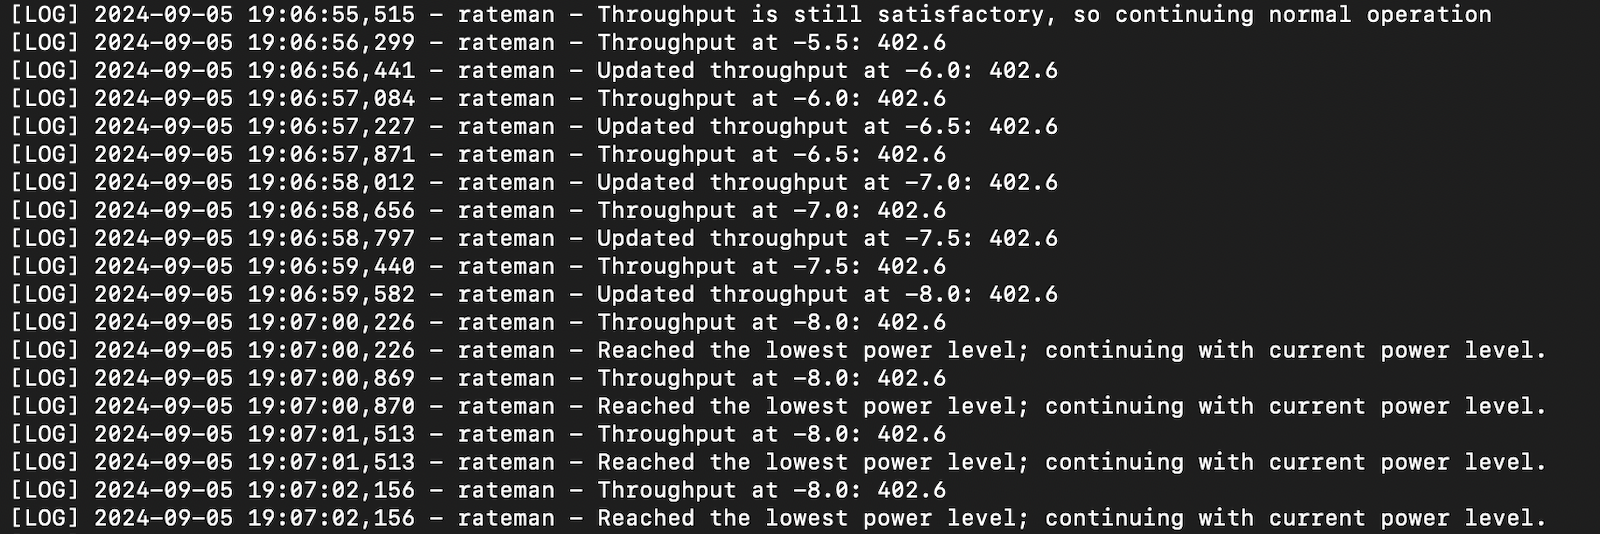
4. Results from logging in the Power Controller
Log Overview: The power controller logs capture a range of data points, including power levels, throughput measurements, and timestamps. These logs are crucial for understanding how the algorithm adjusts power settings in response to throughput changes.
Key Data Points:
Power Level Adjustments: Logs show each instance where the power level was adjusted, including the previous and new power levels.
Throughput Measurements: Recorded throughput values at different power levels provide a basis for evaluating the effectiveness of power adjustments.
Threshold Comparisons: Instances where the throughput fell below or met the predefined thresholds are noted, offering insight into the algorithm’s decision-making process.
3. Log Sample: Here’s a snapshot of the logs
5. Experimental Setup and Configuration
a. Access Point and Station Configuration
For the experiments, two Redmi Routers with MT768 chips were used, where one acted as the access point (AP) and the other as the station (STA). Both devices utilized IEEE 802.11ac(WiFi-5) capable.
AP Configuration:
The AP was configured to operate on the 5 GHz band using channel 149 with a maximum channel width of 80 MHz (VHT80).
The 2.4 GHz band on the AP was disabled, focusing the experiment on the 5 GHz band for better throughput.
STA Configuration:
The STA was connected to the AP on the 5 GHz band, operating on the same channel (149).
This setup ensured a controlled and consistent network environment for the experiments, particularly focusing on high-speed, 5 GHz communications between the devices.
b. Traffic Generation
Traffic was generated using iperf3, a tool widely used for network performance measurement. This allowed for the creation of a consistent and controlled load on the network, essential for evaluating the performance of the power control algorithm.
c. Throughput Calculation
Throughput was calculated using packet capture (pcap) files generated during the experiments. The process involved the following steps:
Capture Data: During the experiments, network traffic was captured using tcpdump to generate pcap format to record detailed packet-level information.
Convert to CSV: The pcap files were then converted into CSV format. This conversion facilitates easier analysis and manipulation of the data for calculating throughput.
Data Analysis: The CSV files were analyzed to extract throughput metrics. This involved processing the data to determine the rate of successful data transmission between the Access Point (AP) and Station (STA).
This method allowed for precise measurement and post-experiment analysis of network performance.
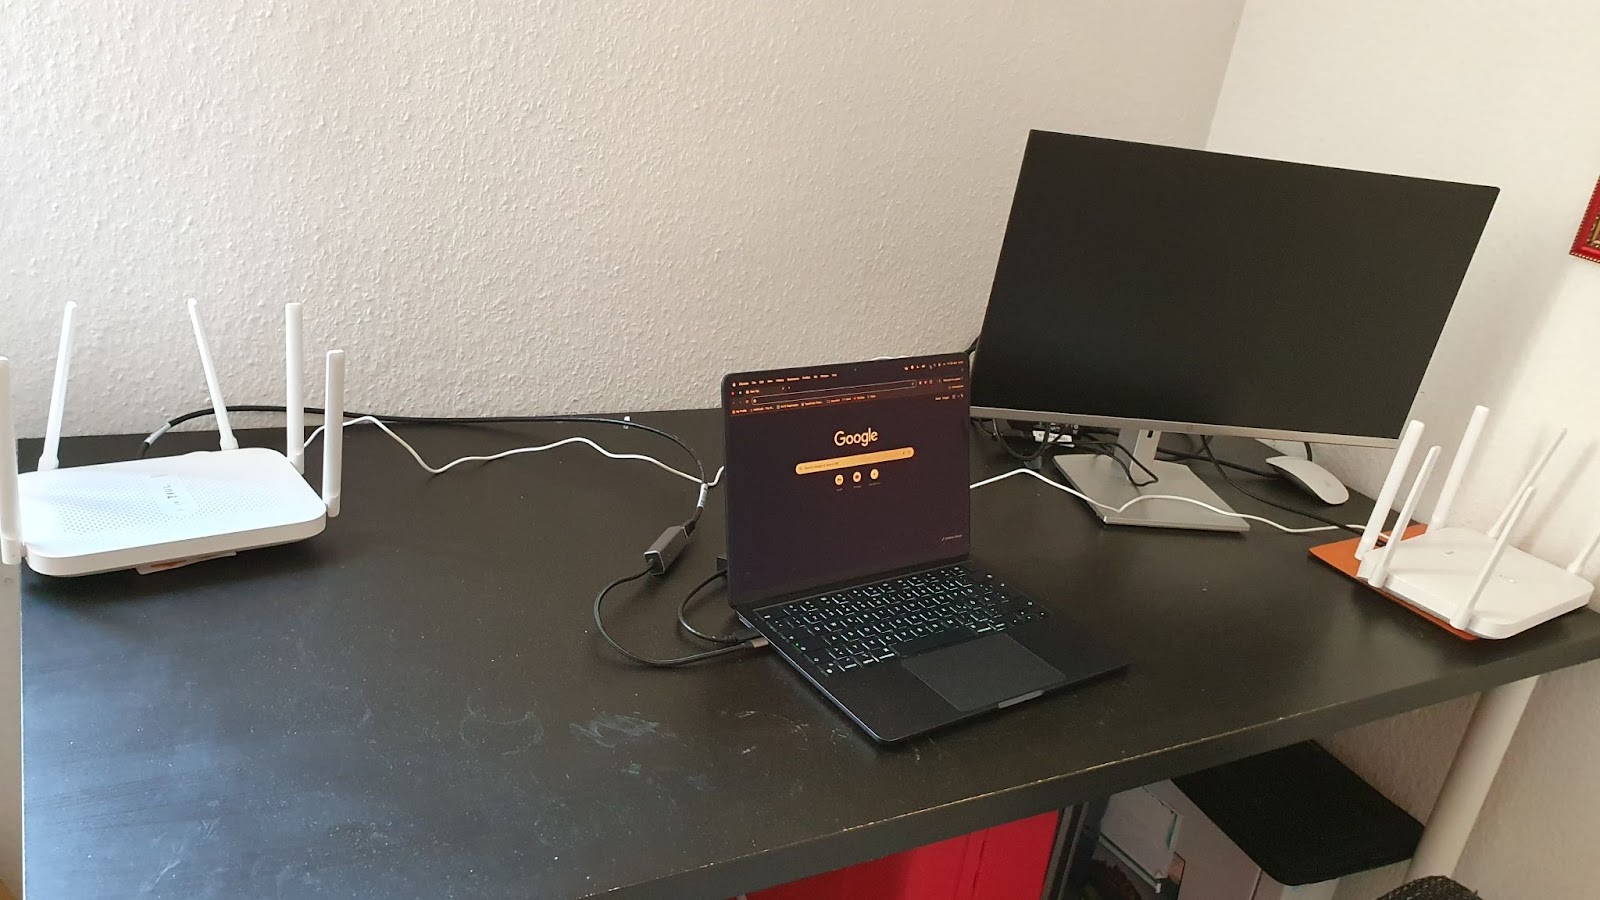
d. Network Topology
In the close proximity experiments, the AP and STA were placed on the same table, approximately 2 meters apart, with no physical barriers between them. For the challenging conditions, the routers were positioned in different rooms or floors, with a distance of around 10 meters between them.
Fig. Experimental Setupin Close Proximity
6. Experimental Results
To evaluate the performance of our power control algorithm, the Experimentation Python package from SupraCoNex was utilized. This package facilitated a series of experiments conducted under various conditions to assess the algorithm’s effectiveness. Here’s a summary of the experimental approach and the results:
Experimental Setup: Multiple experiments were conducted to test the power control algorithm in both close proximity and challenging conditions, allowing us to observe its performance across varied network environments.
Data Extraction: From the experiments, we extracted key data related to rate-time, power-time, and throughput-time relationships. These data points are crucial for understanding how power adjustments impact throughput and rate over time.
Data Visualization: The extracted data was then plotted to visualize the relationships:
Ratevs. Time Plot: Shows how the transmission rate varies over time with different power levels.
Power vs. Time Plot: Illustrates the power levels used during the experiments and how they change over time.
Throughput vs. Time Plot: Displays the throughput variations over time, highlighting the performance of the algorithm in maintaining optimal throughput.
Analysis: By analyzing these plots, we were able to gain insights into how well the power control algorithm adapts to changing conditions and maintains network performance. The visualizations provided a clear picture of the algorithm’s effectiveness in real-time adjustments.
To evaluate the effectiveness of our power control algorithm, we compared it against several established methods. Here’s a brief overview of the algorithms used in the experiments:
1. Kernel Minstrel HT:
This algorithm focuses on selecting transmission rates based on observed performance metrics to optimize network performance. It employs a Multi-Rate Retry (MRR) strategy with four stages: the highest throughput rate (max_tp1), the second highest throughput rate(max_tp2), the third highest throughput rate (max_tp3), and the rate with the maximum success probability (max_prob_rate). If a rate at a given stage fails, the algorithm moves to the next stage in the sequence, ensuring continued performance optimization by using the next best available rate. This approach balances high throughput with reliable performance, adapting to varying network conditions.
2. Manual MRR Setter:
This method involves using a fixed, slower rate for all transmissions. By consistently using the slowest rate, this approach helps to understand the impact of rate adjustments and provides a reference point for evaluating dynamic control strategies. It provides a clear reference point for evaluating dynamic control strategies, helping to distinctly separate and identify the performance boundaries of different algorithms.
3. Our Power Controller:
Objective: The newly developed power control algorithm dynamically adjusts transmission power levels based on throughput measurements. It aims to optimize power settings to maintain high throughput while optimizing power and minimizing interference.
Mechanism: The algorithm starts with the highest power level, measures throughput, and progressively decreases power levels. It continuously checks throughput against predefined thresholds and adjusts power accordingly to maintain optimal performance.
A. Experiment in Close Proximity
With these algorithms set for comparison, the first set of experiments was conducted with the routers placed close to each other. The routers were positioned on the same table, approximately two meters apart with no barriers in between. This setup provided a controlled environment to accurately measure and compare the performance of each algorithm.
Observation: From the figure we can observe that if the connection is strong, the power controller can significantly reduce the power and still deliver high throughput.
B. Experiments under Challenging Conditions
Following the initial experiments with routers in close proximity, we conducted a second series of tests to evaluate the performance of the algorithms under more challenging conditions. For this phase, the routers were placed in different rooms and on different floors, approximately 10 meters apart. This setup was designed to simulate a more realistic scenario with increased distance, barriers and potential interference.
Unlike the close-proximity experiments where power levels were dynamically adjusted, in the more distant setup, the power levels did not drastically reduce at all times. Instead, the natural tendency observed was for the power to stabilize at a lower level.
The power controller effectively managed to adjust the power levels, but the adjustments were more subtle compared to the previous tests. This is indicative of the controller’s ability to adapt to the increased distance and interference by settling at a lower, but stable, power level that still maintained acceptable throughput.
7. Possible Enhancements in the Future
While the current implementation of the power controller has demonstrated promising results, there are several immediate next steps to further enhance its performance and adaptability:
Throughput Estimation Improvement: Study how well estimated throughput for optimal and highest power levels are isolated to provide better throughput estimates. This refinement could lead to more accurate power control decisions.
Complex Scenario Testing: Test the controller in more complex scenarios involving other devices operating on the same channel. This will provide insights into how the controller performs in real-world conditions with multiple network elements.
Interference Management: Conduct interference management tests with multiple access points (APs) and stations (STAs), all running the power controller. This will evaluate the system’s effectiveness in managing interference and maintaining performance in crowded environments.
In addition to these immediate enhancements, future developments could explore more advanced options such as leveraging machine learning for predictive adjustments, utilizing historical data for better adaptability, implementing time-of-day adjustments for optimized power settings, and adapting to environmental factors for improved robustness.
Conclusion
I’ve had an incredible experience being part of GSoC 2024. This opportunity has allowed me to delve into new areas, including working with Python for the first time and developing plotting scripts. I am truly grateful for the chance to contribute to this project and learn so much along the way. A big thank you to the mentors who provided invaluable support and guidance throughout the journey.
Hello! As the Google Summer of Code ends, so this project will end too. Below you find what i’ve been working on this summer. You can check Part I here and Part II here.
Recapitulating
The main goal of this project is to migrate Pirania captive’s portal rules from iptables to nftables, which is the new framework for packet processing in Linux. Pirania is intended to be a portal captive, so when a users connects to a wi-fi network they are prompted to insert a voucher or redirected to a web site of the community, for example.
A captive portal can be used by a community network as a tool to ensure the sustainability of the local network’s operation.
What was needed
When enabled, a captive portal needs to allow/block packets in order to work properly. Pirania does it by inspecting the origin MAC Address. Furthermore, IP packets need to be allowed in order to access local network services.
These rules are created by captive-portal script, which uses iptables, ebtables, ipset and uci in order to configure the rules properly. With the newer framework for packet processing only nftables and uci needs to be used since nftables understands layer 2 protocols and have ipsets functionality embedded and faster.
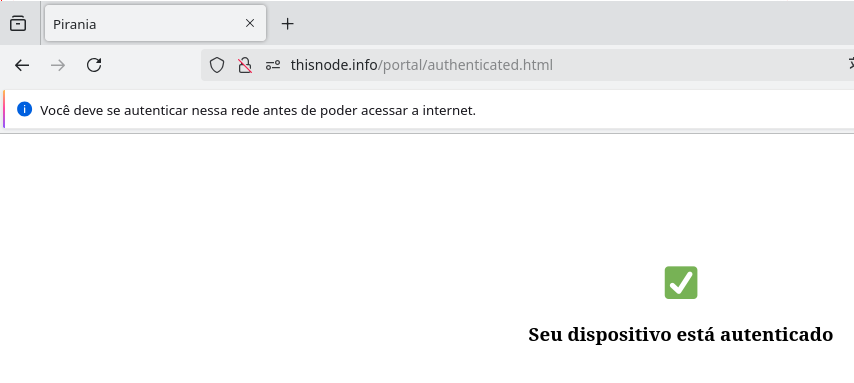
Also is here where lives the function pirania_authorized_macs which is responsible for returning the registered MAC addresses, that is, those that can access the Internet. This MAC can be registered via the command line by calling the captive-portal binary or via the web interface, where the user will enter the voucher.
After entering a valid voucher this is the page that will appear to the user:
Steps needed:
1 – translate the script to use nftables framework.
2 – test.
For testing there is the possibility to use in a virtual environment with qemu (more info here). I spent a considerable time trying to allow internet access in a virtualized environment but i opted to use in a real hardware. The chosen hardware was a rocket m5 from the manufacturer ubiquiti. The firmware precompiled was downloaded here.
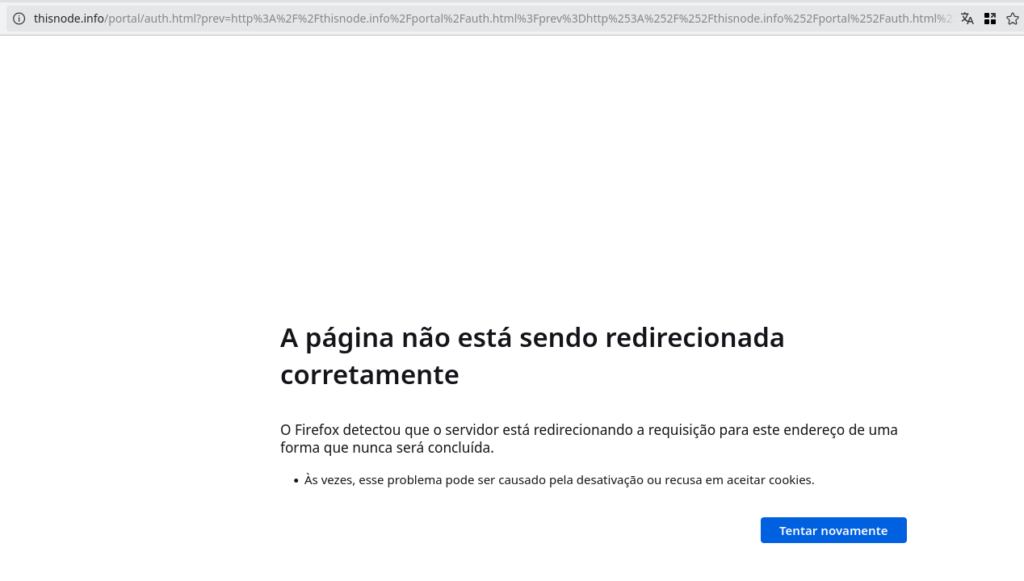
While testing the new script, i was haunted by a redirection loop. After a few modifications i was able to overcome this issue.
One of the biggest challenges was learning the new nftables framework. Fortunately, I found many examples and tutorials on the internet and I started to enjoy it. It took me a while to get used to this technology and I’m still learning. The results of my work can be found here.
The new version of LibreMesh will probably be released this year so I’ll have more work to do.
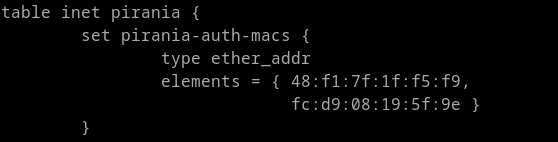
After a voucher is activated, the set pirania-auth-macs is populated, as shown above:
If a voucher is in use, its possible to list:
What i found beyond
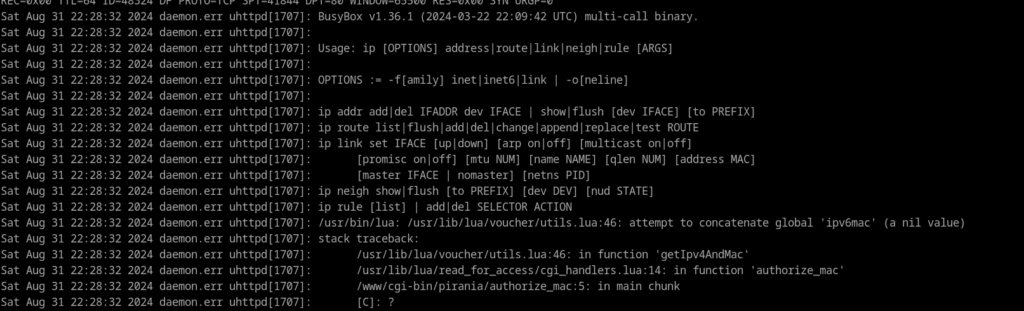
Found that some packages were missing:
Also that in utils.lua the command invocation “ip neighbor” was not working but “ip n” or “ip neigh” worked perfectly.
Next steps
Pirania and shared state are awesome packages developed by LibreMesh community. Porting these packages to OpenWRT will bring more visibility and people to contribute.
Follow the development of the new version of LibreMesh and see if there is anything that can be improved.
Conclusions
Being able to contribute to this project is something that makes me very happy. In 2015, I was looking for a relevant topic for my final project at university and I met passionate people at an event called Fumaça Data Springs, where I was able to meet some of the developers and get my hands dirty on routers with this incredible software called LibreMesh.
I would like to thank my mentors Ilario and Hiure for the opportunity to participate in GSoC 2024 and for the knowledge they shared.
I would also like to thank Andi and Freifunk for their commitment to making projects like this happen.
This concludes my project at GSoC, but if you have any questions, please feel free to contact me.
This post is the final post in the continuation of this blog series. In part 2, I discussed the theory behind Qaul BLE support for Linux and a walkthrough for creating a BLE GATT server, advertisement of services, and scanning of devices advertising qaul services. We also discussed the theory of message transfer through BLE GATT characteristics. Please refer to that blog before proceeding.
In this blog, we will explore the implementation and low-level design of the BLE support in greater depth.
Correction in the previous Blog
In the previous blog, while creating the GATT server, we defined two services:- “main_service” and “msg_service” with their respective characteristics. The issue here is, that multiple services lead to longer advertisement messages that are only supported by extended advertisements. So, for compatibility, we are using only “main_service“, which encapsulates both characteristics:- “mainChar“, and “msgChar” for normal advertisements. Rest all things are same.
Introduction
We will begin by configuring services and characteristics of the qaul device to send libqaul messages to other devices and spawn a new thread for receiving messages from all nearby devices. For byte-loss transfer, we are enclosing our data inside delimiters “$$” and then breaking it into byte arrays. On the spawned message listener, we receive messages from all nearby qaul devices and separate the messages into a map of type <qaul_id, message>. The message starts at “$$” and ends when ending “$$” is encountered. The message is then sent to libqaul for decoding.
Message receiver
The message is received by “msgChar” when some other device overwrites the value of this characteristic. While configuring msgChar, we created a msg_charcteristic_ctrl which emits an event, CharacteristicControlEvent::Write(write), io_write by characteristic. On accepting the write request into read_buffer which is then sent to ble_message_sender for further processing of bytes. Ble_message_reciever receives the byteArray in the set of 20 and maintains a map of qaul_id v/s message received till now. As soon as ending $$ is encountered, the message is sent to libqaul.
The whole above architecture works by spawning two new threads, one for receiving data from other devices and the other for manipulation of received bytes, for loss-less transfer of bytes.
Message Sender
On discovering a nearby qaul device emitting the same main_service and read_char as any qaul device, the libqaul starts to send routing messages at regular intervals for other devices to get updated on routing tables. All other public or personal messages are also transmitted similarly.
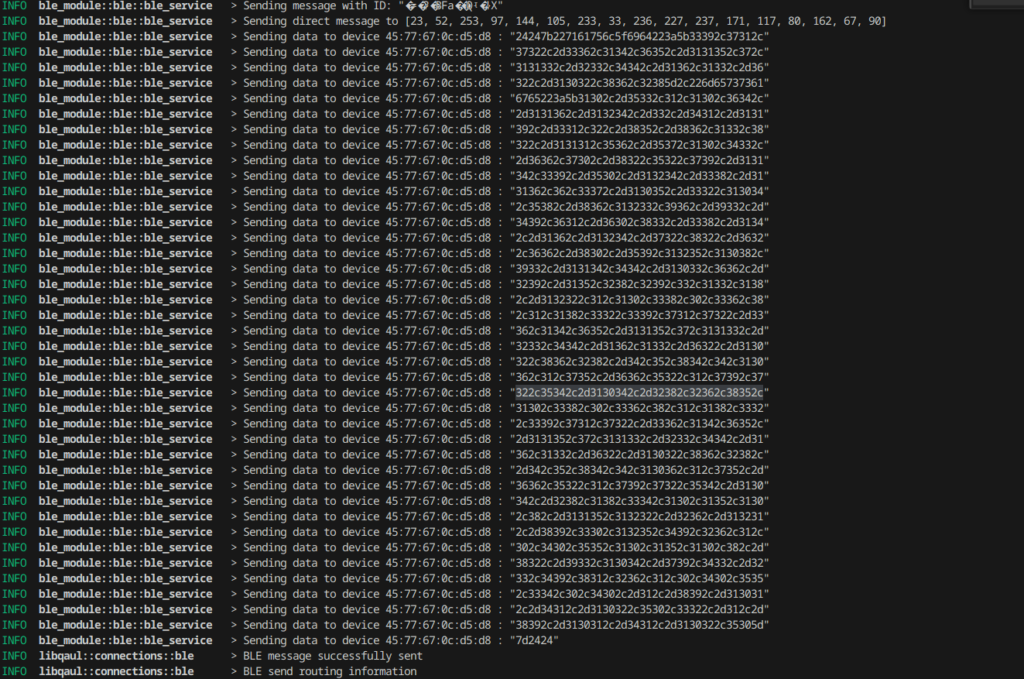
On receiving a “DirectSend” request from libqaul, ble_module adds delimiters(“$$”) to the start and end of the message. Then it breaks the message into arrays of 20 or fewer bytes each and pushes each into a queue. The Gatt client then connects to the specified server and tries to io_write the message into the value of the characteristic of the server which will eventually trigger the Write event of characteristic_ctrl.
Also, while writing data to another device, the GATT client also updates its list for last_found_time for out_of_range_checker.
Result :
We were successful in creating a reliable connection between Android 33+ and Linux devices with nearby device discovery and message transfer using ble_module.
Device discovered by Android ble_module.
Device discovered by Linux ble_module.
Messages are Successfully sent and received by both devices.
Images for BLE Message from Android to Linux
Message sent by Android.
Message received by Linux.
Images for BLE Message from Linux to Android
Message sent by Linux.
Message received by Android.
Limitations:
The above implementation works well for any Linux device with Bluetooth Adapter version >= 5.0 and Android SDK version >= 33. The absence of any of the above conditions would lead to the loss of some random bytes from the message leading to the failure of this protocol.
Conclusion
The implementation of the Bluetooth Low Energy module using Bluez is limited in extensibility and reliability, especially within the planned architecture. The instability of Linux Bluetooth can cause message loss if conditions aren’t met, indicating a need for further optimization of the BLE module and the underlying protocol to enhance robustness and reliability.
While working on the Qaul project and implementing the ble module, I learned a lot about peer-to-peer communication, routing, and Bluetooth in general.
I would like to express my sincere gratitude to my mentors, Mathias Jud and Breno, for allowing me to participate in GSoC 2024 and for their invaluable guidance throughout this project. I am also grateful to Andi and all the Freifunk members involved with GSoC for making this project possible.
This marks the end of my GSoC’2024 project, but as I mentioned earlier, there is still work to be done. If you have any questions, please feel free to reach out. I hope you found this project as rewarding and enjoyable as I did!
With the GSoC 2024 edition coming to an end, I want to share the final report of my project, which I have been working on for the past few months. My project involved the development of a GUI wizard to simplify the initial OpenWrt configuration. The main objective was to create an intuitive and easy-to-use tool that allows users, regardless of their technical level, to configure their OpenWrt router quickly and safely. This report details the achievements, challenges, and current status of the project, as well as the next steps that could be taken to improve the tool.
Project Objectives
1. Develop an Intuitive User Interface
Create a GUI that is easy to use, regardless of user knowledge, to guide users through the initial configuration steps.
Add the basic settings needed to get an OpenWrt device up and running, such as administrator security, Internet connection, wireless configuration, and activation of additional services.
3. Optimize for Diverse Devices and Usage Scenarios
Ensure that the GUI works efficiently on a wide range of OpenWrt-compatible devices.
Technical Development and Implementation
1. UI Design and Architecture
The interface was designed with usability and accessibility in mind. The UI was designed with a modular approach, allowing for future expansion and customization with relative ease.
Key UI Elements:
Step-by-Step Navigation: Each step of the setup process is presented in a linear sequence, allowing users to move forward and back as needed.
Real-Time Validations: Validations have been implemented to ensure that entered data, such as passwords and network settings, meet required security standards and formats.
Responsive Design: The interface adapts to different screen sizes, which is crucial for devices with user interfaces of various sizes, from small routers to tablets or remote access devices.
2. Implemented Configuration Features
a) Administrator Security:
Password Setting: A field has been included for the user to define the administrator password during the first configuration. To improve security, the interface requires the password to be at least 10 characters long, including uppercase and lowercase letters, numbers, and symbols.
Dynamic Validation: As the user types the password, password strength indicators are displayed, providing instant feedback on its security.
b) Internet Connection Configuration:
Connection Type Selection: The interface allows you to select between several connection types: DHCP, Static IP, and PPPoE.
Dynamic Fields: Depending on the connection type selected, different fields are displayed. For example, for a static IP connection, the IP, subnet mask, gateway, and DNS servers are requested, while for PPPoE, the username and password provided by the ISP are required.
Auto-Detection: A feature for automatic detection of the connection type, based on the WAN port response, has been implemented, helping less experienced users to select the correct option without needing to know the technical details.
c) Wireless Network (Wi-Fi) Settings:
SSID and Password: Users can define the Wi-Fi network name (SSID) and set a strong password for the network. Similar to the administrator password, the Wi-Fi password must meet certain security criteria.
Encryption Types: The option to select the network encryption type has been included, with recommendations to use WPA3, the most secure standard currently available. WPA2 support is also provided for older devices.
Mesh Networking Configuration: The option to configure mesh networks has been integrated, allowing users to expand their wireless network coverage using multiple OpenWrt devices.
d) Additional Services:
VPN: The option to activate a VPN server is offered, providing secure access to the network from remote locations. Basic configuration guides have been included for OpenVPN and WireGuard, the two most commonly used protocols in OpenWrt.
DHCP Server: Users can enable or disable the DHCP server on their network, and configure the range of IP addresses to be assigned.
Next Steps
Multilingual Support: Expand language support to make the wizard accessible to a broader audience globally.
Advanced Settings: Include more options for advanced users, such as custom firewall, and more details in VPN configuration.
Documentation and Support: Create more detailed documentation and user guides, including video tutorials, to help new users get familiar with the wizard and OpenWrt capabilities.
Challenges and Lessons Learned
Balancing Simplicity and Functionality
One of the key challenges was to design an interface that was simple enough for beginner users, but at the same time offered advanced options for more experienced users, so basic settings were implemented with advanced options accessible in additional sections.
Improving User Experience
Throughout development, I learned the importance of constant feedback from third parties such as mentors or outsiders who were essential in adjusting and improving the interface, ensuring it met community expectations.
Conclusion
Working on this project as part of GSoC 2024 has been an incredibly rewarding experience.
I want to thank my mentors for all their help and guidance. I also want to thank the GSoC team for providing me with this opportunity for growth and learning.
Hello again everybody! With GSoC 2024 coming to an end, it is time to present you my final blog post/report for my project, showing you what I have achieved during the summer.
Project Goal
This project aims to introduce a new firewall software offloading variant to OpenWrt by intercepting an incoming data packet from the NIC as early as possible inside or even before the network stack through the eBPF XDP or TC hook. After that, the packet might be mangled (e.g., NAT) and redirected to another network interface or dropped.
The result should be that we see a performance increase, either by having a higher throughput, dropping packets faster, or lowering the overall CPU load.
More detailed descriptions of this project can be found in my first blog post here and my midterm update here.
What I did
To achieve the goals of this project, I had to design and implement three parts of the software:
The eBPF program which intercepts, mangles, and forwards or drops incoming data packets
A user-space program that attaches the eBPF program, reads Firewall rules, and makes routing decisions for the received packets
An eBPF hashmap for the communication between the eBPF- and user-space program
Finally, a performance evaluation is required to compare the results of this eBPF implementation against OpenWrt’s current Firewall.
When the eBPF kernel-space program receives a packet, it parses the layer 2, 3, and 4 packet headers, and if a DSA switch receives the packet, it also parses the DSA tag. If any header is unknown in the respective layer, it passes the packet to the network stack. The following headers/DSA tags are currently supported:
Layer 2
Layer 3
Layer 4
DSA Tags
Ethernet 802.1Q VLAN PPPoE
IPv4 IPv6
TCP UDP
mtk gswip qca
It then checks inside the eBPF hashmap what to do with the received packet:
If there is no entry yet for the packet/flow, it creates a new one to signal the user-space program.
If there is an entry but the eBPF program should not redirect the packet, the packet is passed to the network stack or dropped.
If there is an entry and the eBPF program should redirect the packet, it …
Mangles the packet by applying NAT (if applicable) and adjusting the TTL and checksums
Pushes the Ethernet header and possible additional L2 header onto the packet
Sends the packet out of the designated network interface
User-space program
When the user starts the binary, it attaches the eBPF program to the lowest possible network interfaces on the system or to all network interfaces given by the user per command line argument.
It then loops every n seconds through the flow entries of the eBPF hashmap and checks via nf_conntrack whether a connection tracking exists for that flow.
If so, and if the flow entry is new, it …
Retrieves possible NAT information via nf_conntrack
Makes the routing decision
Checks if the eBPF program needs to push layer 2 headers
Determines the next hop via rtnetlink
Saves all that information inside the eBPF map to signal the eBPF program that it can take over now
For all existing flow entries, it updates the nf_conntrack timeouts as long as an established connection tracking entry exists
If a connection tracking entry does not exist, it checks Firewall rules via OpenWrt’s scripting language ucode if the eBPF program should drop the packet.
When a configurable flow timeout occurs, the user-space program deletes the flow entry from the eBPF map.
What is left to do
Submitting an XDP generic patch
Currently, for XDP generic, if the pre-allocated SKB does not have a packet headroom of 256 Bytes, it gets expanded, which involves copy operations consuming so many CPU cycles that the hoped-for performance gain is negated. I have already created a patch that makes the XDP generic packet headroom configurable, but I still need to submit it to upstream Linux.
Routing changes
When there is a new flow entry, the user-space program makes a routing decision and stores the result inside the eBPF map. But it could be possible that such a route changes now, e.g. because the user explicitly changed it or a network interface went down. The user-space program doesn’t react yet to routing changes, which means that the eBPF program still forwards packets to the old routing destination.
Counter updates
As soon as the eBPF program starts forwarding packets, network interface and nf_conntrack counters aren’t updated anymore. Updating the interface counters shouldn’t be a problem, but in my testing, nf_conntrack counter updates seem to get ignored from user-space.
Performance results
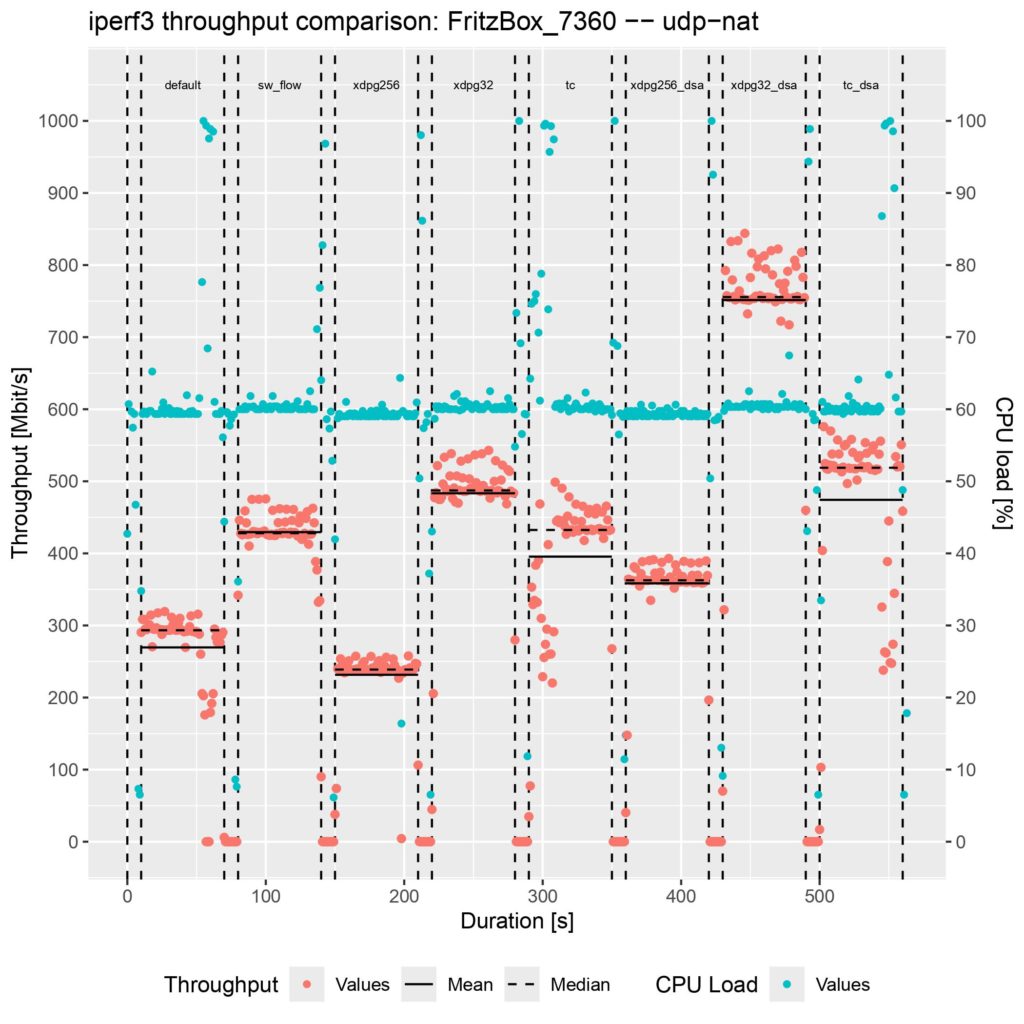
Similar to my first blog post, I tested the throughput performance on an AVM FRITZ!Box 7360 v2 running OpenWrt with Linux Kernel version 6.6.41, which CPU is too weak to saturate its Gigabit ports. I used iperf3 to generate IPv6 UDP traffic for 60 seconds where NAT is applied for the source and destination IPs and ports; you can find the results inside the following plot:
The parts are the following:
default: OpenWrt’s Firewall running but without any offloading enabled
xdpg256: The eBPF program attached to the XDP generic hook with the default package headroom of 256 Bytes
xdpg32: The eBPF program attached to the XDP generic hook with a custom package headroom set to 32 Bytes
tc: The eBPF program attached to the TC hook
xdpg32_dsa: The eBPF program attached to the XDP generic hook of the DSA switch with a custom package headroom set to 32 Bytes
tc_dsa: The eBPF program attached to the TC hook of the DSA switch
Unfortunately, there is no performance gain when using the XDP generic mode with the default 256 Bytes packet headroom. TC is on the same level as Netfilter’s software offloading implementation. XDP generic with the custom 32 Bytes packet headroom is around 50 MBit/s faster.
The actual performance gain comes into play when attaching the eBPF program to the DSA switch. While XDP generic with 256 Bytes packet headroom is now at least faster than without offloading, XDP generic with 32 Bytes packet headroom is about 250 MBit/s faster than any other offloading, which means about 50% more throughput. TC is also a little bit faster, but there is not such a performance increase as for XDP.
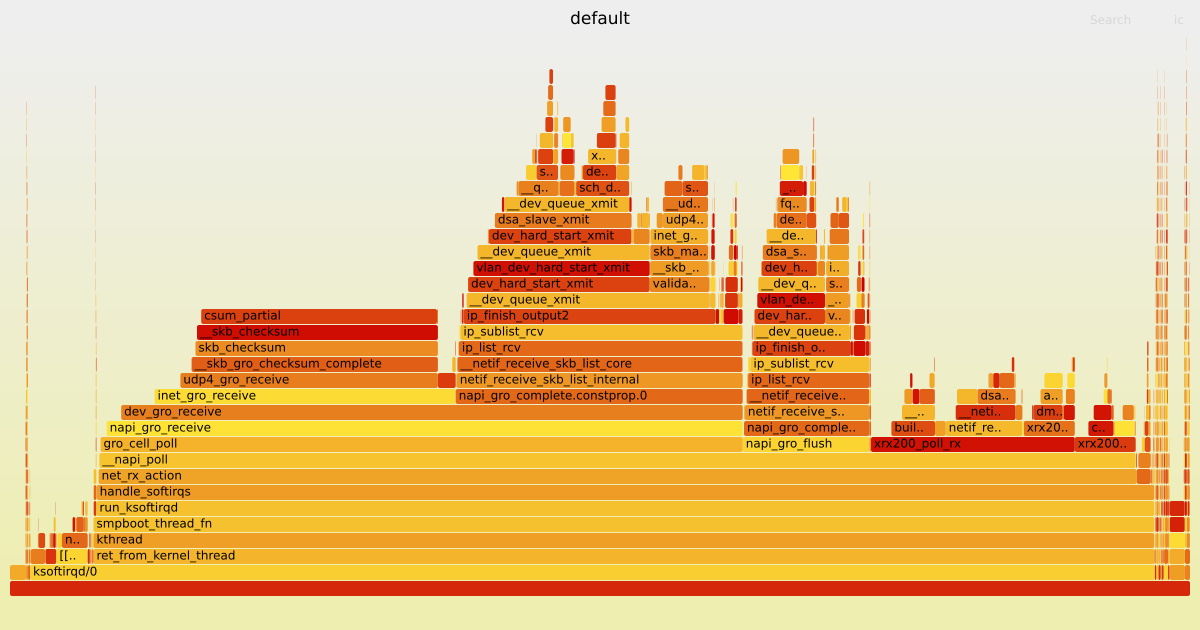
I have created the following graphs using the Linux command line tool perf and scripts from the FlameGraph repository. They show how many CPU cycles Linux kernel functions used for the OpenWrt Firewall running without any offloading and the XDP generic with 32 Bytes packet headroom attached to the DSA switch.
As you can see, since the eBPF program saves some Linux kernel function calls, the CPU can poll for more data via the xrx200_poll_rx function, which consequentially benefits the throughput performance.
Soon, I will also upload the graphs for the other measured parts and the package dropping performance into my already mentioned GitHub repository.
Concluding thoughts
While implementing this new Firewall offloading variant, I learned a lot of new things, not just about eBPF but also about the Linux kernel and network stack itself. Although it was not always easy, because I had to delve into Netlink first, for example, I also had much fun while coding.
As I have shown, the performance gain is somewhat mixed compared to OpenWrt’s current Firewall. To have a higher throughput, my XDP generic patch would need to be accepted for the upstream Linux kernel.
Finally, I would like to thank my mentor, Thomas, for giving me the chance to participate in GSoC 2024, and, the same goes for the OpenWrt core developer, Felix, for guiding me through the project. Furthermore, I appreciate that Andi and all GSoC involved Freifunk members make it possible to participate in such a project.
This concludes my GSoC 2024 project, but as I already mentioned, there is still some work to do. Should you have questions, do not hesitate to contact me. I hope you enjoyed the project as much as I did!
My project on community data visualisation is soon coming to a close; it’s time to review the work and what the outcomes were. The main goal of the project was to
build a [data] pipeline from the JSON directory through to some visualisations on a web page.
With some caveats, we’ve successfully achieved that. I made a tool (json_adder) which reads the JSON files into a MongoDB database, with a set of resolvers which provide a query interface, and finally some graphs which call the query interface and render the data using the d3 javascript library.
Beyond that, GraphQL was supposed to allow anyone else to
query the data for their own purposes.
I haven’t achieved this, partly due to the limits of GraphQL, which is better designed to service web apps than free-form queries. Queries are flexible only to the extent that they’re defined in the schema. Secondly, all of this is still only deployed locally, although it’s ready to deploy to production when needed.
At least the most difficult part of the project is over, the infrastructure is all there, and now the barrier to entry is much lower for anyone wanting to make a visualisation. New queries / visualisations can be contributed back to Freifunk’s vis.api.freifunk.net repository on Github.
Graphs
Top ten communities with the most nodes
This graph is very simple, top of the list here is Münsterland with 3,993 nodes at the time of writing. This doesn’t quite tell the whole story, because unlike city-based communities in this lineup, the Münsterland nodes are spread far and wide around Münster itself. Nevertheless, congratulations to Münsterland for the excellent network coverage!
This bar graph was the first one I made, as a simple proof of concept. Since this worked well enough, I moved on to a line graph example, something which could take advantage of the time-series data we have.
Growth of the network over time
This graph shows the sum total of nodes across the network per month, from 2014-2024. The number of nodes grew rapidly from 2014-2017 before tapering off into a stable plateau. The high point ran through September and October 2019, with around 50,700 nodes at the peak.
For some context on this curve, Freifunk as a project began in 2004, and only started collecting this API data in 2014. Part of the initial growth in nodes could be accounted for by new communities slowly registering their data with the API.
The query behind this graph became too slow after I’d imported the full 2014-2024 hourly dataset into MongoDB.1 Daily data was more performant, but was still unnecessarily granular, so what you see here is grouped by daily-average per month.
For shorter time periods, the data is still there to query by day or by hour, and this is something which could be worked into an interactive visualisation.
Routing protocols in use across the network
The next thing we wanted to see was the distribution of routing protocols. This graph is similar to the above, it counts the protocols used by each community every day, and averages the total each month.
This graph doesn’t have a legend (#57), and the colours change on every page load (#56). I don’t know why the colours change like this, is this a common thing with d3? If anyone can resolve this, please help!
In the meantime, I have copied the d3 swatches example, to make a custom legend for the above graph.
We see that batman-adv is by far the most popular protocol, followed by 802.11s, which appears in the dataset in Duisberg in August 2015.
Remaining work
Everything here is all working locally, which leaves the main remaining task to try to deploy it somewhere for public use. We always had in mind that this would have to be deployed somewhere for public use eventually. So, thankfully we’ve already done some of this work and most of the services involved here can be easily packaged up and deployed to production. Andi is going to investigate webpack for bundling the javascript, trying to avoid having to procure (and especially maintain) another server.
Provide snippets that can be embedded in community web pages (#49).
There isn’t a Github issue for this, but the graph page is really a test page with only enough boilerplate HTML to show the graphs. The page would benefit from some styling, a small amount of CSS to make it look more… refined.
Visualisation ideas
A word cloud of communities, scaled by node count (#46).
A heatmap of communities across the network, showing geographical concentrations of nodes (#41).
This was my first time building a traditional web service end to end, from the database all the way through to a finished graph. In the end, the final three graphs do not look individually impressive, but a lot of work went into the process.
I took the opportunity to write the data loading code in Rust, and while I am proud of that, it took me a long time to write and wasn’t easy for others to contribute to. Andi rewrote this data loading code in Python much more quickly, and then made useful additions to it. Coding in a well-understood language like Python had advantages for project architecture which outweighed whatever technical arguments could be had around Rust.
In a similar vein, I learned how to write GraphQL schemas and queries, and arrived at the conclusion that GraphQL is not ideally suited for the kind of public query interface that I had in mind. The happy side of this lesson was that I ended up relying on MongoDB functions, and became better at writing those instead.
As an aside, importing the full decade’s worth of hourly data made my (high end workstation) desktop computer really sweat. It was very satisfying to start the import, hear the fans on my computer spinning up to full speed, and physically feel the weight of all that processing. ↩︎
Recently a patch for hostapd on OpenWrt was merged that allows to Access Points to send messages to other Access Points while still allowing clients to connect to it as it would be a regular Access Point.
This was called APuP: Access Point Micro (μ) Peering
From the author, G10H4ck:
“Fiddling with hostad code I have managed to successfully establish WiFi communication between multiple AP, each of them send and receive traffic from the other as if they where associated stations, while they are all configured in AP mode. This P2P like behavior have multiple advantages compared to the usual setup where one of them is configured as AP and all the others as stations, and also compared to Ad-Hoc, WDS, 802.11s, Multi-AP and EasyMesh. I have named this operanting mode APuP (Access Point Micro Peering).” (Source)
From the OpenWrt merge request:
“A simpler and more useful successor to Ad Hoc, Wireless Distribution System, 802.11s mesh mode, Multi-AP and EasyMesh. Almost plain APs communicate between them via 4-address mode, like in WDS but all of them are AP, so they can eventually communicate also with plain stations and more AP nodes in sight. Low hardware requirements, just AP mode support 4-address mode, and no more unnecessary complications, like hardcoded bridging or routing algorithm in WiFi stack. For each AP in sight an interface is created, and then it can be used as convenient in each case, bridging, routing etc.” (Source)
A bit more context:
“In community networks we need to maximize the possible paths of communitacions between nodes. In a classical AP-STA approach it is not possible to guarantee communication between all possible nodes in all scenarios. As an example if we have 4 nodes A, B, C and D where A and B sees each other, B and C sees each other C and D sees each other. With AP-STA mode each radio must operate either as AP or as STA, each STA must connect to only one AP at once, STA need an AP to relay communication between thems. In each combination configuring each node either as AP or STA you will see that some of them will end up not being able to connect. To overcome this issue in the past adhoc mode was used which solved the basic connectivity issue, still it’s implementation wasn’t high quality and it’s design had important flaws, this resulted it in becoming unmaintained after a few years. Luckly while adhoc was growing outdated 802.11s emerged, it had a few improvements, still some design choice such as complex ways to bridge other networks and routing between nodes fossilized into the standard, increased WiFi drivers complexity became problematic and lastly determined it’s silent demisal. New radios drivers and firmwares doesn’t support 802.11s well. New WiFi standards doesn’t bring much improvements to 802.11s mesh mode, while they do improve a lot AP-STA modes. Still our need of nodes being able to comunicate to anyone in range is strong. In this context, looking for a modern solution I started asking myself, is there an hard to resolve problem that impede AP nodes in sight to talk each other? Talking about my thinking with Felix Fietkau (nbd), we agreed that it might be possible for AP nodes to commuicate directly each other, and because AP mode is what is getting more support and improvements, if we can we just use that on all nodes with some slight modification so all AP in sight can talk each other, we could solve this problem that afflict us since WiFi creation. Felix suggested that this should be possible and with a bit of luck should not even need kernel and driver modifications, modifing hostapd in a way that each AP adds the other in sight to its station list could be enough and it is indeed the staring point to start experimenting and see what happens.” (Source)
The advantages are simple:
no additional mesh SSID is broadcasted
no Linux kernel / driver change
AP mode is much more stable compared to other mesh modes
A few disadvantages also need to be mentioned:
a new interface for each other AP is created, this can be a bit of a configuration burden
the code is still mostly untested
Example Setup
APuP is only available in the OpenWrt snapshot builds as for now until the text major release. If you have two WLAN router A and B then let’s set up one example:
Router A
uci set wireless.radio0.disabled=0
uci set wireless.default_radio0.ssid=openwrt-mesh
uci set wireless.default_radio0.encryption=psk2
uci set wireless.default_radio0.key=12345678
uci set wireless.default_radio0.network=lan
uci set wireless.default_radio0.apup=1
uci commit wireless
Now reboot the device.
The single important setting is apup=1, which enables APuP. Without any other mesh device around, there will be only a “phy0-ap0” interface bridged to the br-lan bridge interface. This is the WLAN interface where normal clients will connect to (e.g. mobile phones, laptops, …).
Router B
uci set wireless.radio0.disabled=0
uci set wireless.default_radio0.ssid=openwrt-mesh
uci set wireless.default_radio0.encryption=psk2
uci set wireless.default_radio0.key=12345678
uci set wireless.default_radio0.network=lan
uci set wireless.default_radio0.apup=1
uci commit wireless
uci set network.lan.ipaddr='192.168.1.2'
uci set dhcp.lan.ignore='1'
uci commit network
uci commit dhcp
These commands also disables the DHCP server on router B and set a unique IP address.
Now reboot the device. After the reboot, a “phy0-ap0” interface will be created as we have seen on Router A.
Since both routers see each other, each of them will also create a “phy0-ap0.sta1” interface that will be bridged to the br-lan bridge interface. If yet another router would be in reach, then a new interface called “phy0-ap0.sta2” would be created and so on for each AP in reach. That is how routers exchange packets between each other.
But be careful. If we would now set up a third device router C similar to router B (or even router A), then any packet will be send between routers A, B and C in a loop, due to the bridged interfaces. This will cause the CPU and bandwidth unitilization to be pushed to the maximum and the network will be unusable. That is what a mesh routing protocol (e.g. batman-adv, OLSR, Yggdrasil) or a spanning tree protocol would prevent. But that is another topic. 🙂
The goal is to design an OpenWrt configuration wizard to simplify the device configuration process, especially for those users who do not have deep technical knowledge.
1. Improve UI:
A clean, modern and easy-to-use user interface was developed for everyone. It allows you to follow a step-by-step process to configure the device with clear and well-defined options, with intuitive navigation between steps, allowing users to move back and forth with ease.
2. Detailed Configuration Steps
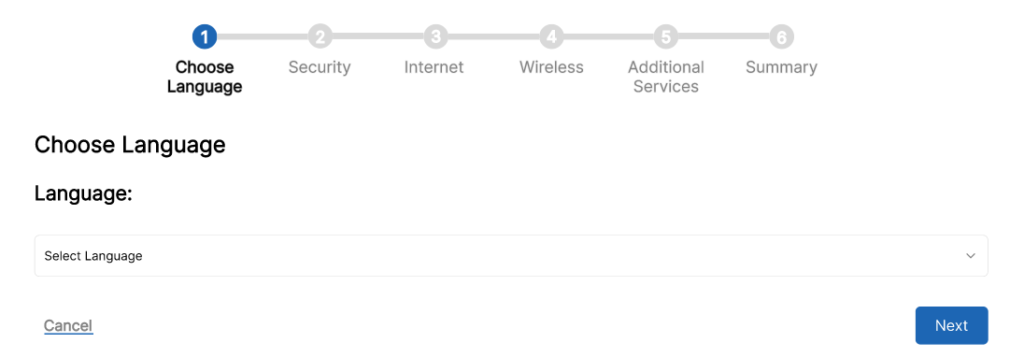
Step 1: Language Selection
Users can choose the language of their preference for the wizard, thus allowing a better understanding of the process.
Step 2: Security
At this stage, users can enter the device name and set administrator passwords. Validations have been implemented to ensure that passwords meet security requirements: at least 10 characters, including numbers, symbols, and a combination of upper and lower case letters.
Step 3: Internet Connection
Here you select the type of Internet connection you want to configure:
– DHCP: The router automatically obtains the IP address and other network configuration parameters from the Internet Service Provider (ISP), simplifying the configuration process.
– Static IP: Allows users to manually enter the IP address, subnet mask, gateway and DNS servers, useful for networks that require specific configurations or when using a fixed IP address.
– PPPoE: Primarily used in DSL connections, it requires the user to enter a username and password provided by the ISP.
Step 4: Wireless Configuration
At this stage, users can configure their router’s wireless network:
– SSID: The name of the Wi-Fi network that devices will see when searching for available networks.
– Wi-Fi Password: Users can set a password for their Wi-Fi network, with security validations similar to administrator passwords.
– Wireless Encryption Type: We have implemented the selection of the encryption type to improve network security.
– Mesh Network: Users can configure mesh networks to expand the coverage of their Wi-Fi network, improving connectivity in large areas.
Step 5: Additional Services
In this section additional services such as longitude, latitude or activating options are enabled:
– VPN: Allows users to securely connect to the local network from remote locations.
– DHCP: Allows the router to automatically assign IP addresses to devices on the local network.
Step 6: Summary
The last step that users encounter is a confirmation summary of the process choices.
Importance of the Advances Made
Flexibility and Security
Allowing selection of wireless encryption type is crucial for users to secure their network according to their specific needs and device compatibility. WPA3, for example, offers significantly improved security compared to WEP.
Easy to use
The new interface and step-by-step navigation simplify the setup process, making it accessible even to those without deep technical knowledge. This lowers the barrier to entry and allows more people to use and benefit from OpenWrt.
Mesh Network Configuration
Integrating the mesh networking option expands network coverage, improving connectivity over large areas and providing a more consistent and reliable user experience.
Next steps
Integration of More Options for Additional Services
Add additional services to add more functionality.
User Interface Optimization:
Modify the user interface based on the feedback received to make it as easy and intuitive as possible.
Exhaustive Testing
Perform tests to ensure the operation and stability of the assistant.
Hello again, everybody! This is the Midterm follow-up blog post for my GSoC 2024 topic: “eBPF performance optimizations for a new OpenWrt Firewall.” It will cover how I started trying to solve the task, what the current implementation looks like, and what I will do in the upcoming weeks.
As a quick reminder: The project’s goal is to implement a new OpenWrt Firewall offloading variant using eBPF. Why eBPF? Because with eBPF, you can intercept an incoming data packet from the NIC very soon inside or even before the Linux network stack. After intercepting the packet with an eBPF program at the so-called XDP or TC hook, you can mangle it, redirect it to another or out of the same network interface, or drop it. Mangling the packet could mean, for example, applying possible Network Address Translation (NAT), adjusting the Time-To-Live (TTL), or recalculating the checksum(s).
The result should be that we see a performance increase, either by having a higher throughput, dropping packets faster, or lowering the CPU load.
Current implementation
The implementation consists of three components:
The eBPF program which intercepts, mangles, and forwards or drops incoming data packets from a network interface
A user-space program that attaches the eBPF program to the appropriate network interfaces and determines whether to forward a received packet and where to
An eBPF map (in this case, a key-value hash map) so that the eBPF and user-space program can communicate with each other
Originally, I wanted to parse all OpenWrt Firewall rules and dump them into the eBPF map when the user-space program starts. When the eBPF program received a packet, it would try to match it with one of the parsed rules. But I had a few talks with the OpenWrt community and my mentor and concluded that this approach poses some problems:
eBPF has limited looping support, but for rule matching, it is necessary to loop.
OpenWrt uses the Netfilter framework as its firewall backend that has (too) complex features to implement in eBPF, like for example the logging of packets.
That is why we decided to go for a “flow-based” approach. When the eBPF program receives a packet, it creates a tuple from some crucial packet identifiers (Ingress interface index, L3 and L4 protocols, and source and destination IPs and ports). The program uses this tuple as the key for the eBPF hash map to signal the user-space program that it has received a packet for a new flow so that it can look up what the eBPF program should do with packets for that particular flow.
Until the user-space program responds, the eBPF program passes all packets belonging to that flow to the network stack, where the Netfilter framework processes it for now. In the meantime, the user-space program checks what the eBPF program should do with packets from that flow and stores the result inside the hash map as the value.
Connection Tracking must also be available because the to-be-implemented offloading variant should be stateful instead of stateless. I first thought about implementing it in the eBPF or user-space program. But then I realized I would somewhat reinvent the wheel because OpenWrt uses the Netfilter framework, which has a connection tracking implementation called nf_conntrack.
The Netfilter project provides an API through their user-space library libnetfilter_conntrack to add, retrieve, modify, and delete connection tracking entries. I am using this API in my implementation to check whether a conntrack entry exists for a packet flow. In the case of TCP, it only forwards packets while a connection is in the “Established” state so that Netfilter can still handle the opening and closing states of the TCP connections. In the case of UDP, the eBPF offloader starts forwarding packets on its own as soon as and as long as a conntrack exists. The user-space program meanwhile updates the timeouts for offloaded connections.
And there is a charm when using nf_conntrack: Such a connection tracking entry directly has NAT information available, so you don’t have to retrieve them by parsing OpenWrt firewall rules. Furthermore, this means that the forwarding part of the eBPF offloader can run independently of the Linux operating system used. It is only dependent on an OS that runs the Netfilter framework, including nf_conntrack.
Packet Forwarding
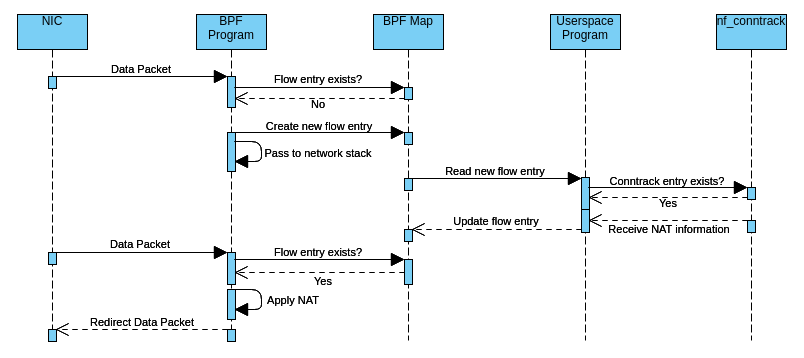
The following simplified activity diagram illustrates how incoming packets are forwarded by the current implementation of the offloader:
Figure 1: eBPF Packet Forwarding
Here is a step-by-step explanation of what is happening:
The eBPF program receives a data packet from the NIC for a not-yet-seen flow. It creates the packet tuple key and uses it to check whether an entry for that flow already exists inside the eBPF hash map. Since it hasn’t seen the flow yet, there is no entry, so the eBPF program creates a new empty entry inside that map to signal the user-space program. Meanwhile, it passes all the following packets of that flow to the network stack until the user-space program responds.
When the user-space program wakes up, it retrieves the new flow entry from the map and checks through libnetfilter_conntrack whether a conntrack entry for the flow exists. If not, or the TCP state isn’t established, it doesn’t respond to the eBPF program (yet), so packets continue passing to the network stack. If there is an (established) conntrack entry, it also looks up inside that entry if NAT needs to be applied and, if so, calculates the checksum difference. Finally, it updates the flow entry accordingly to signal the eBPF program that it can take over now.
When the eBPF program receives a new data packet for that flow again, it reads from the flow entry that it can forward the packet now, so it does possible NAT and checksum adjustments and redirects the packet to the target network interface. When there is a TCP FIN or RST or a conntrack timeout occurs, the eBPF program doesn’t forward the packet anymore and passes it to the network stack again.
Where to attach? Where to send?
There are two things I didn’t mention yet about the implementation:
On which network interfaces should I attach my eBPF program?
What is the next hop for the packet, i.e., to which output interface and neighbor to send it?
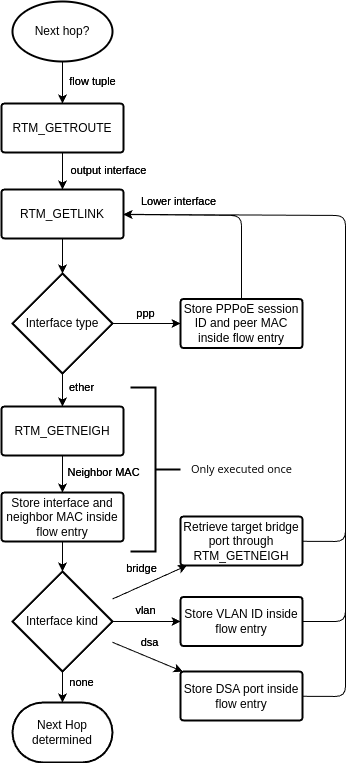
I implemented the latter within the user-space program using the Linux routing socket RTNETLINK. When I started to implement this, I performed the following three steps to determine the next hop:
Send an RTM_GETROUTE message containing the packet tuple to determine the route type and output interface. I only offload unicast flows.
Send an RTM_GETLINK message containing the output interface to determine the source MAC address.
Send an RTM_GETNEIGH message containing the output interface and the destination IP to determine the destination MAC address.
Finally, the user-space program stores the output interface, source, and destination MAC address inside the flow entry. The eBPF program then rewrites the MAC header and redirects the packet to the output interface. But I wasn’t satisfied with that approach yet; I will explain the reason based on the following picture:
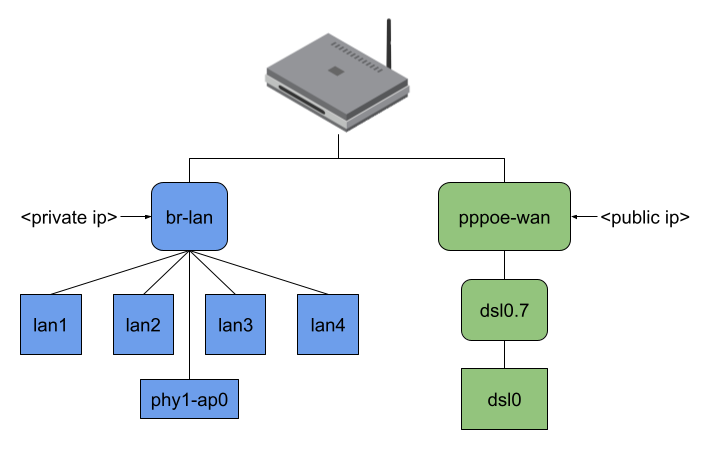
Figure 2: Example network interfaces on an OpenWrt device
The picture shows the network interfaces of my AVM FritzBox 7530 running OpenWrt. As you can see, all four LAN ports of my private network and my WiFi are bridged (which is typical, I think, and generally default for an OpenWrt installation). My dsl0 WAN port has a Point-to-Point Protocol over Ethernet (PPPoE) interface on top to establish a VDSL connection to my ISP, which additionally requires tagged VLAN packets (dsl0.7).
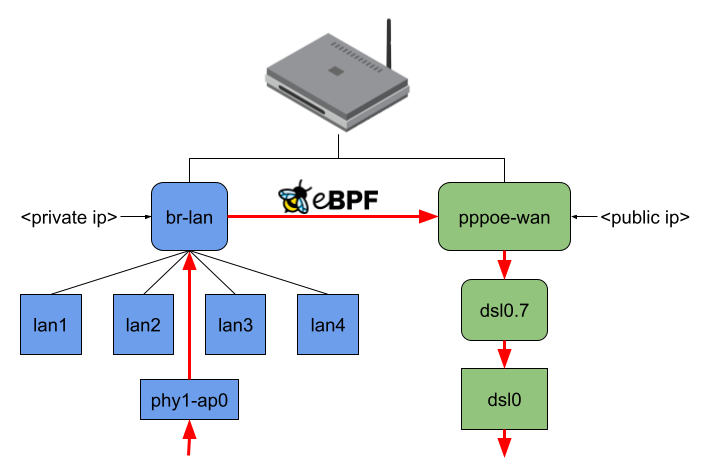
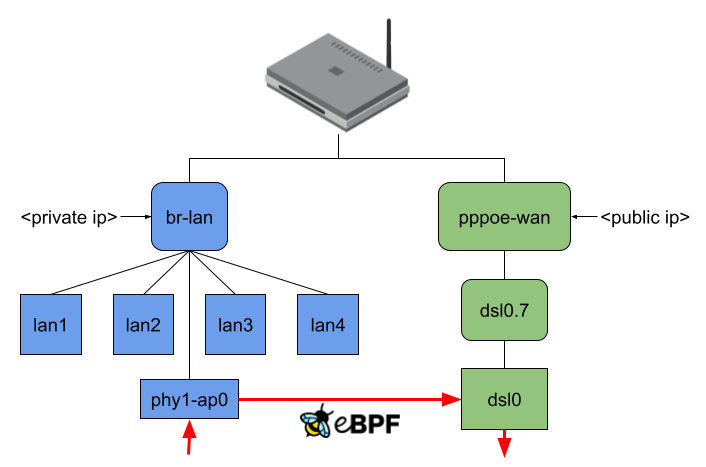
When no offloading is happening and, for example, my Notebook connected to phy1-ap0 would send traffic to the internet, the packets would travel through all shown interfaces except the LAN ports. (Figure 3). Regarding the eBPF offloader, the simple way would be to attach the eBPF program to the br-lan and pppoe-wan interfaces because I wouldn’t have to parse any additional L2 headers. The same goes when making routing decision(s) since you won’t have to query more interface information or push L2 headers. But the eBPF fast path would be minimal in that case. (Figure 4)
I thought this was not an acceptable solution for this project because the idea is to intercept an incoming packet as soon as possible. At the same time, the offloader should also send out packets at the lowest possible network interface. Therefore, the user-space program currently attaches the eBPF program to the lowest possible network interface and, while making the routing decision, also tries to resolve to the lowest possible network interface (Figure 5).
Figure 3, 4, and 5: Packet traversal for different offloading variants
The following flowchart shows how the user-space program currently does the next-hop determination:
Figure 6: Next Hop determination via Netlink
The eBPF program can currently parse the following headers of the respective layers. If it receives any packet containing a L2, L3, or L4 header not mentioned here, it passes the packet to the network stack.
L2: VLAN (currently only one) and PPPoE
L3: IPv4 and IPv6
L4: TCP and UDP
DSA: Going one step further down
As you might have seen in the flowchart of Figure 6, the user-space program also parses DSA interfaces, which stands for Distributed Switch Architecture. Routers typically contain an Ethernet Switch for their LAN ports, which has a management port connected to an Ethernet controller capable of receiving Ethernet frames from the switch. While Linux creates a network interface for that Ethernet controller, you can observe that the DSA driver also creates network interfaces (DSA ports) for the front panel ports.
Ideally, when the switch and management interface exchange packets, they tag the packets with a switch resp. DSA tag, which contains the front panel port ID. When the management interface receives a packet from the switch, it can determine from the tag from which front panel port the packet comes and pass it to the appropriate DSA port/interface. When the switch receives a packet from the management interface, it can figure out from the tag to which front panel port it must send the packet.
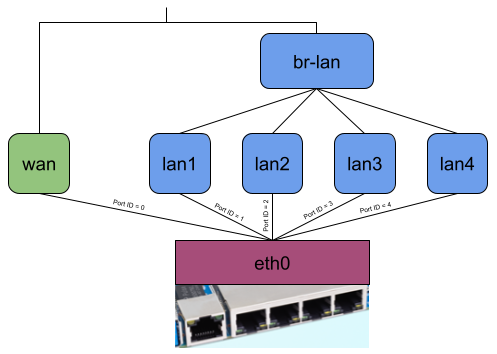
Let’s consider the following picture, which shows how OpenWrt on default settings uses DSA on a Banana Pi BPI-R64. The DSA switch resp. conduit is eth0 and lan1, lan2, lan3, lan4, and wan are the DSA ports resp. users.
Figure 7: Example network interfaces on an OpenWrt device using a DSA driver
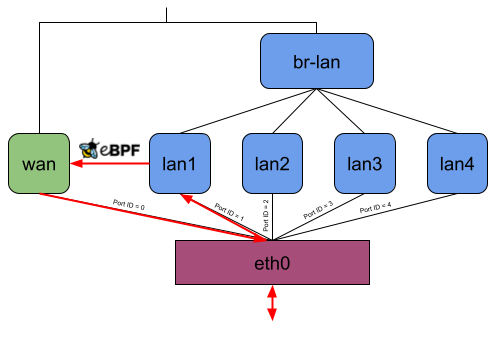
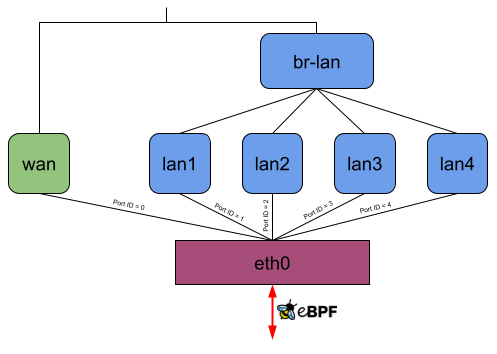
Without offloading, a network packet sent from the private LAN to WAN would go through eth0, lan*, br-lan, wan, and eth0 again (Figure 8). When using the eBPF offloader without attaching to the DSA switch eth0, it is possible to avoid the bridge br-lan (Figure 9). But if you now attach the eBPF program to the DSA switch eth0, it can read and write the DSA tags of packets on itself, and the user-space program can then figure out which front panel received the package and to which one to send a packet. So when the eBPF program receives a packet on eth0, it can send it out of eth0 again without any intermediate interface (Figure 10).
Figure 8, 9, and 10: Packet traversal through a DSA switch for different offloading variants
Although this has the disadvantage that an eBPF program isn’t “generic” anymore because you need to compile it for the DSA driver used by the target device, it has the potential to further increase the forwarding performance.
Work to do in the upcoming weeks
There are a few problems I have encountered, resp., thought of:
I am unsure if nf_conntrack is sufficient for connection tracking because it isn’t possible to query conntrack entries based on the interface that received the packet. I think this can lead to collisions when different interfaces receive identical L3 and L4 flows.
Unfortunately, it is currently impossible to update the nf_conntrack packet and byte counters. This might be patchable in the Linux kernel, but my current workaround is to turn off the counters because I think it is better to have no counters than wrong counters.
I have shown that I retrieve PPPoE information in user space. The problem is that you cannot do that directly via Netlink since the interface attributes don’t provide PPPoE information. This is why I currently retrieve the interface’s link-local peer IPv6 address, convert it to a MAC address, and try to find that MAC inside the file “/proc/net/pppoe”, which is populated by the ppp daemon. I am anything but satisfied with that, but I haven’t found a better way yet.
Next to trying to solve those problems, the next milestone is to implement an eBPF package dropper into the offloader because, for now, it only forwards packets on its own. And then to finally make a performance evaluation of the implementation.
If you have questions, as always, feel free to ask them, and thank you for reading my Midterm update!