The Web interface for Retroshare Application is under process. Many features are functional but there is still a lot of work to do and fix. This GSOC project aims at developing the web interface to a certain extent and include as many missing features as there are in the Retroshare QT interface.
About Me
Hello Everyone,
I am Sukhamjot Singh, a 4th-year undergraduate in Computer Science at International Institute of Information Technology Bangalore. I love 2 things – Table Tennis and Open Source development. The fact that my contribution, however small or big, will be a part of something huge and useful, motivates me to work further.
Project – Goals and Deliverables
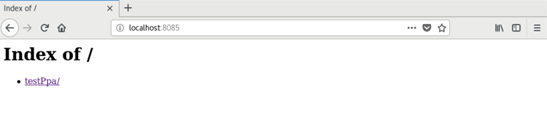
Homepage of Web Interface.
The Web interface for Retroshare is made using MithrilJS ( a lightweight Javascript framework ) and the backend is mainly supported through the use of Retroshare QT interface and JSON API that is already available. Frontend design will be consistent with the already present features.
Major deliverables: The major deliverables will be in form of tabs which mainly include:
Files
File Manager
Uploads
Search
Forums
Navigation Bar for different categories of forum.
Displaying forums info
Search
Channels
The layout is same as forums.
Display posts, files, info of the channel
Configuration
This tab helps to configure Retroshare App
Config options for Network, People, Mail, Files etc.
This needs further discussion with the mentors.
Further objectives also include solving some of the issues in the features that are already present. Working on existing Github issues is also a priority.
Community Bonding period – First two weeks.
In this period, I have familiarized myself with the mentors ( Cyril Soler and Gio ) and discussed the goals and objectives of the project. I have started developing the Channels and Forums tab and have completed the basic layout. All of this work is done in a separate branch on my fork of the repository.
The updates about the development are regularly provided on Github and to the mentors. There are also weekly meetings being scheduled to report the progress of the project with the mentors. I will also post more blogs for further developments.
The process of contributing and getting selected for Google Summer of Code’22 has been thrilling and I wish to have an exciting summer with Freifunk – Retroshare and my mentors.
I must say to my regret that due to many exams at the university I could not finish the project in the prescribed period. However, since I have posted my thoughts and ideas for implementation here, someone who is interested in this is welcome to pursue this further.
You can find my approach to Client Capability Measurement here
Hi! I’m Tomás on my last post about the LibreMesh Application (now just LimeApp). It was really fun to work with Altermundi on this project and I like the results that we achieve. I hope that everyone enjoys this post just like I enjoyed working on the application! So, let’s get started.
Finished the first part of the GSoC we started to build the next version of the app (1.0).
Resume
As a resume, the objectives for this part are:
Do a correct use of threads trying to avoid interruptions to the user.
To implement a new Graphical User Interface with the capability of returning messages to the user about the situation of the network (for example, could the app connect to thisnode.info? No? Why?).
Add the app to the LibreMesh Operating System.
Fixing the HTTPGet
First things first the previous app had a bug discovered at the first meeting of the second part. If someone has a server on the address thisnode.info the connection could be reached and, in this case, the app shows that the connection to LibreMesh was correct in all the possibles cases.
So, the solution is to do an HTTPGet to thisnode.info. There’s an interesting answer in StackOverflow about this topic: https://stackoverflow.com/questions/2793150/how-to-use-java-net-urlconnection-to-fire-and-handle-http-requests
So, we will only focus on getting an HTTPGet, so with the tools that we got from the article, I built this code:
This code looked fine but there’s one thing that wasn’t correct according to the Android specifications. There’s a permitAll in the policy. This means that connections can happen in the principal thread of the application. To publish in the play store, we needed to change this and create a thread to run the HTTPGet, so the code now looks like this:
This isn’t the best example of a Thread cause doesn’t work concurrently, but it helps the app to respect the Android specification.
Thanks to our testers, we discovered that there was a problem with the latest Androids version that required too many permits to access the SSID or even the ID of the WiFi, so we decided to disable the verification that used these attributes in the latest version of Android
Also, we needed to add the attribute android:usesCleartextTraffic=”true” in the Android Manifest because the latest Android version doesn’t allow HTTP sites on WebView.
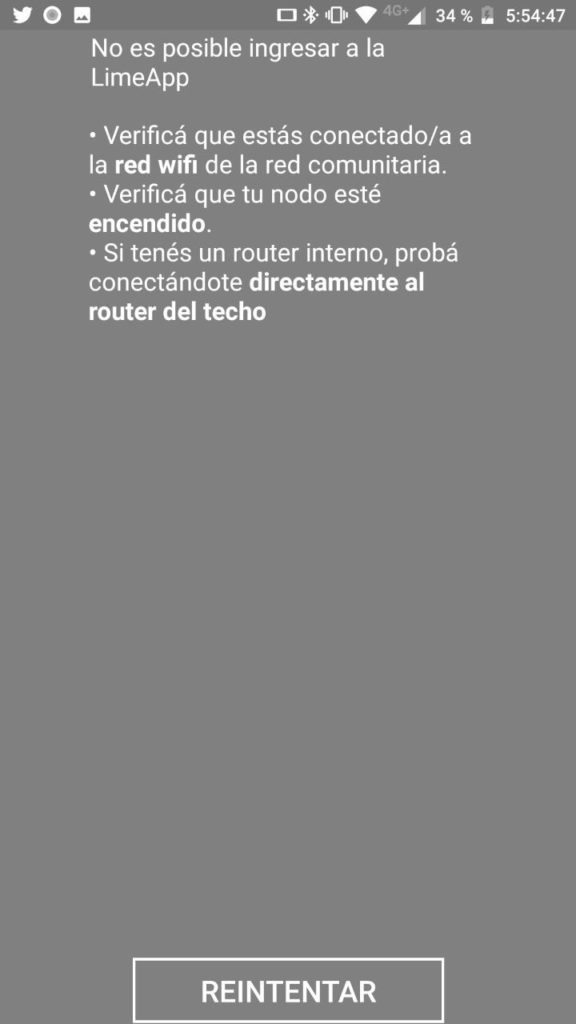
Finally, we added an error screen and changed the use of the app from three buttons to an “automatically display” of the Lime-App, or an error message.
Graphical interface
We wanted to maintain the app light, so the graphical interface needed to be only two screens:
One with the WebView that access to the LibreMesh configuration.
Other one with an error and some tips to fix it.
So, with these use cases, we created an error screens that looks like this:
And here’s a video of how’s the app working:
Unit testing
With all the problems solved and the testers using the prerelease version, we added some unit testing using Mockito. This is an example of a Unit Test of a correct connection to the app:
@Test
public void correctConnection() {
    when(wm.isWifiEnabled()).thenReturn(Boolean.TRUE);
    when(wm.getConnectionInfo()).thenReturn(wi);
    when(wm.getConnectionInfo().getNetworkId()).thenReturn(1);

    try {
        when(urlc.getInputStream()).thenReturn(null);
    } catch (IOException e) {
        fail();
    }

    MainActivity ma = new MainActivity(wm, urlc);

    assertEquals(true, ma.accessToLibreMesh());

}
This test uses mocked objects to simulate a response and then it executes the function. We plan to add in the close future Integration tests.
Reducing the app size
One of the objectives that we set for the second part of the GSoC was to reduce the APK size to add the app to the LibreMesh OS. The original size was 2.91 MB and knowing that a LibreRouter has 8 MB of total space, uploading the app means to use 36% of the node space.
The first attempt to reduce the APK size was to start using the “Generate APK” function of Android Studio instead of using the debug APK. This is also needed to sign the app to publish in the Play Store. This reduced the size from 2.91 MB to 2.42 MB.
This reduction was great but isn’t enough, so we started using the tips of the ApkGolf project (https://github.com/fractalwrench/ApkGolf/b) to reduce the space. In an ideal case, we could use all of them, but we wanted to maintain things like a Constricted Layout for the Error message.
We started adding some lines to the build.gradle that add scripts that help to reduce the code and resources size.
(The proguardFiles were already in the code, but also helps in the size reduction).
Another interesting setting is the resConfig. The library imports usually bring support for multiple languages. We’re currently using Spanish, so setting this to only one language reduce the size a little
resConfigs "es"
Another thing that reduces space is to convert the images to WebP (and accept a good percentage of reduction of quality). We also deleted some files and hard-coded things like the colors (to remove de .xml).
The file that occupies the most space is the one that’s related to classes (ours and imports), so the best way to reduce space use was to remove them. In the build.gradle there were a lot of imports that we added in some moment, but we removed the use of them, so remove also from the build.gradle was a good idea.
They were particularly two interesting dependencies:
The first one was added by Android Studio and we didn’t use it, but the second one was an addition to the design of the application. We removed the calls to the import and the dependency. That reduced approximately 400 KB of space.
At the end of the process, the APK size is 730,337 KB, this means a reduction of approximately 85% of space use.
Finally, we decided to publish a close version to the Play Store because all the main objectives were completed. Currently, we’re waiting for Google to finish the revision on the App.
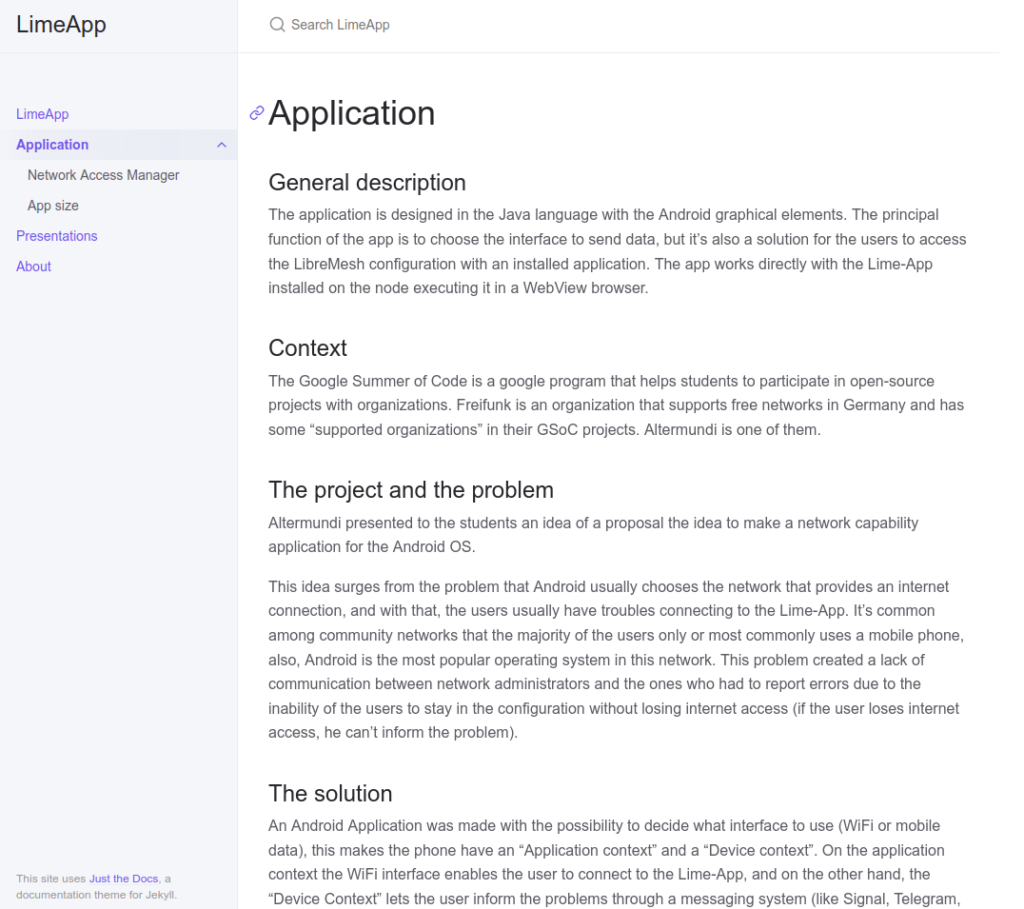
Jekyll page
We’ve also added a Jekyll page for the project (available on Github) that shows some information about the application and the problem that solves.
I’m really happy with the work that we did during this GSoC and I’m glad that this application is going to help Community Networks around the world. Thanks to all for letting me be part of this great community and especially to Nicolas Pace and Germán Ferrero for all the support that they gave me during this two months. Greetings and I hope that I can help with other open-source projects in the future!
I am Aditi, and this is my last blog post for Google Summer of Code 2021!
As this journey comes to an end, I would like to summarise the wonderful experience I’ve had over the period of 10 weeks. Though, my interaction with OpenWrt has been before that, and I am positive, this is not the end of my contributions to the wonderful community!
Google Summer of Code with FreiFunk
Before talking about the details of my project, I would like to write a small acknowledgement of my 10 week journey.
It has been a really exciting journey! I learnt more about Git/GitHub and React in these 10 weeks than I had learnt in past one year of working by myself. GSoC allowed me to improve my communication skills by talking in communities!
These 10 weeks working with FreiFunk(OpenWrt) finally enabled me to get over my impostor syndrome. The mentors and admins have always been helpful even after I made quite a few mistakes in a few commits.
I would like to thank the community for tremendous amount of support and patience! 😊
So, as per my first blog, we planned on achieving the following over the summer:
The main aim of OpenWrt Device Page Project is to create an overview of OpenWrt supported devices to simplify user choice of acquiring new devices. The project can be broken down into two major sub-tasks:
Creation of input form from a JSON Schema to simplify the process of adding device metadata to the github repository.
After creation of input form, the second step is to render the device pages. The device pages will have search masks, to search specifically for devices with certain features like USB port, WiFi6 etc.
The form has been build with the autocomplete functionality (which has been quite a challenge!). However, there are still some issues that need to be fixed.
Future Scope
One of the major next steps of the project is to use the device data to create device pages. The device pages would have search option to search devices on the basis of USB Port etc.
Retroshare service a.k.a backend of retroshare mobile was compiled in 2019. So, it was some compilation issue with the new mobile phone which is launched after 2019. For overcoming these issues, I had to find the reason and solution to this problem. That solution is something on which I didn’t work before. So, it took me a long time to understand and still it is not working properly. But I will solve this problem soon.
Future Plans :
Adding of Forum suppport.
Improvement of UI/UX.
Support of CI/CD pipelines.
Conclusion:
During this program, I learnt many different things ranging from tools to technologies.
There is still some work needed for the project, which is why I’ll keep on working on it. Contributions, suggestions and feedback are always welcomed.
At the end it is just the beginning of another journey. Good day and fare the well everyone.
Hey all hope you all are doing. With heavy heart I would like to conclude this beautiful journey of GSoC 2021 with one last blog.
First I would like to start by thanking Freifunk, Google and my mentor Mr. Benjamin Henrion for guiding me to become a better developer during the course of this program.
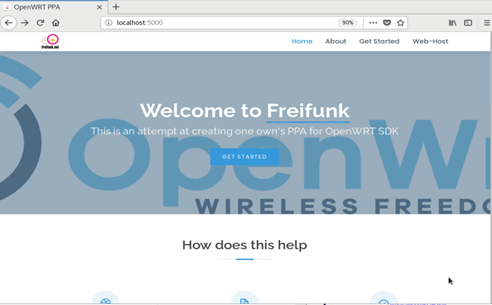
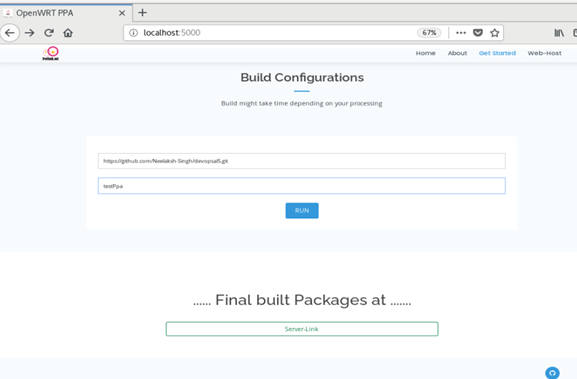
As stated in the first blog, the main project revolved around making a working OpenWRT SDK available to users with an abstraction layer for their easy use.
First order of business was to present the user with a web interface where they just have to provide with their repository link, which can then be build using the OpenWRT SDK and final packages and targets could be hosted on a server.
The website looks like :-
The final build are hosted on a httpd server running on the background
Challenges encountered
During the development of this project the issue I faced was that of building the user scripts in the docker container containing the SDK. Also the default config file had to be implemented to override the menuconfig settings.
To overcome this I created a docker image containing the SDK which automatically builds the user packages. You can find it here.
The second challenge was for the build container to run in the background, without disturbing the the web-interface functionality.
For this I have used multiprocessing module and subprocess’s Popen module respectively. What they do is simply create a separate process for build step and running it parallelly alongside the web-interface thereby achieving concurrency.
Future Plans
Improve Web-portal with added UI/UX
Finding more ways to host these packages.
Improving the build process by running them in Kubernetes cluster.
Having a provision for multiple builds.
Possibly include CI/CD pipeline for the same.
Conclusion
During this program I learnt many different things ranging from tools to technologies.
There is still a lot to be achieved for the project, which is why I’ll keep on working on it. Contributions, suggestions and feedback are always welcomed.
At the end it is just the beginning of another journey. Good day and fare the well everyone.
Working on this project has been amazing, not only have I been able to work hand in hand with great developers but I have also learned a lot of things related to software development that will probably be useful for me in the future. The main idea of this project seeks to improve the implementation of the administration interface of the Pirania captive portal which is implemented in LibreMesh, a plugin used in different Community Networks.
During these weeks, I focused on 3 aspects: design, testing and implementation.To create the sketches that would allow me to detail the achievement of our ideas, we chose a tool called Figma, in this I could deploy the initial designs that we plan to implement for this project. Below you can see some of the screens I created:
List of vouchers screen
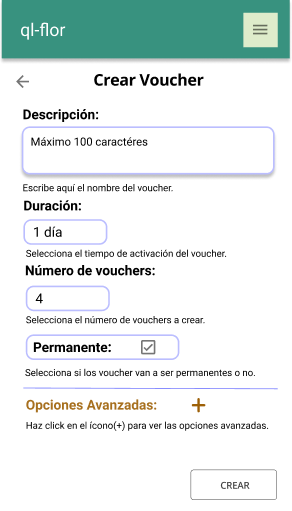
In this first screen we thought of some functionalities such as being able to search for vouchers, list vouchers and access another screen to create vouchers, when we choose the option to create vouchers we will see a screen like the following one:
Voucher creation screen
In this screen you can find some functionalities such as:
– Description field, to identify who the voucher is for or what it is used for.
– Choice of the duration time since the voucher activation.
– Choice of voucher permanence, to establish whether a voucher can be used for “unlimited” time or not.
– Possibility to choose how many vouchers to create.
– Possibility to edit a voucher created to correct any typo in the description or to “delete” a voucher so that it can no longer be used.
– And set the possibility of choose some other advanced options such as setting an expiration date to activate the vouchers.
– At the end of the voucher creation, generate a metadata page to deliver the voucher passwords and other data of interest such as the description and the voucher creation date.
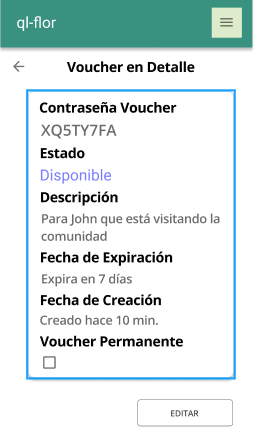
Voucher details
In this screen we access after selecting a specific voucher in the voucher list and we can find some features such as the availability status, the creation date and the password that enables access.
As you can see, the idea of these screens is to maintain a similar and clear aesthetic, just like the LimeApp.
After that, I was working on a TDD framework to write the tests for these screens, I used technologies like React Testing Library and Jest. screens, I used technologies like React Testing Library and Jest.
Working on these tests was my favorite part of the project, as I feel that I was able to learn many things in this area and discover tools that I did not know.
Currently this project is at this point, however, I will continue working on new updates to implement all these ideas that I have been working on these weeks.
Finally, I want to thank Freifunk and my mentors for helping me in this process, it has been very rewarding for me to share and learn so much from them!
Hello everyone!, The main intention of this project is to update the existing API spec schema files to the latest version of JSON schema, and also few tools which are dependent on the spec files.
The current latest version of JSON schema is version 2012-12, but unfortunately there isn’t much support to update the dependent tools(to be specific, the generator). So my mentor Andibraeu and I have chosen to work with draft7 version, as it has upper hand with implementation support compared to other recent versions.
Our initial map out
Migrate all the spec schema file to draft 7 version.
Pick out a framework to update the generator.
Generate and test the forms.[1]
List and update all the remaining dependent tools.
Test the updated tools.
Fix bugs, if any.
Spec files
Migrating the spec files to draft 7 version is not a difficult task. At the beginning, I have only migrated the recent version of spec file, so that we can immediately start working with the tools. And after updating all the tools, I have migrated all the spec files to draft 7 version.
Some features to point out:
Used definitions to reuse some fields like (phone, email, city, URL, etc.).
Added formats to some fields like (url, email, lastChange).
Used minProperties instead of required for contacts.
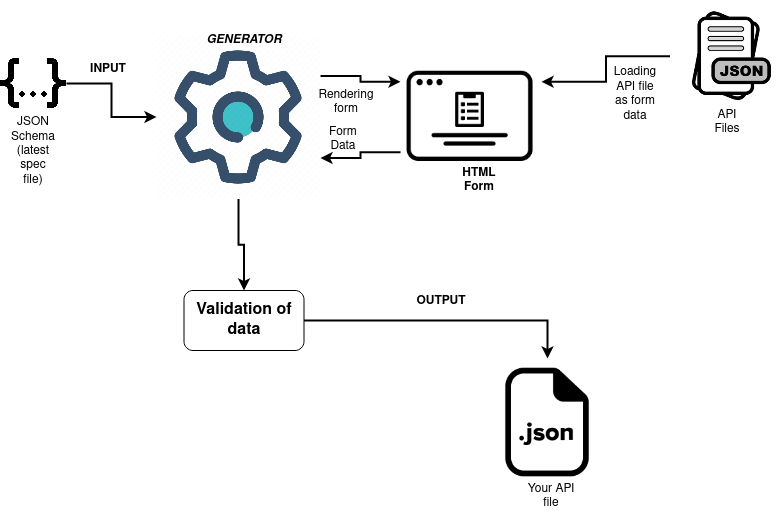
This is one of the significant tool depending on spec schema files. The job of the tool is very simple, it takes JSON schema as input, generates HTML forms to render in the browsers, handles validation of the form data against the input JSON schema and finally, generates a JSON out file.
Generator Layout
Unfortunately, no framework seemed perfect at the beginning, so I have picked up several frameworks to try them out and weigh the pros and cons to finally pick one. I had mentioned all the pros and cons in a document(check the references section).
Frameworks that I have tried
UI Schema for React
React JSON schema forms (mozilla)
Restspace Schema forms
JSONForms (Eclipse Source)
By weighing all the pros and cons, we have chosen JSONForms (Eclipse Source) to proceed with the further development.
JSONFORMS (Eclipse Source)
And thereafter, I developed UI schema for custom layout for the form field in the webpage. Also, at this point, I have to develop a custom renderer to render a map for picking the latitude and longitude of the communities locations. So upon looking at the documentation I developed the custom renderer (renderer, control and tester) thereafter to adopt this renderer to schema we need to have single object which only embeds longitude and latitude fields. So I quickly discussed with my mentor and added a new spec file to the organization. In conclusion, we have our generator up and running a demo in GitHub Pages.
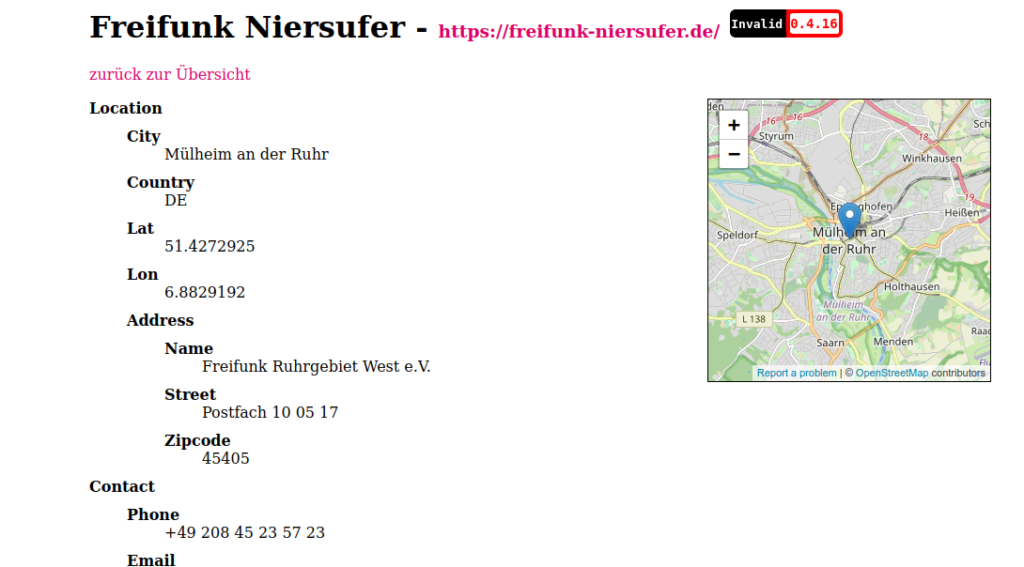
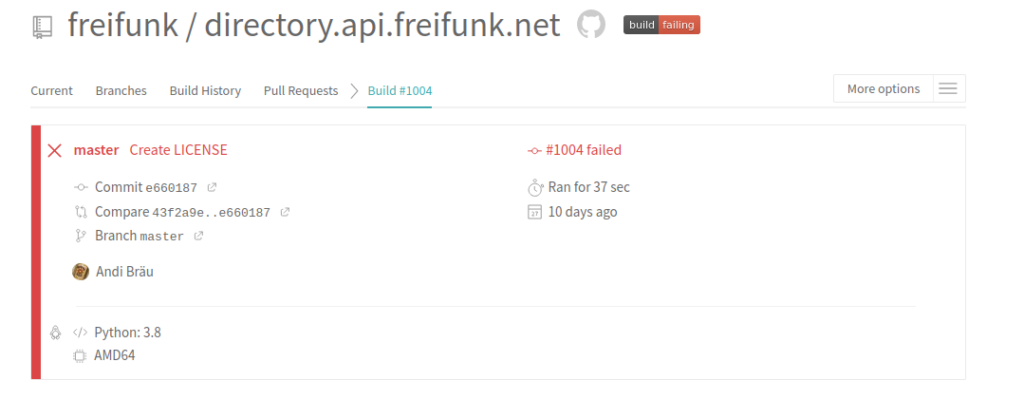
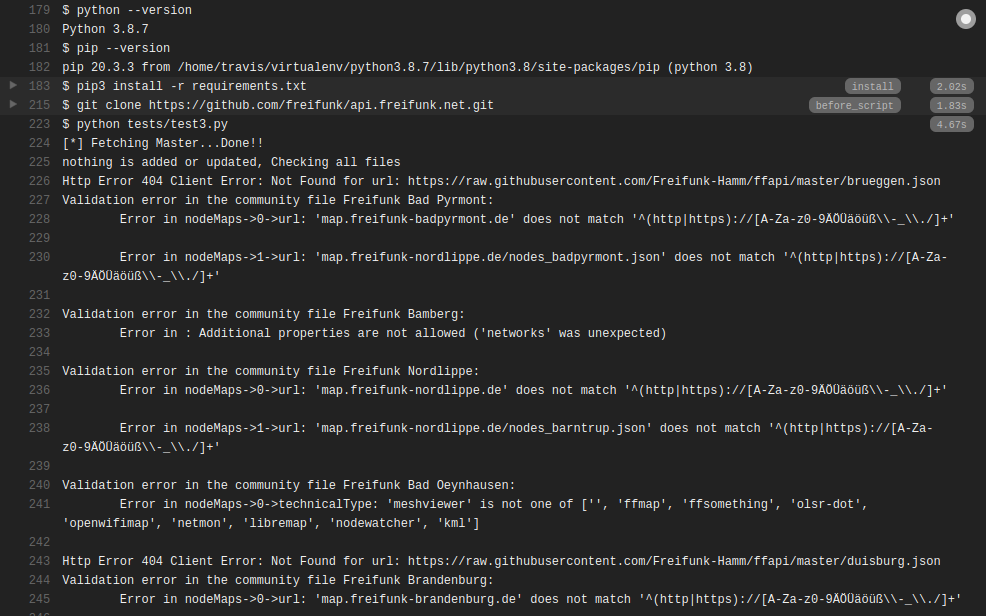
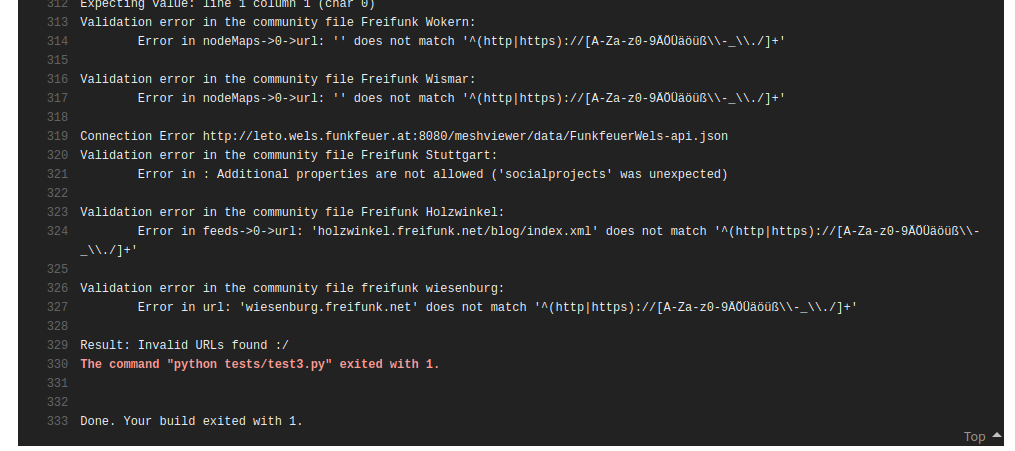
All the API files are collected in the directory repository. And this Travis job validates the data of the API file data, when they are updated or added to the directory.json
If you recall as I have added new spec file by embedding latitude, longitude into an object to adopt with the jsonforms custom renderer for map picker using react-leaflet. This would affect a lot of other tools like Community finden, Kontakt, etc which are truly based on the lon, lat fields of the API files. But luckily all these tools use a summarized API file, And the collector script is used to collect all the communities files.
Improvements:
Deserialized geoCode object and appended the fields to the respective locations. So that the fields are set to their old locations.
I have started the project with minimal understanding of react, typescript and jsonschema. But it was very fun to understand and work on. I really liked this way to learn new things rather than reading or doing a course. Every issue that I have encountered had leaded me to understand the things briefly. I’m really thankful to freifunk for the opportunity. And a big shout out to my mentor Andreas Bräu for absolutely wonderful guidance and support.
Hi super happy to see you here! It has been an exciting and productive summer from which I learnt a bunch of new stuff and irdest plus GitLab have been gracious on me. The project went through many ups and downs but we made our way fixing the bugs and making things work as expected. I hope I’ll be able to convey some information of the work done by me on apiece of this magnificent software over the course of the summer. Let’s begin!
Irdest!?
Okay, so first things first. Let me introduce you with Irdest and what it does to make sure we are on the same page and irde.st doesn’t sound completely (we)ird to you, and then we’ll progress on the title afterwards. First, I’ll try explaining it in a single line,
"Irdest... is a beast!"
Okay no jokes this time(that was no joke btw), going to explanation for real xD, irde.st is a software suite that allows users to create an internet-independent, decentralized & ad-hoc wireless mesh network. It removes all the dependencies of a user from a specific service and enables users to create a local network mesh of their own. It does not expose data or information of the user. Even the IPs of the peers present in the mesh are not known, they communicate via routers and the entire communication is end-to-end encrypted between the users, thereby increasing privacy in user data. As of now, Irdest supports various functionalities to users like sharing files over the network created, call between users, and messaging.
A Gist
This summer was focused on building the FFI Layer to implement the features supported by the library in the upstream. So if you have been following the initial three posts by me on the same topic, then you must be aware of the fact that the biggest challenge being encountered is compiling library properly and linking it to the application in the compile time itself.Apart from this, considerable challenges were about maintaining the robust CI which makes sure we don’t break stuff at any point of development process, and the very sensitive FFI layer. We got through these challenges and finally implemented some of the upstream features in the application, but not all. Because with this sophisticated setting of the components we need to move forward carefully in order to not break stuff, and with limited time in our hands we decided to implement some of the very basic features in the application and write an unbreakable CI for them, from which we can make use of the build artifacts and can keep track where things break.
Work Done
Without going into too much depth of the concepts/thought process and discussion,let’s quickly touch upon the work done in the course of this summer of code. You can refer to the previous posts if find yourself interested in detailing of the changes made/steps taken and why and stuff like that.
I. Compiling the Rust Library
The very first thing I did as a part of the summer of code was fixing the rust library compilation. Initially, the rust library was broken due to the massive refactor and some portion of the huge codebase being left.Due to compilation errors in the rust library(and I being beginner to Rust back then) it took some time to fix the errors, refactor the remaining portion of code accordingly and make it build green. As soon as the rust library was up, the target was to make the application compile and link the library to the application in the compile time.With all these changes being made, a challenge was to write CI for all this cross-compilation setting, which I had never done before.
II. Writing the CI
Writing the CI for android components including our FFI bridge wasn’t that tricky, but it did require some good knowledge of cross-compilation, Cargo and obviously android :P. But we ended up implementing that too, and with the current state of CI, nothing can break easily and we have awesome and strict checks that compile the components as per the need. We made use of GitLab’s one of the greatest and finest works, which is their CI,how they organize and define Pipelines, Jobs, triggering mechanisms and artifacts handling in subsequent and post Jobs. We combined the power of GitLab-CI and our own custom docker image irdest-android-build-env. This made our CI run lightning fast, Jobs that took 11mins to run without any Hi-Fi image being used now finished in 3 to 4 minutes, this was a huge gain and we were able to optimize our CI runs even more via redefining Pipelines, Jobs flow and via introducing the concept of Child Pipelines, another great piece of work by GitLab.
III. Implementing the Features Supported by Library
After all this CI and basic stuff being done, we moved ahead with implementing the functions supported by our rust library in the application. So I implemented the login and registration features, both in the single MR and due to very less time left in hands, I had to make major UI changes in the same MR, thereby increasing its size, the UI changes were not stellar, but they made the application layouts very responsive and with almost zero dimension hardcodings, everything works like springs, other ones get adjusted automatically, if the change is observed/experienced by any one of all present(for a particular layout).
IV. Some UI Fixes
Also there was a very nasty UI bug that I can remember of, in the Login/Registration screen, in which the screen got split into two components,the login one and the registration one, so in this I setup the optimal fragment transactions and created an abstract layout in the root screen which is empty by default and sets the desired layout file as per the requirements, e.g., it shows the Registration one if clicked on registration button and similar for the others.
V. Codebase Modernization
In the final days, we moved towards modernizing the application codebase via following some best practices in it and removing the old/deprecated ones : P , but sadly this couldn’t be merged because of the changes made in the NDK v23 API,which made our cross-compiler plugin incompatible with the project and thereby leading to CI failures, although all of this has now been fixed locally at my fork, but we wish to implement a stable and elegant solution after pondering on the problem for some time. So, along the lines for codebase modernization, the opened MRs included the migration from ol’ school Groovy Gradle files for dependency management to human readable Kotlin DSLs, along with some tool version bumps(out of which one was our NDK which I bumped to v23from v21 xD, yeah I can see ‘ya a bit sad, it hurts ; ( ) and some changes in Kotlin scripts we were able to compile the library directly from the Android-Studio itself, which previously was a great PITA and we had to manually compile the library. The next MR targeted the migration from legacy view scans to ViewBinding, increasing the application performance!
Well there are really a bunch of improvements that can be made in the existing codebase! Let me help you think of few:
* Writing Unit tests for the features implemented by far * Writing Instrumented tests for UI flow implemented by far * Making the application support many/some more functions that the library supports * Running instrumentation tests on CI * Fixing the NDK v23 incompatibility with our cross-compiler plugin
last entry was a joke(that was no joke btw), ignore it xD
Acknowledgements : )
Well we finally arrive here. A huge thanks to my amazing mentor, Spacekookie ❤️, who was always there to help me out when stuck and shared their valued thoughts on what directions we need to take for the project. Discussions with them have always been super super insightful and let me ponder for a while about their thought process in figuring out the solutions. A big thanks to you again! Nextly, this project would never have been possible without the organization Freifunk where I got accepted as a GSoC’21 student to work on one of their project. It was a truly amazing experience where I learnt a lot of new stuff and met people having similar interests, which made the project and discussions more involved, productive and helpful. Thanks to all. Although I’m a bit disappointed about the very limited time we had to work on the project and couldn’t make it to the level we thought at a point of time.
But anyways, super happy after working on Irdest!
Btw you can find me on GitHub with username: s-ayush2903 👀
Cheers Until next time we meet 🥂 ~Ayush Shrivastava
Hell yeah, we paved our way to the conclusion of summer of code while working on this magnificent piece of software, Irdest and I’m super excited that you too are here! It is super happy to see if you’ve been following the series of the trailing blogs where I shared the progress the project made with the time of the course of the summer and the proposed timeline. Okay, so in the final phase of summer of code I focused on implementing the features supported in the upstream by Irdest(in the Rust library) in the android application, along with implementing better CI(will touch upon it later) and revisiting how we used our pipelines, Jobs and our custom docker image for CI, also, easing the cross-compilation for developers and modernizing the application codebase via using the best practices, although we faced blockers due to internal changes in NDK v23 and could not go ahead with all the changes, yeah quite sad : (
Okay, so now let’s see in detail and discuss the work done on the each component and brief thought process behind decisions made. This document first contains the work in final phase of summer of code
I. Implementation of Features Supported by Irdest
This was the crux of the project and quite a tricky and technical task to implement, all the work done on fixing and rewriting the FFI layer, whether it be from android application side or the android-support crate from the rust library, in previous phase comes into action here. Considering the time available to us and keeping in mind about not being overwhelmed or too excited to write a bunch of core-library functions, we decided to implement the basic functionality of user Registration and Login in the Application, and manually test these functionalities work fine and wrote a CI for them as well, to not let regressions creep in our codebase again. Yeah, so for implementing the Registration feature in the application, I fixed the FFI layer(again : P) and correctly set the wrap/unwrap functions in the rust side of FFI layer, fixing package name along with mentioned tweaks resulted in correct functioning of the Registration feature. So you can now create a new user and get a cryptographic ID assigned to it and use the credentials to login to the application. Making similar changes in the Login function of library, fixed stuff. With these library functions being fixed, the Auth began to function, theoretically. I had to change and fix the UI/Navigation setup in the application, how screens are changed/exchanged etc, in order to make Auth work, from point of view of an end-user.
II. Redefining & Re-architecting the App Navigation
Previously, the Register screen wasn’t being displayed properly, it was nested or better word to use, split the screen in two parts, Login one and Registration one(see we/irdest/#21 for more context and a clear picture). The problem turned out to be how Fragment transactions in the application were being handled and how we exchanged layout files on-the-fly along with the aforementioned Transactions. So previously everything was handled inside a single root file only, the layout(of login screen) was already present there by default and on going to registration did not entirely remove the Login layout instead split the screen, and some hardcoded dimensions too were present, making the problem persist more and less easy to fix . So what I did was creating an abstraction in the root layout file and keeping that abstract layout empty by default, with proper dimensions, which made sure the entire space is occupied by the concerned screen. So that root layout in the main file was essentially a FrameLayout which spanned screen accordingly and that FrameLayout held exactly which layout is going to be displayed on the screen. So you can consider this FrameLayout as a container which showed layouts as per requirement and initially contains nothing. Yep, you never get to see an empty screen, which is because we dynamically set the layout to be displayed in the FrameLayout via Kotlin files in the order the screens are supposed to appear. Well that’s enough discussion on the topic. I made all the changes discussed in the previous two sections in a single MR : P , so here it goes * we/irdest/!38
III. Revisiting the Project CI
Okay, so by then we had our Rust library being compiled in our CI pipelines, but we wanted more than that, the usability of the components/artifacts that were being produced as a result of builds. So we decided to publish the rust library to GitLab CI directly from the pipelines and use those artifacts as per need.Also, we used to publish the APK but since no cross-compilation was taking place in the CI, hence the APK being published from there was pretty much useless, so we enabled the cross-compilation in the CI and continued the APK uploading, as a result of which, the application installed using the APK from CI pipelines was running properly on the device. Next were some productivity related changes madein the CI, e.g., by design the APK obtained from application build is stored deep down in the app/build/.../.../debug/app-debug.apk and was being uploaded to same path in the artifacts archive from GitLab CI, I removed this Matryoshka dolls style hierarchy and moved the needed build files/reports to the top level directory.
You can find the corresponding MRs below: * Enabling the Cross-compilation: we/irdest/!34 * Uploading Rust Library as CI artifact: we/irdest/!35 * Removing Matryoshka dolls style artifacts archive hierarchy: we/irdest/!40 * Uploading Lint Reports on Failure: we/irdest/!42
IV. Modernizing the Application Codebase
In the final days of the summer of code, we took active and fast steps to migrate chunks of our application codebase to follow Modern Android Development practices. Although, due to some NDK version incompatibility with the cross-compiler plugin we were unable to merge these changes and unable to fix our docker image too.But anyways, since the CI was green previously with optimized build time and our exhaustive docker image, so it’ll have to work again this time too! Okay, so coming back to the topic, the first MR I created in this direction was the migration from Groovy Gradle files to Kotlin DSLs, this migration already as numerous and obvious benefits over conventional Groovy Gradle files, but the cherry on the top was that with these commits in the MR, the cross-compilation was automatically being triggered on hitting the build button/icon only! Previously we had to compile the library first and then the application, to link the library to the application, but this MR saved us a huge time and PITA : )
The next step was regarding improvement of application performance via reducing Memory consumption while it is running. To achieve it we first eradicated all the findViewById() calls and the not so recommended Kotlin Synthetics as well, you can learn about the reason for the change in the linked issue(s). We instead used ViewBinding to bind and reference the views in runtime without worrying about the application crashes, this was a huge asset and since no view scans were being performed in the application runtime, the application runtime speed also increased and resulted in a decrease of memory consumption. But sadly,we couldn’t go ahead with the merging of these MRs because of the mentioned NDK version and cross-compilation plugin incompatibilities : ( We’ll be able to merge these as soon as we fix the docker image. Although, there is a way to fix it but that is not elegant, also, we want to do it for once and all, like no need to touch that CI file again unless we have to introduce some entirely new Job. Find the corresponding linked MRs here: * Migration from Groovy Files to Kotlin DSLs: we/irdest/!36 * Using ViewBinding & Remove Slow stuff: we/irdest/!41
And, the issue: * Using ViewBinding instead old methods: we/irdest/#22
Cheers Until next time we meet and hope to see ‘ya in the final report! ~Ayush Shrivastava