Assembling the testbed
I decided to give you a brief intorduction to the development of my testbed. In the past month most of the time I experimented with different virtual environments for kernel development. The pros of virtualization:
- Fast test cycles: multiple virtual machine (VM) can use the same, freshly compiled kernel
- No physical devices, you dont have to reboot your machine every time when you want to test your recent kernel changes. VMs reboots very fast (about 6-7 sec in my current setup)
- Flexible network virtualization: you can connect your VMs with virtual ethernet links to virtual switches
My current worflow looks like this:
1. Make changes in the kernel code or configuration (make menuconfig or .config file)
2. Compile the modified kernel
3. Boot the virtual machines with the new kernel
4. Test if works, debug, etc.
5. Goto 1.
In the following you can find a detailed intro how to setup the kernel development and test environment with QEMU and virtual networking
The key components
On my host machine I use the following softwares for the setup:
- Ubuntu 18.04 Desktop
- Default 4.15 kernel
- QEMU 2.12
nmcliNetworkManager console interface for bridge creation
Some info about the VMs:
- Ubuntu Server 18.04
qcow2cloud images - MPTCP supported 4.14 kernel
cloud-initfor customizing the cloud images
My current testbed
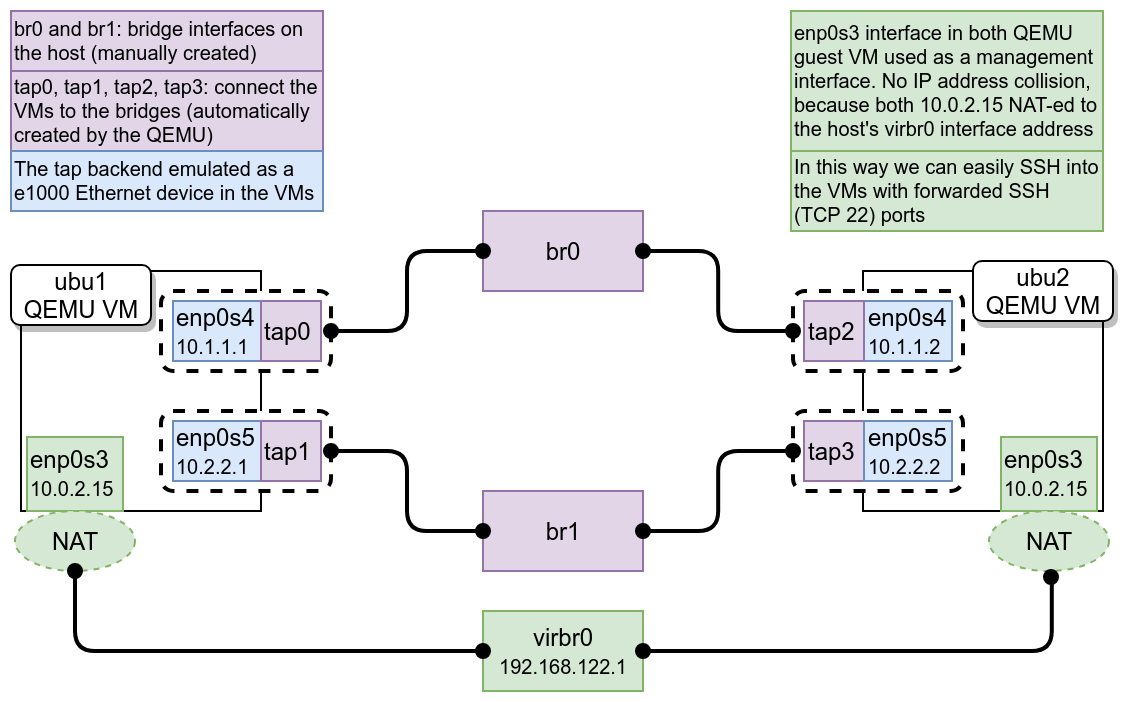
The picture above give the main components of the network configuration of my development environment. I try to explain the steps for reproducing the environment. This section shows how I made the virtualization environment on the host machine. The QEMU brings lots of neat features for easy virtualization, like connect your VMs to bridges on your host, port-forward some port from guest to the host, load external kernel to the guest, etc. We will need all of them for the development.
Get the dependencies
Step 1) Install the required softwares for kernel compilation
I use Ubuntu 18.04 where most of the required components are available from the default repository and you can install them with a simple apt command. First I installed the packages for kernel compilation, you can find lots of resources on the inetrnet about the current dependencies, in my case:
$ sudo apt install git fakeroot build-essential ncurses-dev xz-utils libssl-dev bc bison felx libelf-dev
Step 2) Install the softwares for the virtualization
Now we will install QEMU and some additional tools for maximum compatiblitiy. This will install QEMU 2.11 version. For my setup I compiled and installed the 2.12 version from source, you can find more info here: https://www.qemu.org/download/#source This version contains a simplified -nic networking option described here: https://www.qemu.org/2018/05/31/nic-parameter/
$ sudo apt install qemu-kvm libvirt-clients libvirt-daemon-system bridge-utils virt-manager cloud-utils
Step 3) Get the MPTCP kernel source code
After lots of effort looks like MPTCP will be merged into the mainline kernel soon, so in the near future this step will be deprecetad, but until that you can get the MPTCP kernel source form github
$ git clone -b mptcp_v0.94 git://github.com/multipath-tcp/mptcp
Step 4) Get the Ubuntu Cloud image (what we will use as a rootfs)
With QEMU can boot cloud images which is very common in cloud enviroments, where the installation of the linux distributions might be difficult for the end user or requires lots of resources. With cloud images you can skip the installation of the linux distribution (for example Ubuntu Server) you can access minimal set of softwares and install more with the package manager. I get the latest Ubuntu Server cloud image from here: https://cloud-images.ubuntu.com/bionic/current/ There are lots of architectures and formats, I use https://cloud-images.ubuntu.com/bionic/current/bionic-server-cloudimg-amd64.img which is for QEMU (qcow2 format).
Preconfigure the networking
In the following we will take look for the network setup. This is very easy, we will make two bridges for the VMs. You can imagine these as switches where you can plug the UTP cables of the VMs. Also, this method is very flexible, so you can setup these bridges with Mininet or NS3 network simulator and you plug your VMs into them. With those simulators you can simulate Wi-Fi, LTE or LoRa links instead of error free, reliable ethernet links. But for simplicity we will use regular linux bridges now.
Step 1) Create two briges with nmcli
With a few command we can make two linux bridges with the NetworkManager command interface nmcli. This is probably already preinstalled on your machine. Important note: we use nmcli because this makes permanent changes, so this will keep the bridges after a reboot of the machine. Also with this method we can avoid any config file modification.
$ #Setup the bridge interfaces
$ nmcli con add ifname br0 type bridge con-name br0
$ nmcli con add ifname br1 type bridge con-name br1
$
$ #Disable the STP because we need both path later
$ nmcli con modify br0 bridge.stp no
$ nmcli con modify br1 bridge.stp no
$
$ #Disable DHCP on the bridges
$ nmcli device modify br0 ipv4.method disabled
$ nmcli device modify br1 ipv4.method disabled
$ nmcli device modify br0 ipv6.method ignore
$ nmcli device modify br1 ipv6.method ignore
$
$ #Activate the bridges
$ nmcli con up br0
$ nmcli con up br1
Step 2) Configure the qemu-bridge-helper to get know QEMU from the bridges
You have two option here. It depends on QEMU version and your linux distribution on the host machine, but there is two config file you have to modify. The content of the files should be the same in both cases, to tell QEMU “hello, we have br0 and br1 bridges, use them as you wish”:
allow br0
allow br1
Method #1: create a config file in /etc/
$ sudo mkdir /etc/qemu/
$ sudo gedit /etc/qemu/bridge.conf
$ sudo chmod 640 /etc/qemu/bridge.conf
$ sudo chown root:libvirt-qemu /etc/qemu/bridge.conf
Method #2: modify the content of the /usr/local/etc/qemu/bridge.conf file (which was empty in my case). I use this method for keep my /etc/ clean.
Compile the kernel
Now we prepare the kernel image for the VMs. If we want to use our kernel for network development for example, we have to enable some networking related features in the config. Also, we will use some debugging and tracing tools for inspect the operation, so we should have to enable the debug informations.
Step 1) Make the initial config (defconfig)
With the following commands we will create a .config file what we can use as a starting point of the configuration. Then we can modify this file or make further changes with make menuconfig
$ #Assuming you already cloned the MPTCP kernel at the beginning of the tutorial
$ cd mptcp
$ make x86_64_defconfig
$ make kvmconfig
$ make -j `nproc --all`
This will gives you the compiled kernel what you can find the arch/x86/boot/bzImage place.
Step 2) Enable the MPTCP and debugging
Now we have to enable the MPTCP and the debug features, because both of them disabled by default. Also I will enable tc netem module which will be useful for limit traffic rate to lower bandwidth. I will use eBPF (more info here: http://www.brendangregg.com/ebpf.html), ftrace (https://lwn.net/Articles/370423/) and perf (https://perf.wiki.kernel.org/index.php/Main_Page) for tracing and debugging. Modify the .config file (or search all the features in make menuconfig, but in this case I don’t recommend that).
#Common debug parameters
CONFIG_BLK_DEBUG_FS=y
CONFIG_CIFS_DEBUG=y
CONFIG_DEBUG_BOOT_PARAMS=y
CONFIG_DEBUG_BUGVERBOSE=y
CONFIG_DEBUG_DEVRES=y
CONFIG_DEBUG_FS=y
CONFIG_DEBUG_INFO=y
CONFIG_DEBUG_KERNEL=y
CONFIG_DEBUG_MEMORY_INIT=y
CONFIG_DEBUG_STACKOVERFLOW=y
CONFIG_DEBUG_STACK_USAGE=y
CONFIG_PM_DEBUG=y
CONFIG_PM_SLEEP_DEBUG=y
CONFIG_PNP_DEBUG_MESSAGES=y
CONFIG_SLUB_DEBUG=y
CONFIG_X86_DEBUGCTLMSR=y
CONFIG_X86_DEBUG_FPU=y
CONFIG_GENERIC_CPU_AUTOPROBE=y
CONFIG_GENERIC_IRQ_PROBE=y
CONFIG_KPROBE_EVENTS=y
CONFIG_KPROBES_ON_FTRACE=y
CONFIG_KPROBES=y
CONFIG_KRETPROBES=y
CONFIG_OPTPROBES=y
CONFIG_PROBE_EVENTS=y
CONFIG_UPROBE_EVENTS=y
CONFIG_UPROBES=y


#eBPF related parameters
CONFIG_BPF_EVENTS=y
CONFIG_BPF_SYSCALL=y
CONFIG_BPF=y
CONFIG_HAVE_EBPF_JIT=y

#perf related parameters
CONFIG_PERF_EVENTS_INTEL_CSTATE=y
CONFIG_PERF_EVENTS_INTEL_RAPL=y
CONFIG_PERF_EVENTS_INTEL_UNCORE=y
CONFIG_PERF_EVENTS=y

#tracefs related parameter
CONFIG_DYNAMIC_FTRACE_WITH_REGS=y
CONFIG_DYNAMIC_FTRACE=y
CONFIG_FTRACE_MCOUNT_RECORD=y
CONFIG_FTRACE_SYSCALLS=y
CONFIG_FTRACE=y
CONFIG_KPROBES_ON_FTRACE=y

#Enable MPTCP
CONFIG_MPTCP_BINDER=y
CONFIG_MPTCP_FULLMESH=y
CONFIG_MPTCP_NDIFFPORTS=y
CONFIG_MPTCP_PM_ADVANCED=y
CONFIG_MPTCP_REDUNDANT=y
CONFIG_MPTCP_ROUNDROBIN=y
CONFIG_MPTCP_SCHED_ADVANCED=y
CONFIG_MPTCP=y
Save the modified .config file.
Now we will enable the netem in menuconfig just to show this method as an example. In the kernel folder type
$ make menuconfig
Then in the menu navigate to the Network emulator (NETEM) and enable it by pressing the y button
-> Networking support
-> Networking options
    -> QoS and/or fair queueing
        -> Network emulator (NETEM)
Step 3) Recompile the kernel with the new features
Now we have to recompile the kernel to instrument the new features. The kernel image (bzImage) file size should be larger because of the debug informations
make -j `nproc --all`
Booting the guests
This is the most important part of the tutorial because we have to take care lots of details. If the following steps not works as expected on your machine or you have troubles you can find lots of resources on the web (like: https://www.collabora.com/news-and-blog/blog/2017/01/16/setting-up-qemu-kvm-for-kernel-development/ or https://www.youtube.com/watch?v=PBY9l97-lto)
Step 1) Create the cloud-init input images
We have a fresh .img file to boot it, but think about it for a second: what is the username and the password for the first boot? How we can change that or add SSH public ker to the authorized_hosts? Can we change the username and the hostname on boot? The answer for all the question: yes, all of the possible with cloud-init (http://cloudinit.readthedocs.io/en/latest/)
Create a file with the host infos (hostname, username, SSH public key, etc) with the following format. Save it on the name you wish, cloud-init-data.txt for example. (Replace the ssh-authorized-keys parameter with your own public key, .ssh/id_rsa.pub for example)
#cloud-config
hostname: ubu1
users:
  - name: test
ssh-authorized-keys:
  - ssh-rsa AAAAB3[...] spyff@pc
sudo: ['ALL=(ALL) NOPASSWD:ALL']
groups: sudo
shell: /bin/bash
Now you can create a cloud-init image file with the configuration above what you will add to the VM. The cloud-init module of, which is preinstalled on every Ubuntu cloud image file will find it and configure the guest.
$ cloud-localds ubu1.img cloud-init-data.txt
The output of the command is a small image file with the cloud config.
Step 2) Boot the guest first time
In this step we just try out if everyting works. If the guest VM boot in, we can install additional softwares, kernel modules and headers, etc.
$ sudo qemu-system-x86_64 \
-kernel mptcp/arch/x86/boot/bzImage \
-append "root=/dev/sda1 single console=ttyS0 systemd.unit=graphical.target" \
-hda bionic-server-cloudimg-amd64.img \
-hdb ubu1.img \
-m 2048 \
--nographic \
--enable-kvm \
-nic user,hostfwd=tcp::2222-:22
In this command we boot the guest VM from the cloud image with the MPTCP kernel. The systemd.unit=graphical.target kernel command line parameter is important otherwise we will boot into rescue mode. -hdb ubu1.img pass our cloud config informations to the geust. The parameter -nic user,hostfwd=tcp::2222-:22 forward the guest’s SSH port to us as a local TCP 2222 port. This is useful if we have more than one geust VM, we can forward each geust’s SSH port to different local port.
Important note: -nic QEMU parameter only works with >= 2.12 versions, with 2.11 you can use -netdev user,id=net0,hostfwd=tcp::2222-:22 -device e1000,netdev=net0 See this for details: https://wiki.qemu.org/Documentation/Networking#The_new_-nic_option
We can SSH into the guest VM:
ssh test@127.0.0.1 -p 2222
Step 3) Prepare the second VM
Repeat Step 1) with but modify the hostname to ubu2 in the cloud-init-data.txt first. Then create a new ubu2.img file with cloud-localds what we will pass to the second VM with the -hdb parameter.
If we want to boot the same .img file with two QEMU guest we get the following error: qemu-system-x86_64: -hda bionic-server-cloudimg-amd64.img: Failed to get "write" lock Is another process using the image?. We have to option now: copy the .img file as a new one, or use backing files. With backing files we can use the base image as a common “root” of the two VMs. To get a brief intro to backing files I recommend this article: https://dustymabe.com/2015/01/11/qemu-img-backing-files-a-poor-mans-snapshotrollback/ Lets create two images:
$ qemu-img create -f qcow2 -b bionic-server-cloudimg-amd64.img ubuntu1.img
$ qemu-img create -f qcow2 -b bionic-server-cloudimg-amd64.img ubuntu2.img
Now we can pass the backing files for the VMs what they can read and write, but they don’t touch the original bionic-server-cloudimg-amd64.img file and save the differences only. Keep in mind those changes will lost if you delete the backing files and without the base image your backing files doesn’t works anymore.
Step 4) Boot both VM without network config
For config the network interfaces of the virtual machines, just boot both of them and try if we can SSH access both console at the same time. Open four terminal windows (2 SSH + 2 QEMU) and type the commands
$ sudo qemu-system-x86_64 \
-kernel mptcp/arch/x86/boot/bzImage \
-append "root=/dev/sda1 single console=ttyS0 systemd.unit=graphical.target" \
-hda ubuntu1.img \
-hdb ubu1.img \
-m 2048 \
--nographic \
--enable-kvm \
-nic user,hostfwd=tcp::2222-:22 \
$ sudo qemu-system-x86_64 \
-kernel mptcp/arch/x86/boot/bzImage \
-append "root=/dev/sda1 single console=ttyS0 systemd.unit=graphical.target" \
-hda ubuntu2.img \
-hdb ubu2.img \
-m 2048 \
--nographic \
--enable-kvm \
-nic user,hostfwd=tcp::3333-:22 \
Then login
$ ssh test@127.0.0.1 -p 2222
$
test@ubu1:~$
$ ssh test@127.0.0.1 -p 3333
$
test@ubu2:~$
Step 5) Configure the networking on the guest machines
This is a little bit tricky step. We dont now the names of the network interfaces yet, so we only guess. For exapmle we can check the default interface name on the guests with ip a
$ sudo -i
# ip a
1: lo: <LOOPBACK,UP,LOWER_UP> mtu 65536 qdisc noqueue state UNKNOWN group default qlen 1000
link/loopback 00:00:00:00:00:00 brd 00:00:00:00:00:00
inet 127.0.0.1/8 scope host lo
   valid_lft forever preferred_lft forever
inet6 ::1/128 scope host
   valid_lft forever preferred_lft forever
2: enp0s3: <BROADCAST,MULTICAST,UP,LOWER_UP> mtu 1500 qdisc fq_codel state UP group default qlen 1000
link/ether 52:54:00:12:34:56 brd ff:ff:ff:ff:ff:ff
inet 10.0.2.15/24 brd 10.0.2.255 scope global dynamic enp0s3
   valid_lft 86157sec preferred_lft 86157sec
inet6 fec0::5054:ff:fe12:3456/64 scope site dynamic mngtmpaddr noprefixroute
   valid_lft 86395sec preferred_lft 14395sec
inet6 fe80::5054:ff:fe12:3456/64 scope link
   valid_lft forever preferred_lft forever
Looks like we use enp0s3 so if we add two more ethernet interface we assume they will get the enp0s4 and enp0s5 names. With this assumptions configure the guests:
On ubu1 guest VM:
# touch /etc/systemd/network/20-wired-enp0s4.network
# touch /etc/systemd/network/21-wired-enp0s5.network
#
# cat <<EOF > /etc/systemd/network/20-wired-enp0s4.network
[Match]
Name=enp0s4
[Network]
Address=10.1.1.1/24
Gateway=10.1.1.2
EOF
#
# cat <<EOF > /etc/systemd/network/21-wired-enp0s5.network
[Match]
Name=enp0s5
[Network]
Address=10.2.2.1/24
Gateway=10.2.2.2
EOF
On ubu2 guest VM:
# touch /etc/systemd/network/20-wired-enp0s4.network
# touch /etc/systemd/network/21-wired-enp0s5.network
#
# cat <<EOF > /etc/systemd/network/20-wired-enp0s4.network
[Match]
Name=enp0s4
[Network]
Address=10.1.1.2/24
Gateway=10.1.1.1
EOF
#
# cat <<EOF > /etc/systemd/network/21-wired-enp0s5.network
[Match]
Name=enp0s5
[Network]
Address=10.2.2.2/24
Gateway=10.2.2.1
EOF
If you scroll back and take a look to the figure you can verify that the IP addresses are matching.
Step 6) Start the guest VMs with additional network interfaces
Now we will start both guest and they can connect each other on both path through the bridges. We have to specify for the QEMU that we want to add two additional ethernet interface for both VM and connect them to the host bridges br0 and br1 (see the figure on the top of the post). Open up two terminal and do the following commands
Start ubu1 VM
sudo qemu-system-x86_64 \
-kernel mptcp/arch/x86/boot/bzImage \
-append "root=/dev/sda1 single console=ttyS0 systemd.unit=graphical.target" \
-hda ubuntu1.img \
-hdb ubu1.img \
-m 2048 \
--nographic \
--enable-kvm \
-nic user,hostfwd=tcp::2222-:22 \
-nic bridge,br=br0,mac=52:54:00:10:11:01 \
-nic bridge,br=br1,mac=52:54:00:10:22:01
Start ubu2 VM
sudo qemu-system-x86_64 \
-kernel mptcp/arch/x86/boot/bzImage \
-append "root=/dev/sda1 single console=ttyS0 systemd.unit=graphical.target" \
-hda ubuntu2.img \
-hdb ubu2.img \
-m 2048 \
--nographic \
--enable-kvm \
-nic user,hostfwd=tcp::3333-:22 \
-nic bridge,br=br0,mac=52:54:00:10:11:02 \
-nic bridge,br=br1,mac=52:54:00:10:22:02
Important: you should specify different MAC addresses with the mac= key, because otherwise the VM you started second will stuck, beacause at the boot it can see the same MAC address on the bridge. Thats because one QEMU process only generates different MAC addresses for his network interfaces. If you start two QEMU process, both will get the same MAC addresses on their ethernet interfaces.
If everyting right you should see the following output on ubu1 VM
# ip a
1: lo: <LOOPBACK,UP,LOWER_UP> mtu 65536 qdisc noqueue state UNKNOWN group default qlen 1000
link/loopback 00:00:00:00:00:00 brd 00:00:00:00:00:00
inet 127.0.0.1/8 scope host lo
   valid_lft forever preferred_lft forever
inet6 ::1/128 scope host
   valid_lft forever preferred_lft forever
2: enp0s3: <BROADCAST,MULTICAST,UP,LOWER_UP> mtu 1500 qdisc fq_codel state UP group default qlen 1000
link/ether 52:54:00:12:34:56 brd ff:ff:ff:ff:ff:ff
inet 10.0.2.15/24 brd 10.0.2.255 scope global dynamic enp0s3
   valid_lft 85004sec preferred_lft 85004sec
inet6 fec0::5054:ff:fe12:3456/64 scope site dynamic mngtmpaddr noprefixroute
   valid_lft 86397sec preferred_lft 14397sec
inet6 fe80::5054:ff:fe12:3456/64 scope link
   valid_lft forever preferred_lft forever
3: enp0s4: <BROADCAST,MULTICAST,UP,LOWER_UP> mtu 1500 qdisc fq_codel state UP group default qlen 1000
link/ether 52:54:00:10:11:01 brd ff:ff:ff:ff:ff:ff
inet 10.1.1.1/24 brd 10.1.1.255 scope global enp0s4
   valid_lft forever preferred_lft forever
inet6 fe80::5054:ff:fe10:1101/64 scope link
   valid_lft forever preferred_lft forever
4: enp0s5: <BROADCAST,MULTICAST,UP,LOWER_UP> mtu 1500 qdisc fq_codel state UP group default qlen 1000
link/ether 52:54:00:10:22:01 brd ff:ff:ff:ff:ff:ff
inet 10.2.2.1/24 brd 10.2.2.255 scope global enp0s5
   valid_lft forever preferred_lft forever
inet6 fe80::5054:ff:fe10:2201/64 scope link
   valid_lft forever preferred_lft forever
5: teql0:  mtu 1500 qdisc noop state DOWN group default qlen 100
link/void
6: sit0@NONE:  mtu 1480 qdisc noop state DOWN group default qlen 1000
link/sit 0.0.0.0 brd 0.0.0.0
Note: modify the content of the /etc/systemd/network/ files if you got different interface names in your VMs. Now you can verify the connectivity between the VMs:
# ping -c 4 10.1.1.2
PING 10.1.1.2 (10.1.1.2) 56(84) bytes of data.
64 bytes from 10.1.1.2: icmp_seq=1 ttl=64 time=0.340 ms
64 bytes from 10.1.1.2: icmp_seq=2 ttl=64 time=0.338 ms
64 bytes from 10.1.1.2: icmp_seq=3 ttl=64 time=0.489 ms
64 bytes from 10.1.1.2: icmp_seq=4 ttl=64 time=0.422 ms

--- 10.1.1.2 ping statistics ---
4 packets transmitted, 4 received, 0% packet loss, time 3055ms
rtt min/avg/max/mdev = 0.338/0.397/0.489/0.064 ms
#
#
# ping -c 4 10.2.2.2
PING 10.2.2.2 (10.2.2.2) 56(84) bytes of data.
64 bytes from 10.2.2.2: icmp_seq=1 ttl=64 time=0.353 ms
64 bytes from 10.2.2.2: icmp_seq=2 ttl=64 time=0.360 ms
64 bytes from 10.2.2.2: icmp_seq=3 ttl=64 time=0.429 ms
64 bytes from 10.2.2.2: icmp_seq=4 ttl=64 time=0.362 ms

--- 10.2.2.2 ping statistics ---
4 packets transmitted, 4 received, 0% packet loss, time 3064ms
rtt min/avg/max/mdev = 0.353/0.376/0.429/0.030 ms
Few other trick
Extend the default disk space in the VM
Extending the image file is fairly simple. For example extending with 5Gb looks like this
qemu-img resize image-file.qcow2 +5GB
But this has no effect on the filesystem. We have to boot and log in to the VM and manually extend the filesystem using parted.
$ sudo parted

#get the list of the available partitons
(parted) print
Model: ATA QEMU HARDDISK (scsi)
Disk /dev/sda: 7730MB
Sector size (logical/physical): 512B/512B
Partition Table: gpt
Disk Flags:

Number  Start   End     Size    File system  Name  Flags
14      1049kB  5243kB  4194kB                     bios_grub
15      5243kB  116MB   111MB   fat32              boot, esp
 1      116MB   7730MB  7614MB  ext4

# use the number of the desired partition you want to resize
# type the new "End" you get from here "Disk /dev/sda: 7730MB"
(parted) resizepart 1
End?  [7730MB]? 7730
Bandwith limit the guest VM interfaces
For function testing, you might be want to collect packet traces or investigate the live traffic with tcpdump. The size of the pcap can growing large which is a problem in disk limited VM environment. To avoid this, you might be want to limit the bandwidth of the network interfaces.
The following commands only affect on uplink (upload, sending) bandwidth, so if you want to limit the bandwidth to both direction, use the same commands on the second machine too.
#limit the upload bandwidth on network interface enp0s4 and enp0s5 to 10Mbps

$ sudo tc qdisc add dev enp0s4 root netem rate 10mbit
$ sudo tc qdisc add dev enp0s5 root netem rate 10mbit
Install kernel modules and kernel headers in the VM
When you build the kernel, use the following command:
$ make -j9 bindeb-pkg
Then you can copy the .deb packages into the VM over FTP or SFTP and install them with dpkg -i *.deb
Install eBPF BCC on the VM from source
Just follow the guide: https://github.com/iovisor/bcc/blob/master/INSTALL.md#ubuntu—source
Be careful if you install clang and llvm the installer maybe use the original names of the binaries like clang-6.0 and llc-6.0 so you have to make a link file to them with the correct names (without version) for the bcc to find them.