Brief summary
In the first post (beginning of the GSoC 2017 project) I made a few checkpoints to complete at the end of the summer. Now I don’t copy them here, but the good news is all of them completed successfully. The main goal was a very simple transparent multipath Wi-Fi link bandwidth aggregation. The proof in the video above. And the details below.
What has been done in August
Because everything tested successfully on a virtual environment, the next step was port everything into a real, LEDE based physical test environment. The first step was to build the LEDE with MPTCP support to the routers. It went without any problem and I have installed it to Netgear R7000 and Netgear R7800 routers. These are quite powerful SOHO routers, R7000 with 1.4GHz- and R7800 with 1.7GHz dual core CPU. But R7800 using more recent architecture so it seems like more than twice as fast as R7000. So I installed ss-redir to R7800 and ss-server on R7000 and configured as before.
On the client, every TCP traffic redirected to ss-redir in the iptables PREROUTING chain (except where the destination is the same LAN as the source). When this happens, the client’s TCP flow from LAN just gets split into two MPTCP sub-flow on the two WAN, which is two Wi-Fi bridge connection in our case. I use some old Ubiquiti devices (2 NanoStation M5 and 2 NanoStation Loco M5) as You see on the video just to try out if it works. When I experimented with ss-server and ss-redir with simple UTP cable connection, it turned out the encryption is very slow even in these powerful CPU-s. I get 700Mbps between the two router (measured with iperf3) but when encryption turned on it slows down 50Mbps or less (depends on the type of the cipher). I decided to fork shadowsocks-libev and make a version which makes the encryption optional. I also created a custom package feed for my LEDE fork which is contains that version. So if You clone MPTCP LEDE and update the feeds, shadowsocks-libev-nocrypto packages are available in the menuconfig. This helps the connection over the ss-redir/ss-server become much faster.
On the server, there is no special config, just an ss-server and static WAN IP addresses with a DHCP server. Every other device (the router with the client, and the 4 Wi-Fi bridges) got the addresses and gateways from DHCP. This makes the configuration very comfortable.
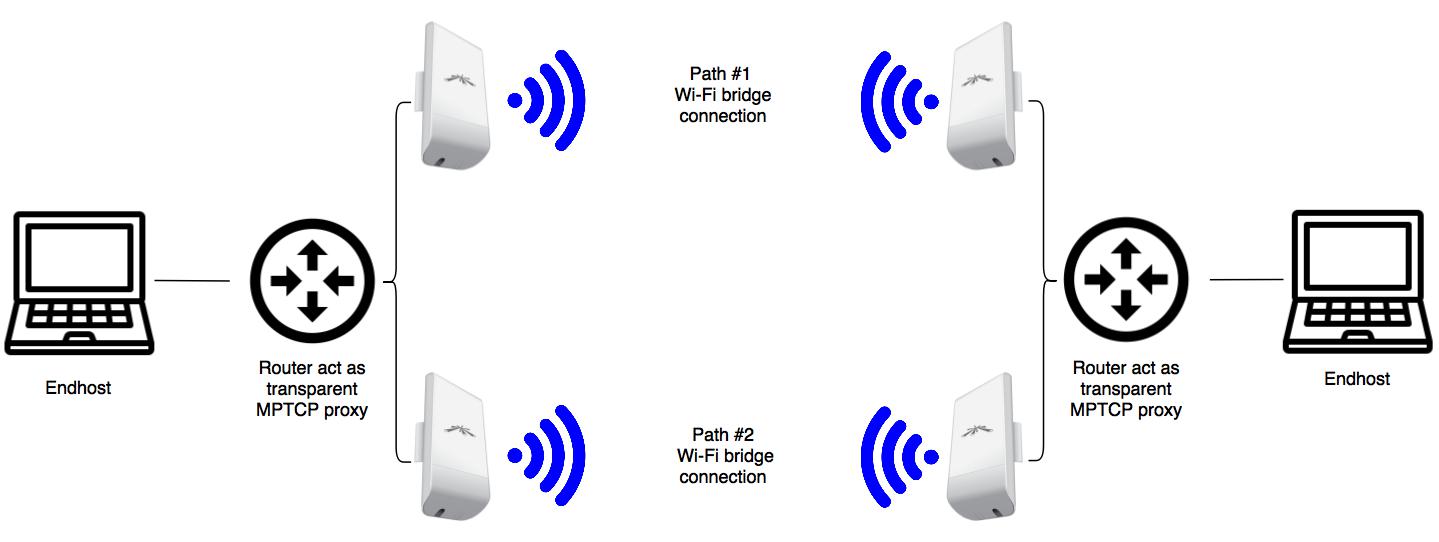
I configured the Wi-Fi station pairs to different bands: 5180MHz and 5700MHz to make sure they are not interfering with each other. Then I started the test! As You can see in the figure (and on the video, but it’s not as clear because of my small desk and extra cables for the PoE injectors) I connected one LAN client to each router. One of them is my PC and the another is my notebook, each of them run iperf3. Very important, as I mentioned in my previous post, none of them have any special configuration! Just plugged into the LAN port of the router and that’s it. During the iperf transmission, I unplug one Wi-Fi bridge (from path #1 VLAN) from the router: the iperf session continues, only the throughput slows down to half, from 40Mbps to 20Mbps. This is the expected result: one MPTCP sub-flow torn down between the routers, but the another still alive and functional. When I plug the bridge back in and get the IP address over DHCP, another MPTCP sub-flow builds back over the recovered Wi-Fi bridge and the throughput goes back to 40Mbps.
Potential use-case and deployment
This is a small proof-of-concept testbed but I think this project maybe works on real-life Wi-Fi mesh networks. It is not hard to imagine a mesh network with multiple available paths between the intermediate router devices. Another use-case is to speed up point-to-point rooftop Wi-Fi links – with this You might be beat Ubiquity airFiber24‘s speed with multiple cheaper bridges :-). As I presented there is a realizable gain for the user with minimal configuration on the routers and no configuration on the end devices. In my opinion, the throughput depends on the CPU performance and not on the number of TCP flows. I also verified this with my virtual environment. So if there is many clients and many TCP flow completely fine but for high throughput, the setup require powerful (x86 if possible) hardware.
Future plans
The work in the GSoC 2017 completed, but there are some thing what has to be done in the future. The most important is the UDP or another kind of traffic. Currently, this is singlepath, routed through the default gateway. There is a MPT application (MultiPath Tunnel, like a multipath VPN without encryption) which is suitable for UDP traffic and handles many paths with different weight value (use paths in different ratios). Another interesting approach is the MPUDP kernel module + OpenVPN but this is a small “hack” for research purposes at this moment.
Sadly the current implementation of shadowsocks-libev is single threaded, using only one CPU core. I would like to make it multithreaded if possible in the near future. I will maintain the MPTCP LEDE repo as long as possible in the future and my shadowsocks fork. It depends on resources, but I would like to make a repo for my feed which contains the compiled packages. And yes, the feed now only contains one application, I would like to improve it with other MPTCP related stuff. The ride never ends, the work continues!
I would like to say thanks for Freifunk to adopt this project and my mentors – Benjamin Henrion and Claudio Pisa for their ideas and help! And of course to Google, for make this project possible.
MPTCP LEDE on github: https://github.com/spyff/lede-mptcp
Feed for packages on github: https://github.com/spyff/packages
Shadowsocks-libev-nocrypto on github: https://github.com/spyff/shadowsocks-libev-nocrypto
Blogpost with the tutorial and detailed configuration: https://spyff.github.io/mptcp/2017/08/27/transparent-mptcp-proxy/
Have you thought about sending openvpn over ss-local(SOCK5)?
Yes, practically that approach probably fine for most networks. But this encapsulation cause TCP-over-TCP operation which might be bad for slower connections. http://sites.inka.de/bigred/devel/tcp-tcp.html
I looked at your tutorial here. https://spyff.github.io/mptcp/2017/08/27/transparent-mptcp-proxy/
I do not believe you truly gotten mptcp to work. What you’re seeing is ss-redir was configured to load balance the traffic through two separate servers. It’s really an effect of so-redir, not mptcp. You can disable mptcp from the kernel and yield the same effect.
I got the same effect with one ss-redir remote address and one TCP flow. But I did not mentioned in the blogpost, I set default gateways on both WAN statically. Thats because sometimes the DHCP cant work properly.
One problem is more confusing to me. How do you set the link bandwidth to 20mbps? I use tc tool to set 2mbps, iperf3 test actually achieve 20~30mbps? It is very doubtful.
Hello!
I do the measurement with these old bridges, both of them are slow by default (20-20 Mbps). But when I tried the operation between virtual machines I used tc to set the bandwidth to 10 Mbps. Very important: if you set the bandwith with tc, be careful with the direction of the transmission! Try iperf3 -R option to reverse the flow!
thanks for your replay.There is another problem. In this article, you introduced use WIFI bridging the two paths,but i see you uplua the network cable.that two interface are WAN interfaces or LAN interfaces(Ordinary routers usually have only one WAN interface)?
Yes, thats right! But in OpenWRT/LEDE you are able to modify the switch configuration. For example, if you have 1 WAN and 4 LAN interfaces you can configure 3 WAN and 2 LAN interfaces from these.
Check my blogpost: https://spyff.github.io/mptcp/2017/08/27/transparent-mptcp-proxy/
In this post you should search for the following part: “R7000 original and modified file, R7800 original and modified file.” and you find the example here how I configured the LAN ports to WAN in those two routers. Very similar on ASUS/TPLink and any other routers too!