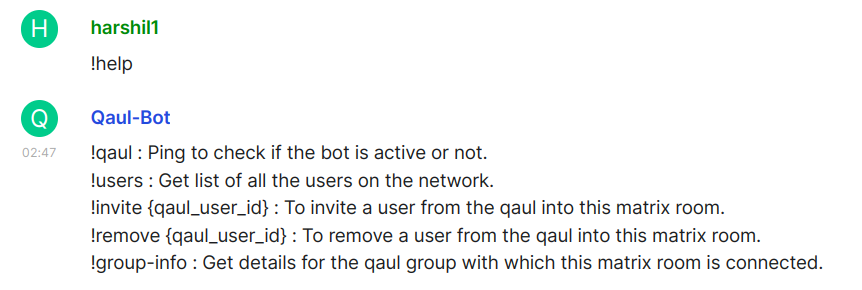
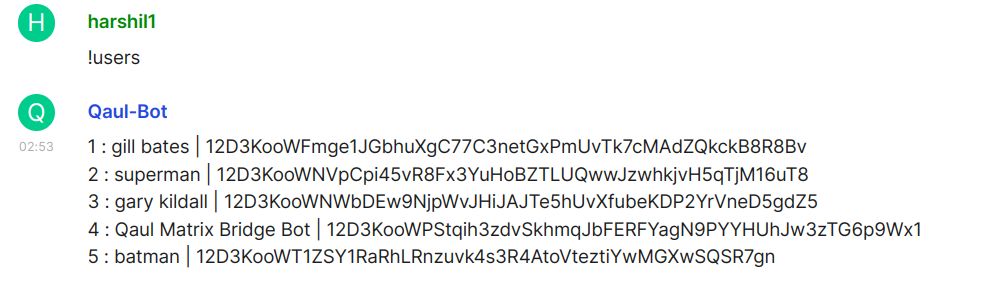
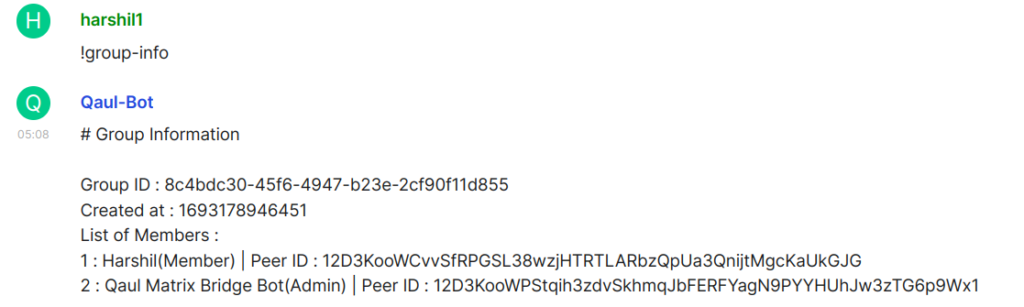
1) Introduction
If you haven’t already done so, I highly recommend reading the introductory blog article on the user space resource allocator for Linux-based OpenWRT access points. The blog gives a thorough introduction to rate and power regulation in IEEE 802.11 devices, which will be beneficial for understanding the work covered later. Happy reading!
Before extending the py-minstrel-ht package, it is crucial to ensure that the user space rate control mirrors the behavior of the kernel Minstrel-HT algorithm. This alignment will establish a reliable basis to evaluate the inclusion of power control in the Minstrel-HT algorithm through performance comparison with the kernel variant.
2) Passive Minstrel-HT
To conduct a precise evaluation of py-minstrel-ht alongside the kernel Minstrel-HT, a passive version of the user space Minstrel-HT was developed. The passive py-minstrel-ht runs alongside the kernel Minstrel-HT where the kernel algorithm performs rate control while py-minstrel-ht passively reports all of its rate selection. In order to compare the rate selection between the Minstrel-HT algorithms, the rate statistics for both rate controls must be identical. As such, he py-minstrel-ht obtains the packet counts via the “stats” API lines from the kernel rate control.
In an ideal scenario, during each rate selection, the statistics on both algorithms would be the same yielding identical rate setting. With the help of this passive variant, it has been easier to evaluate the behavior of the user space rate control and investigate the implementation errors in py-minstrel-ht. The WPCA API through minstrel-rcd can send parsable traces to the user space which can be saved. In the output traces, the WPCA also provides information on the rate selection via “best_rates” line which triggers the rate-setting process in the passive py-minstrel-ht. Similar to the API traces, the passive Minstrel-HT saves its own trace which is later analyzed in conjunction with the kernel traces. The following code section consists an example of such API trace:
wl1;174a4f945a7a9aa0;txs;a0:78:17:74:c2:5f;1;1;1;226;2;233;2;ffff;0;ffff;0
wl1;174a4f945bcf1660;txs;a0:78:17:74:c2:5f;1;1;1;265;2;273;2;ffff;0;ffff;0
wl1;174a4f945bcfaad0;stats;a0:78:17:74:c2:5f;136;0;0;0;7c;0;1b2
wl1;174a4f945bd00750;stats;a0:78:17:74:c2:5f;226;0;0;0;7c;b;436
wl1;174a4f945bd02c80;stats;a0:78:17:74:c2:5f;234;11e;344;31;31;31;53d
wl1;174a4f945bd041c0;stats;a0:78:17:74:c2:5f;233;1b0;385;7c;f8;17e1;3371
wl1;174a4f945bd05d90;stats;a0:78:17:74:c2:5f;265;0;0;0;2;290;7d6
wl1;174a4f945bd07eb0;stats;a0:78:17:74:c2:5f;273;272;592;90;11e;1e7a;3af0
wl1;174a4f945bd0bec0;best_rates;a0:78:17:74:c2:5f;273;1b3;233;231;1f2
wl1;174a4f945bd0e0d0;sample_rates;a0:78:17:74:c2:5f;274;1b7;1f6;226;234;237;266;1f7;227;238;176;1a9;1b5;0;0
The key factors that determine the rate selection are the estimated transmission success probability and estimated throughput of each MCS rate. Hence, before comparing the rate selection, the averaging, success probability, and throughput calculation must match in both algorithms. As a side note, both the Minstrel-HT implementations use the Low Pass Butterworth filter to average success probabilities over time.
The following sub-sections cover an overview of the results obtained from several runs of the passive experiments, each running for 20mins.
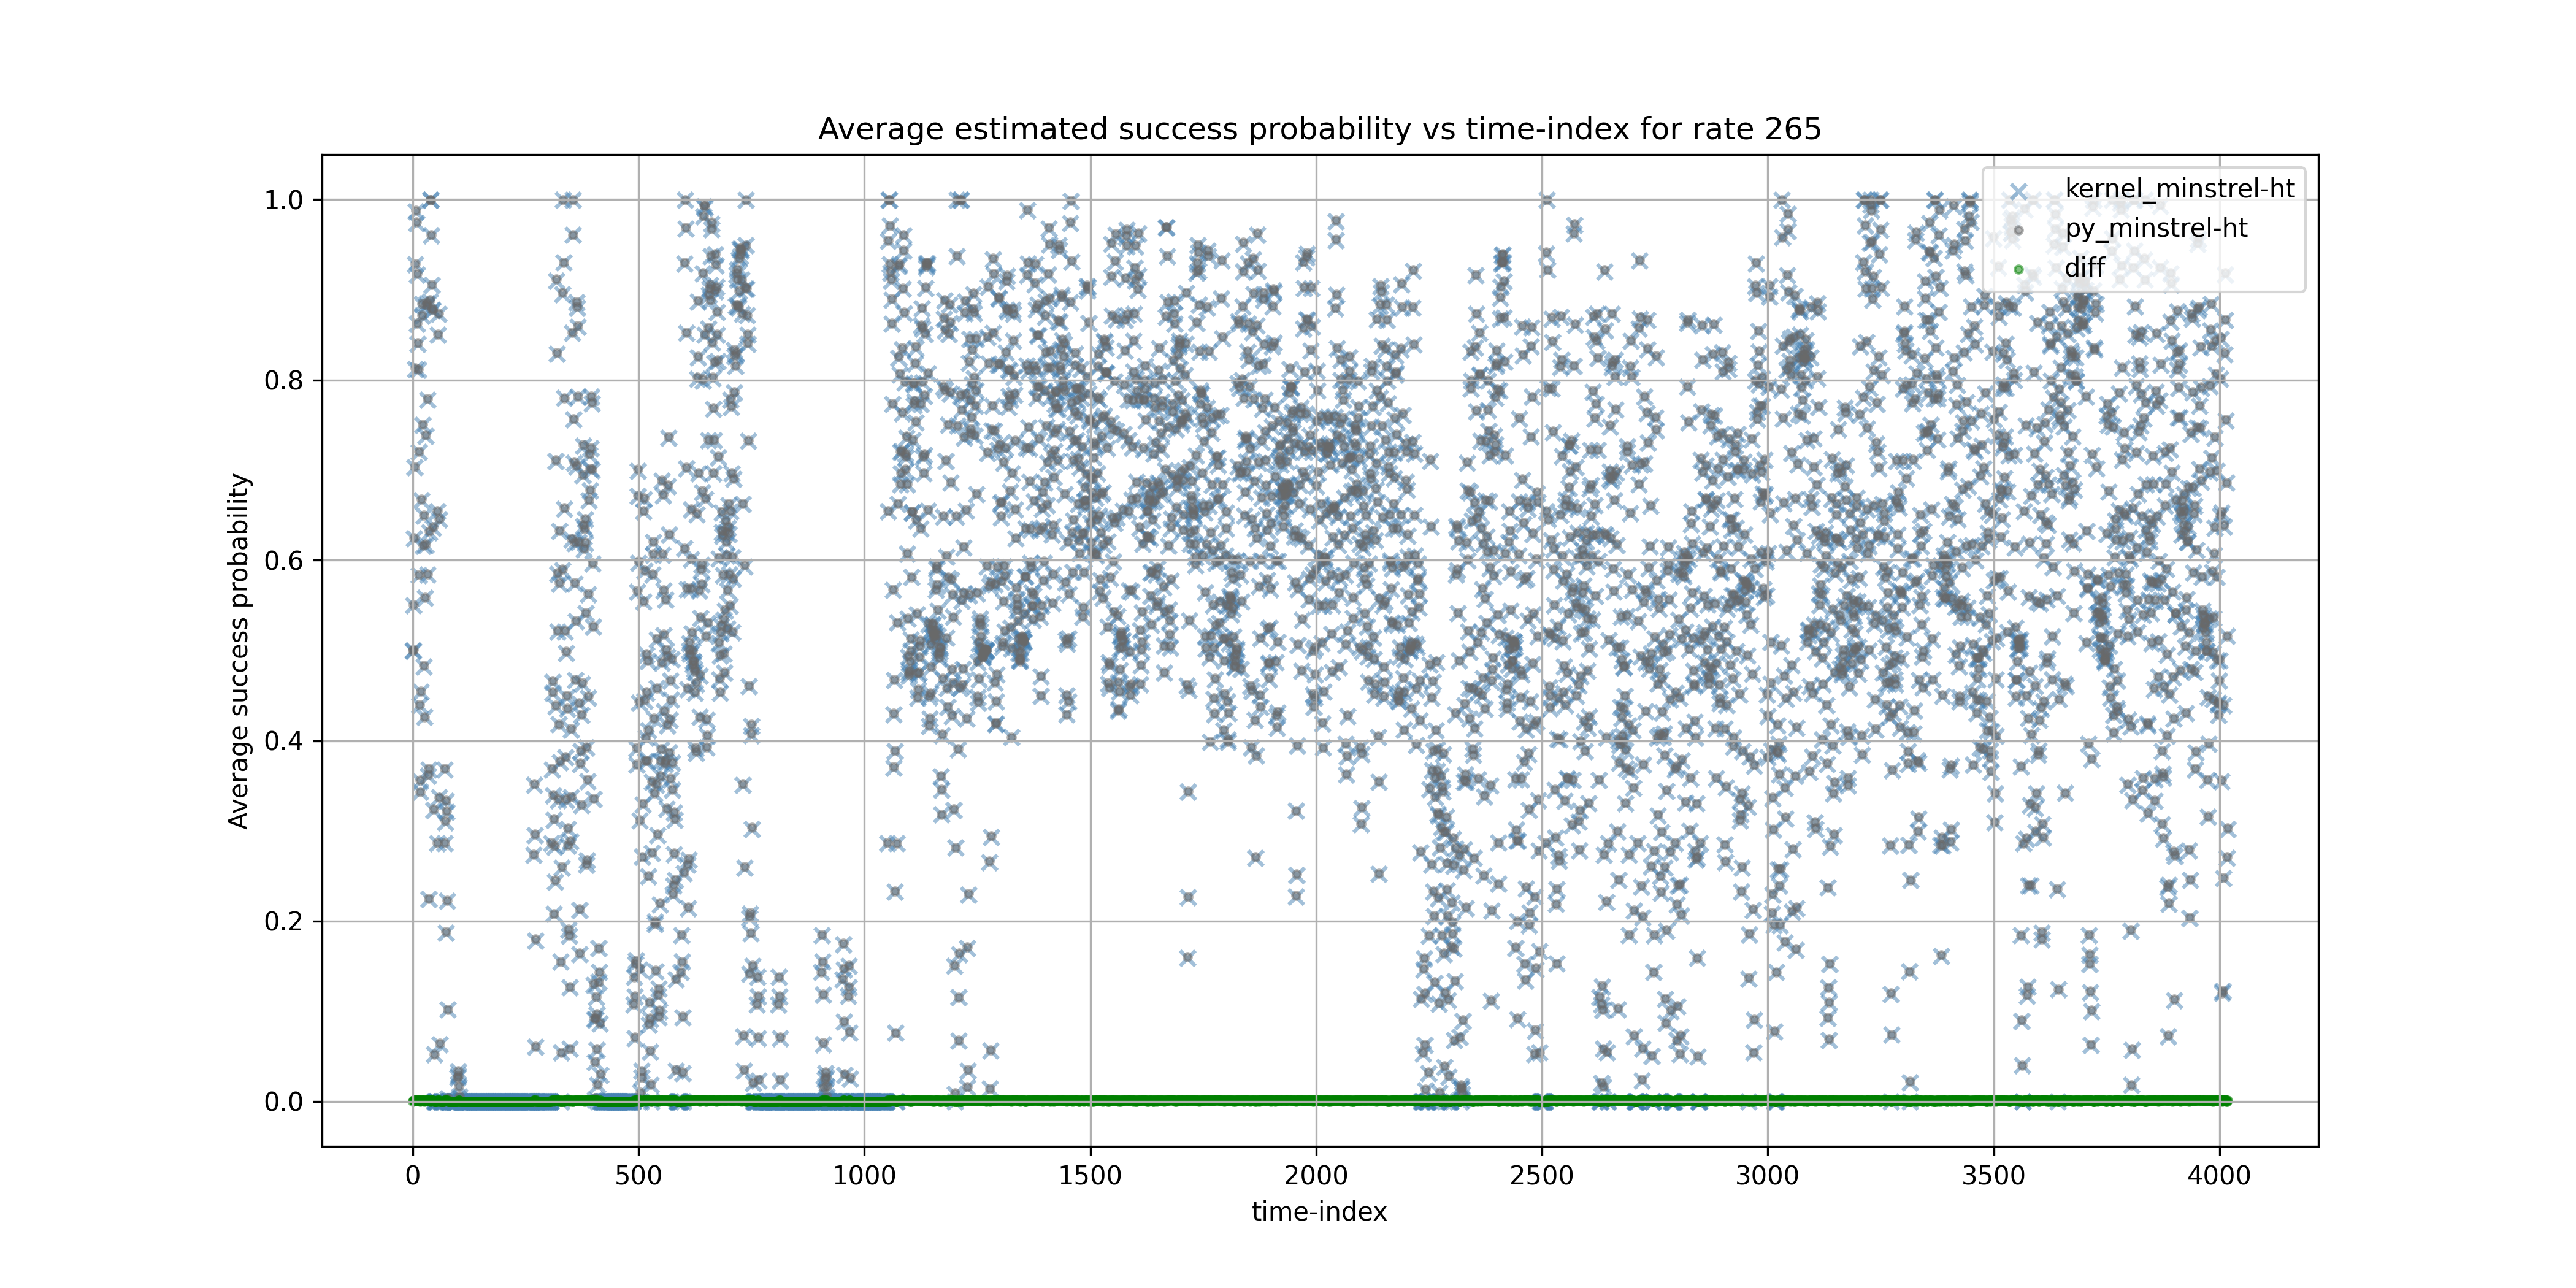
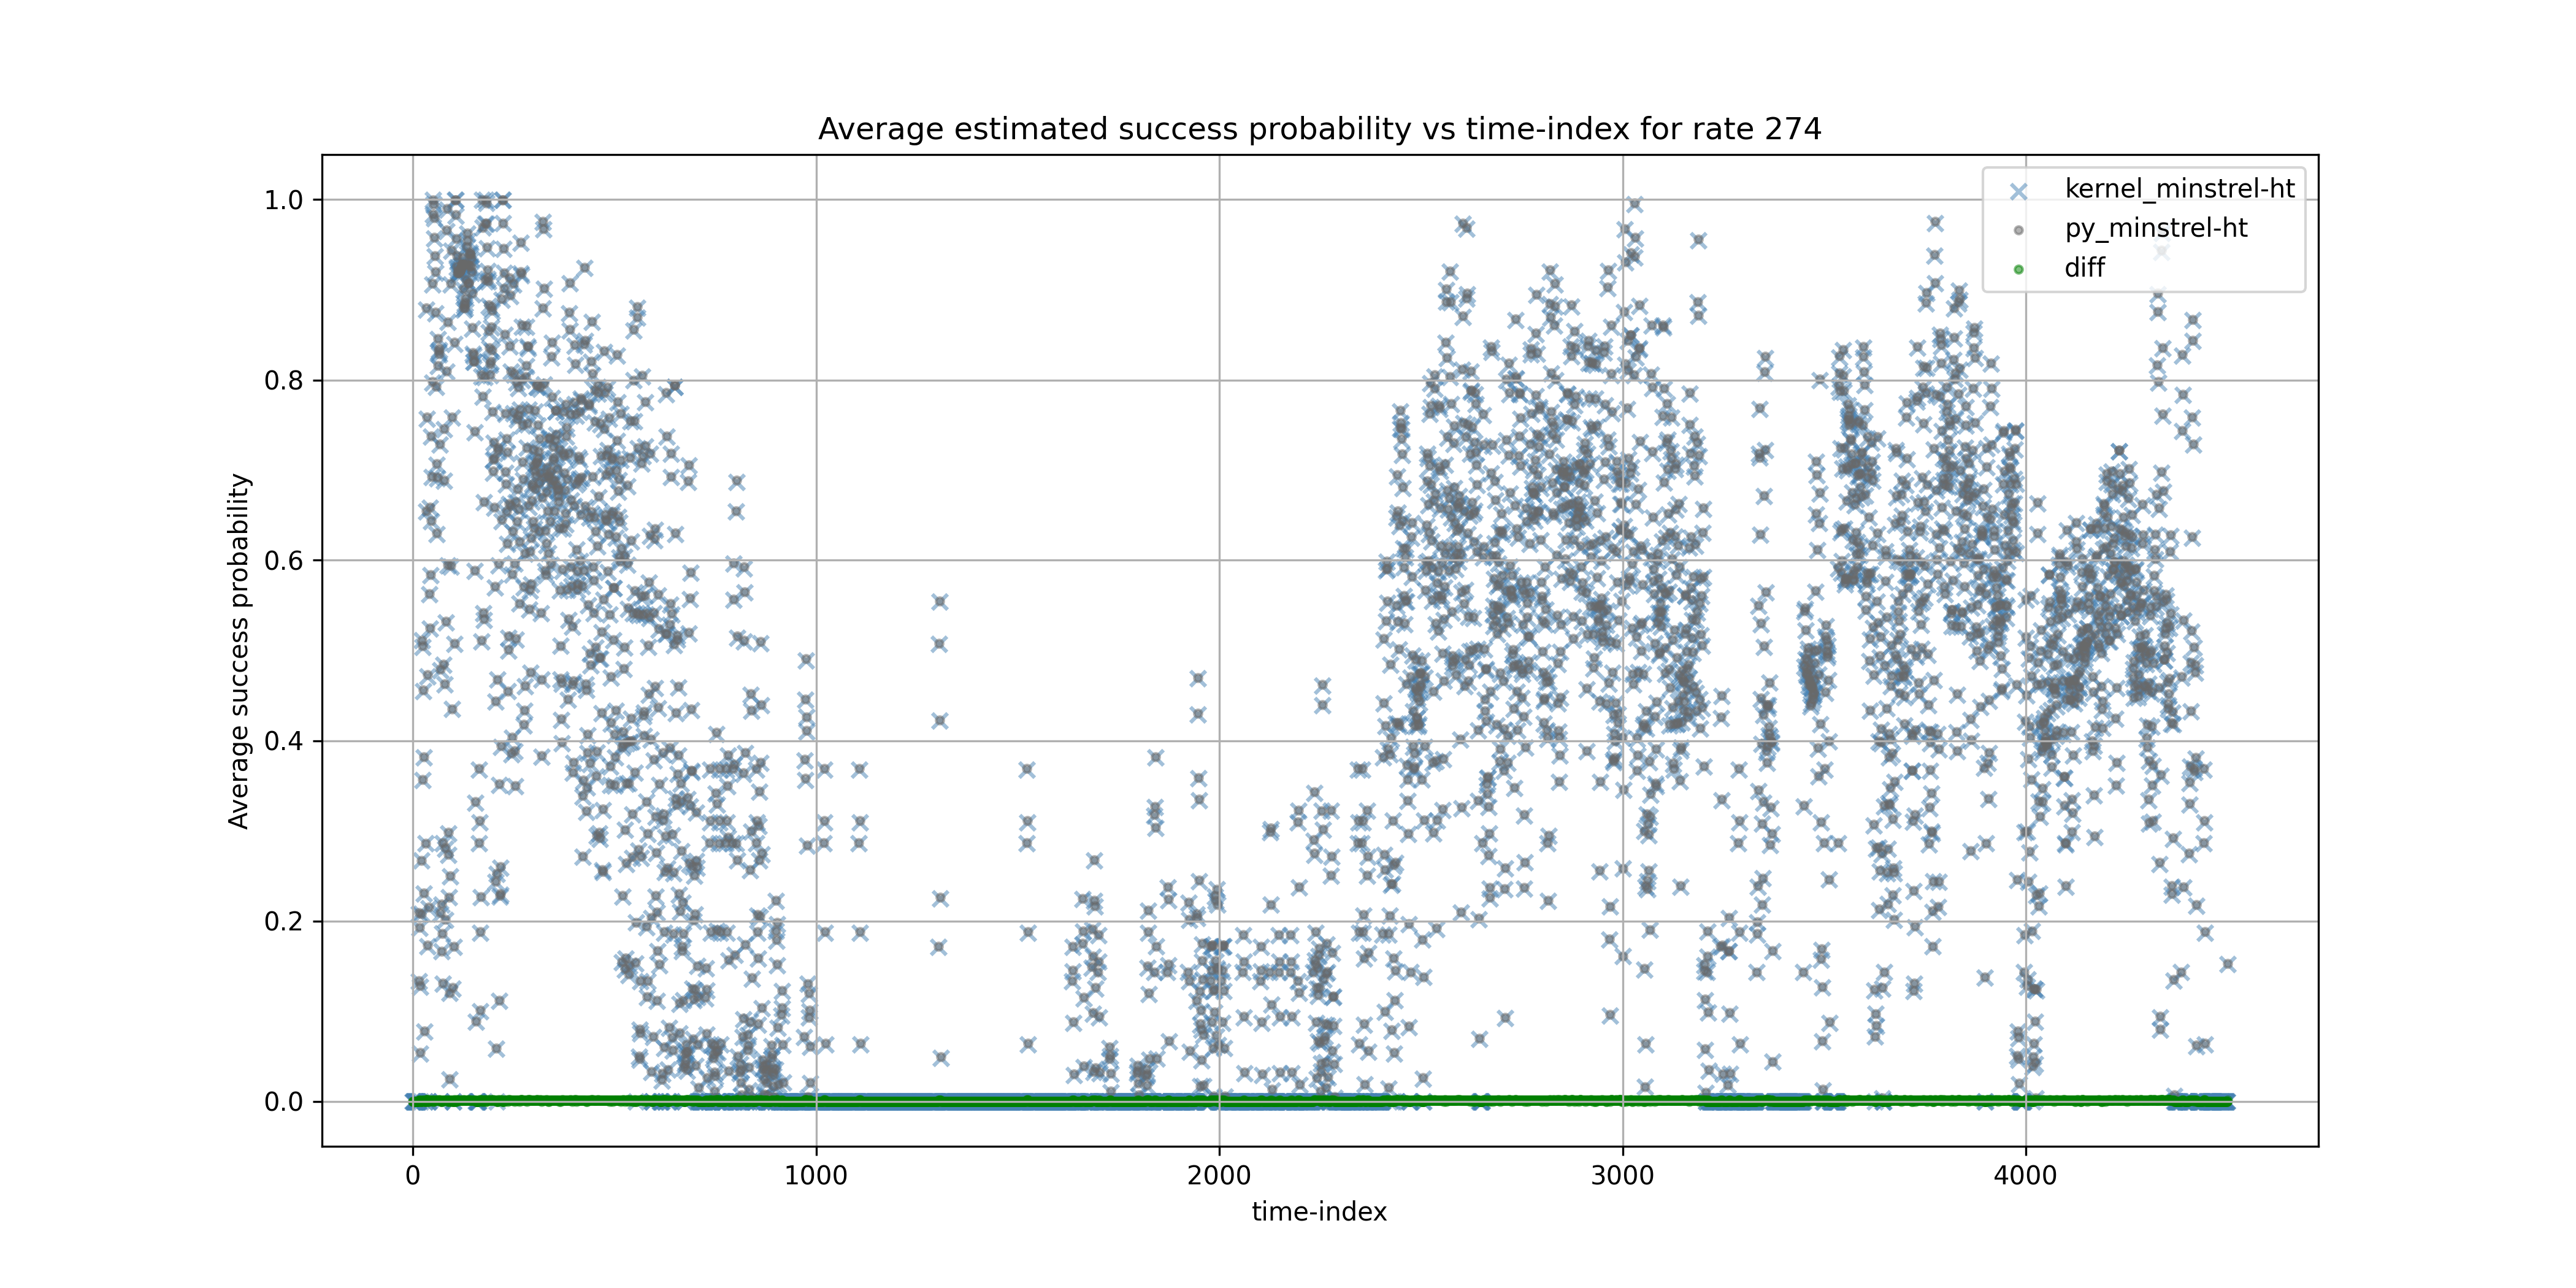
2.1) Probability Estimation in User space vs Kernel space
The section shows the comparison of the transmission success probability between the kernel Minstrel-HT and py-minstrel-ht.
From the analysis, it is evident that the internals of the Butterworth filter in user space acts exactly the same as the kernel algorithm. However, due to floating point restriction, the kernel Minstrel-HT scales all the floating point numbers to integers which can lose precision. This can be observed as the difference between the success probabilities is sometimes up to 0.2%.
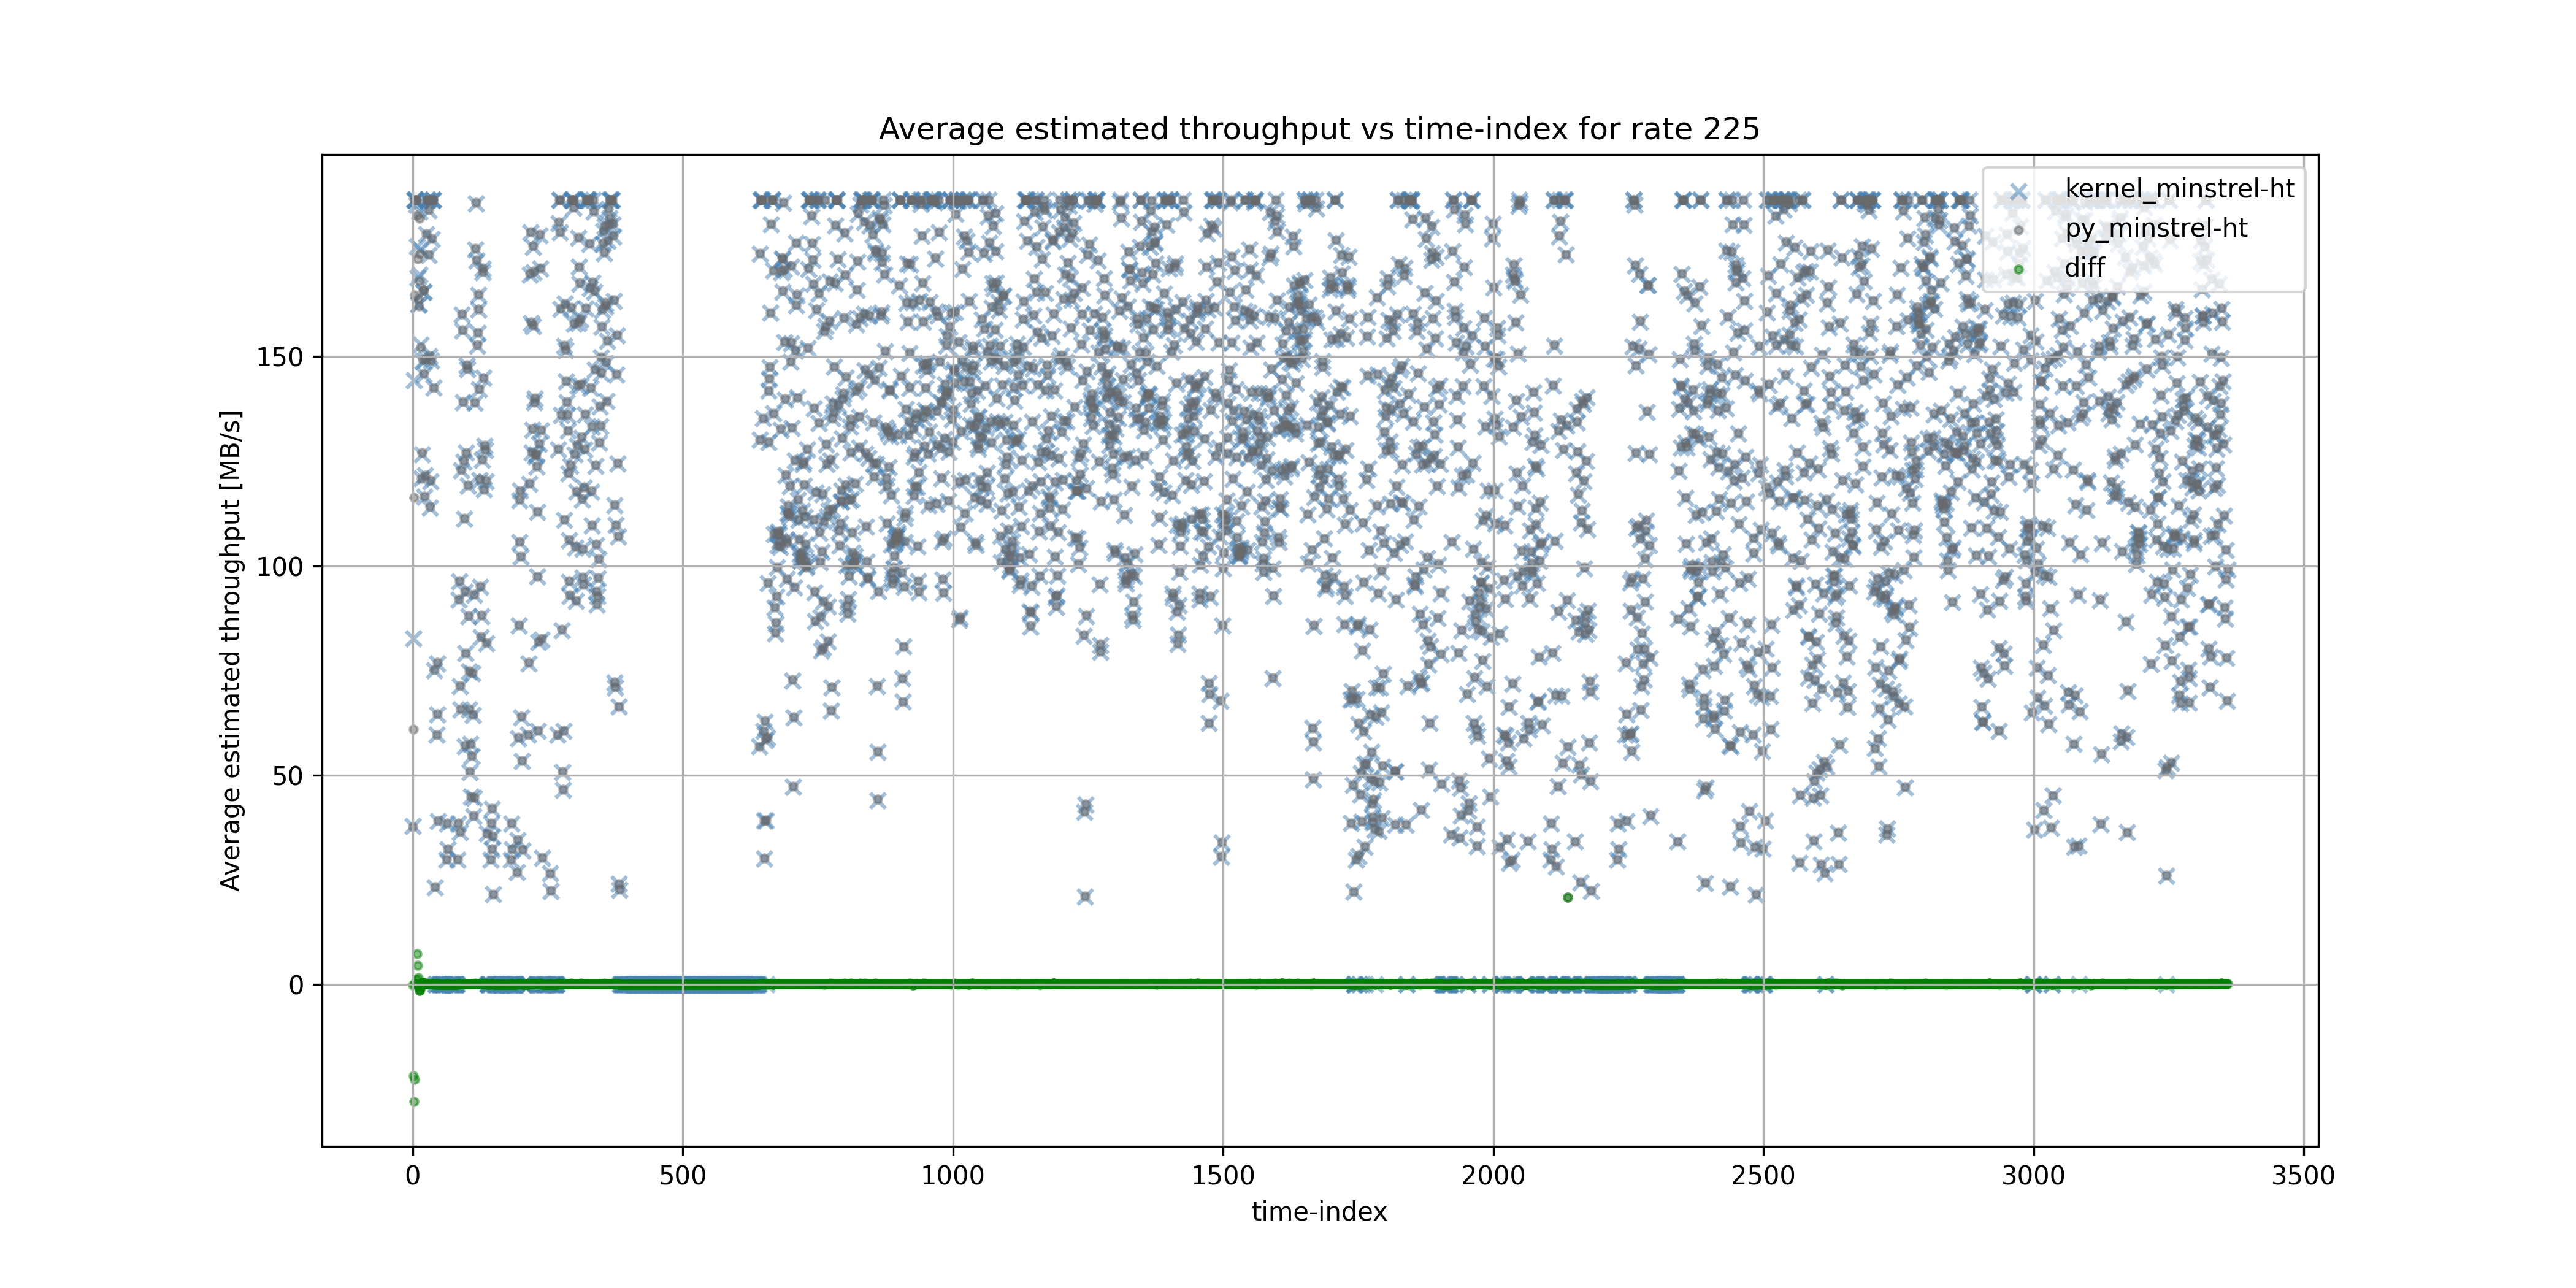
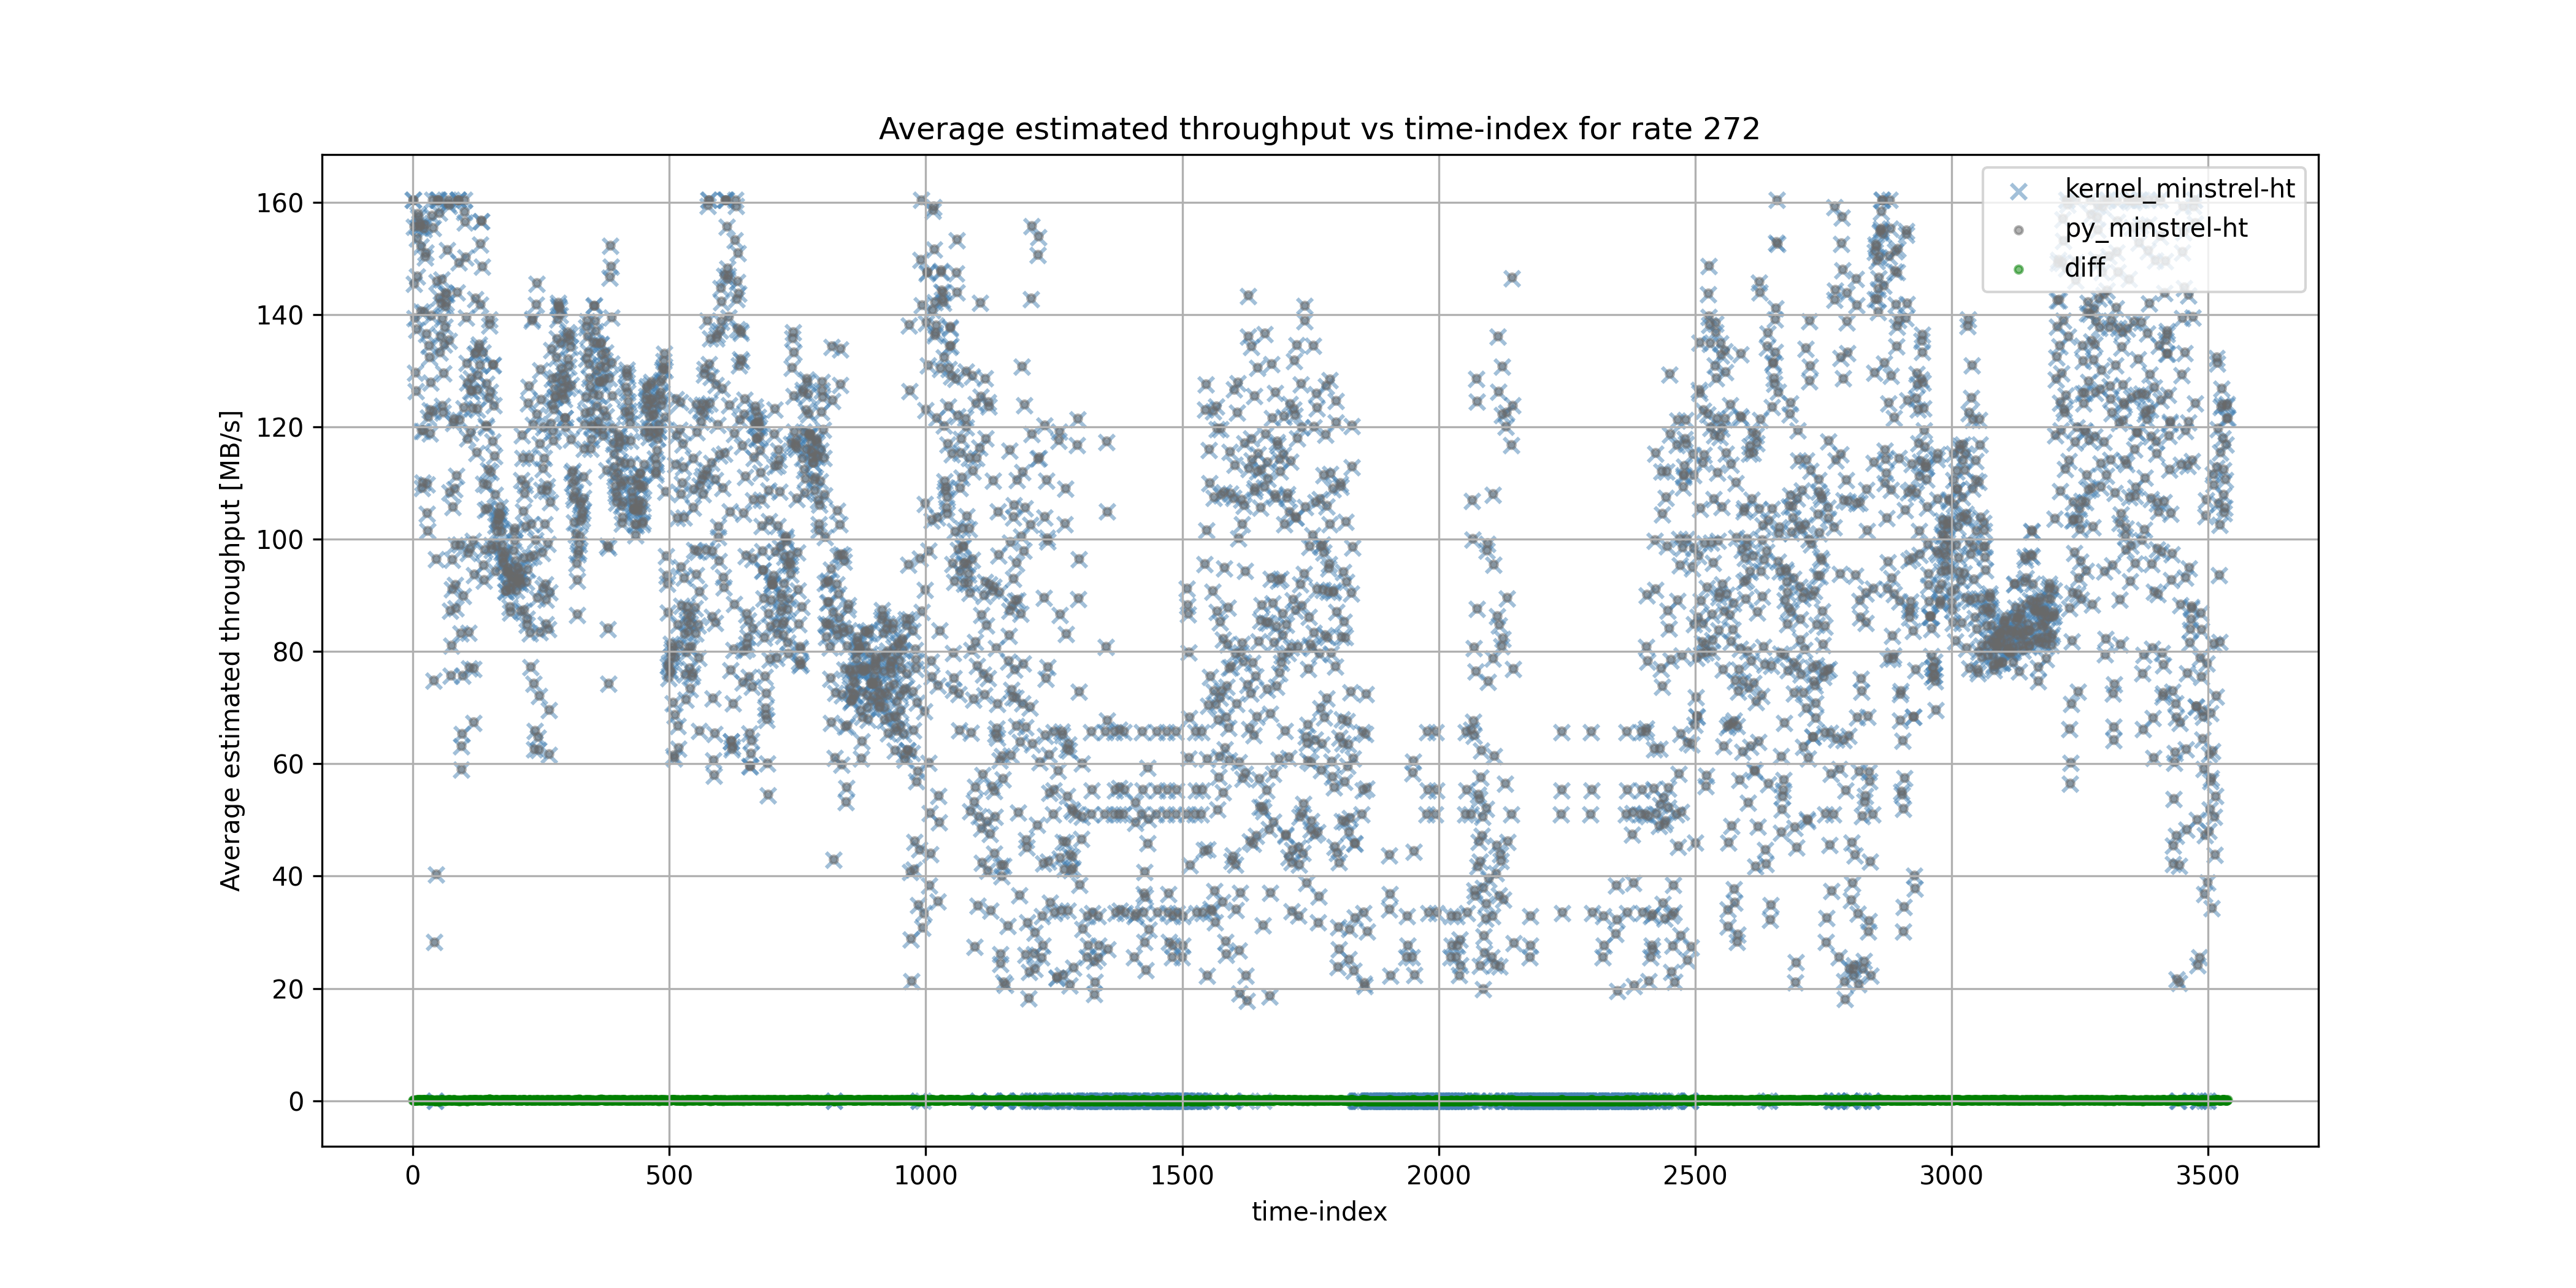
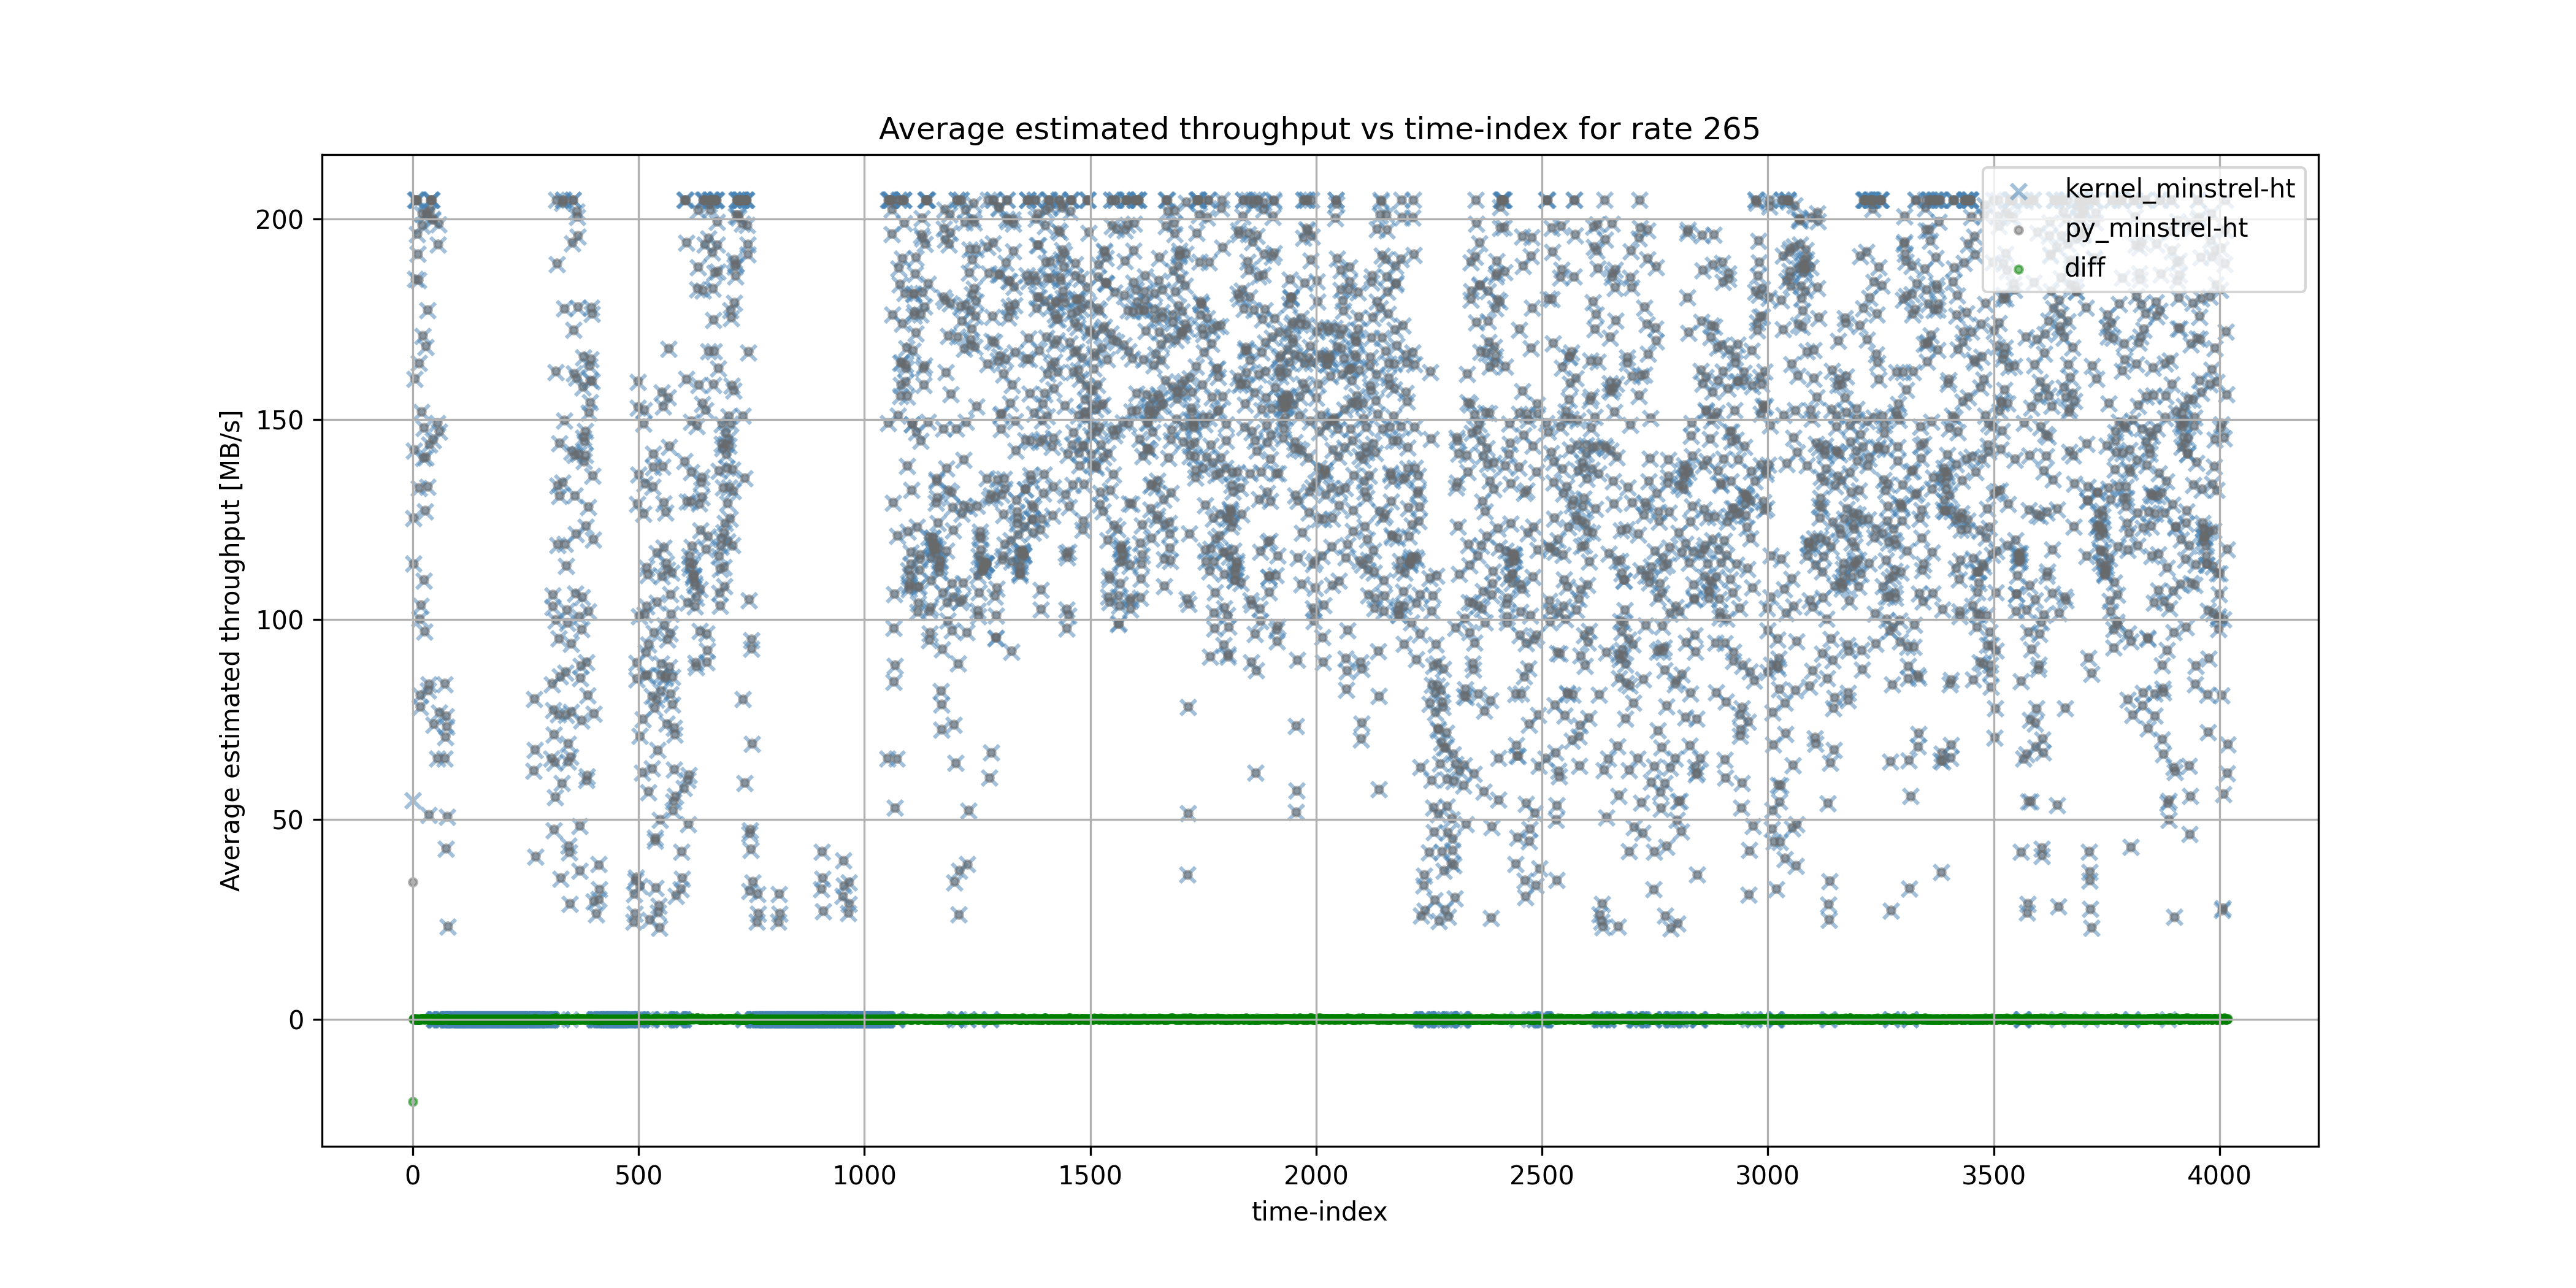
2.2) Throughput Estimation in User space vs Kernel space
Similar to the success probability calculation and discounting in py-minstrel-ht, the estimated throughput for all rates seems to match almost exactly the kernel Minstrel-HT. However, as previously stated, there are negligible errors due to the difference in floating point precision between the two Minstrel-HT algorithms.
2.3) Rate Setting in User space vs Kernel space
Ultimately, the selection of transmission rates determines the comparability of py-minstrel-ht with the kernel Minstrel-HT. In order to compare the rate setting chosen by both algorithms, I’ve developed an analysis script that goes over the saved traces and compares the “best_rates” lines. The following sub-sections show the results of some experiments.
Experiment 1
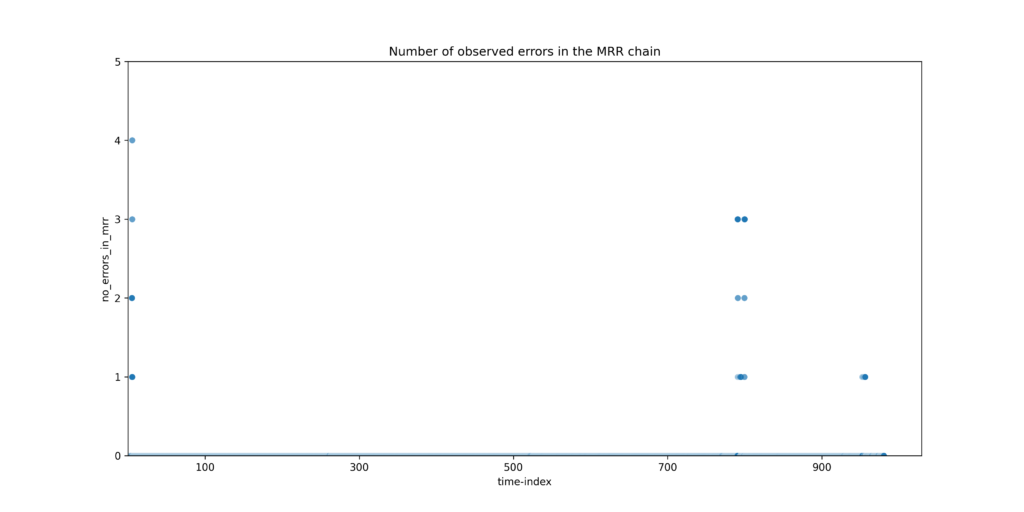
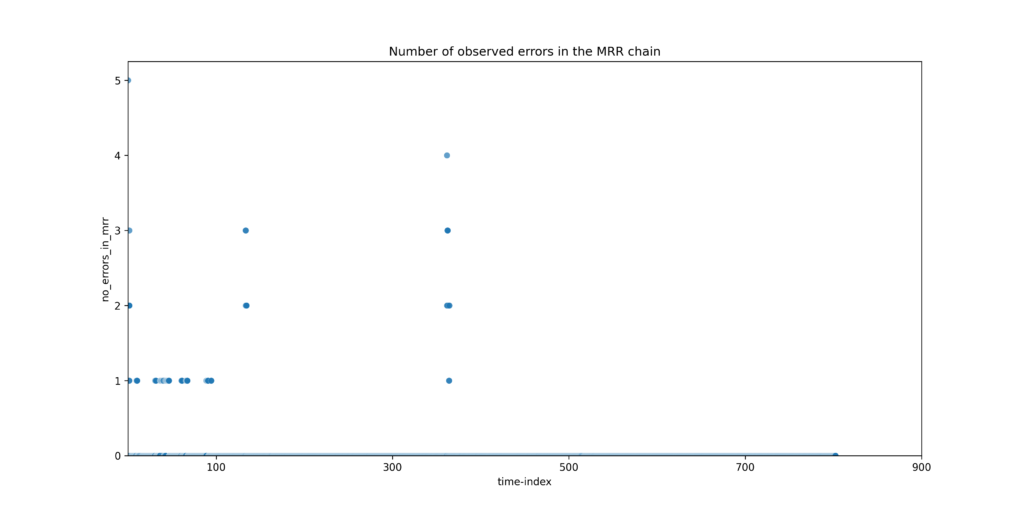
The Minstrel-HT algorithm, for MT76 chips, utilizes the 5 rates in the Multi-rate Retry (MRR) chain. The results show the number of errors in each MRR index and its relative error percentage between the kernel and user space Minstrel-HT. The MRR indices from 0 to 3 are filled by the rates with the highest throughput estimate and the MRR index 4 is filled with the maximum probability rate for robustness.
MRR Setting info:
0 {'correct_instances': 15831, 'incorrect_instances': 1, 'percent_error': 0.0063163213744315315}
1 {'correct_instances': 15818, 'incorrect_instances': 14, 'percent_error': 0.08842849924204144}
2 {'correct_instances': 15810, 'incorrect_instances': 22, 'percent_error': 0.13895907023749368}
3 {'correct_instances': 15760, 'incorrect_instances': 72, 'percent_error': 0.4547751389590703}
4 {'correct_instances': 15783, 'incorrect_instances': 49, 'percent_error': 0.309499747347145}
Furthermore, the following plot shows the total number of errors in the MRR chain when compared with the kernel algorithm.
Experiment 2
MRR Setting info:
0 {'correct_instances': 12633, 'incorrect_instances': 13, 'percent_error': 0.10279930412778744}
1 {'correct_instances': 12626, 'incorrect_instances': 20, 'percent_error': 0.15815277558121146}
2 {'correct_instances': 12628, 'incorrect_instances': 18, 'percent_error': 0.1423374980230903}
3 {'correct_instances': 12623, 'incorrect_instances': 23, 'percent_error': 0.18187569191839315}
4 {'correct_instances': 12429, 'incorrect_instances': 217, 'percent_error': 1.7159576150561442}
2.4) Remarks
After running experiments with the passive py-minstrel-ht and the active kernel Minstrel-HT, a lot of minor errors and bugs in the user space algorithm were resolved. I’ve listed some of the issues that were solved after investigating the results from the passive experiments:
- The probability calculation in py-minstrel-ht did not take into account the packet counts from the last update interval, unlike the kernel Minstrel-HT.
- During the selection of the maximum probability rate, the Minstrel-HT algorithm calculates a threshold airtime value. This value acts as the minimum airtime a maximum probability rate must have. In the kernel algorithm, it is set to 18% higher than the maximum airtime between the rates in MRR0 and MRR1. However, in py-minstrel-ht, this value is erroneously set to 18% higher than the minimum airtime between the top two throughput rates.
- Additionally, during the selection of the maximum probability rate, py-minstrel-ht mistakenly considers only rates that had at least 1 packet attempt in the historical counts. However, there are unused rates that derive their probability estimate based on higher rates in the same minstrel rate group.
- As mentioned earlier, the unused rates also derive their probability estimate based on higher rates in the same rate group. After investigating the high error in MRR4, it was found that py-minstrel-ht was only updating the estimated success probability and not the estimated throughput, which has now been fixed.
In summary, the behavior of py-minstrel-ht aligns with the kernel Minstrel-HT, with observed errors likely stemming from minor precision discrepancies in the kernel space and potential inconsistencies in rate statistics at the start. For example, if MRR1 and MRR2 have very close expected throughput and their order is swapped in either kernel or user space Minstrel-HT, then it is extremely likely that the chosen maximum probability rate is also incorrect due to difference in the airtime threshold. Nevertheless, the Butterworth filter’s role in discounting the estimated probability average over time suggests that with longer experiment runs, the relative error in the MRR chain is expected to decrease.
It’s important to note that despite these efforts, small errors and discrepancies may still exist, and continuous evaluation and refinement of the py-minstrel-ht algorithm will be necessary to enhance its performance and accuracy further, especially with the changing kernel Minstrel-HT code base.
3) Joint Power and Rate Control Algorithm
As the power control extension in the kernel has only been properly implemented on the ath9k devices, I had to wait for the arrival of the ath9k routers as I only have access to MediaTek devices. However, due to an unexpected delay and problems in the shipping of the routers, I have mostly been working on the passive py-minstrel-ht and its analysis on MT76 chips. As such, the py-minstrel-ht hasn’t been implemented with the power control extension, however, thanks to Arne, the py-minstrel-ht has been already refactored such that it works with the new WPCA version and the updated Python-WiFi-Manager.
Nevertheless, I would like to introduce the concept of my proposed power control extension to the Minstrel-HT rate adaptation algorithm, especially the “max_tp” mode. For the max throughput mode, the implementation needs to be well thought-out for every part of the user space Minstrel-HT, not to hamper the optimal throughput
3.1) Initialisation
For the max throughput mode, initially, the py-minstrel-ht would initialize all the rates to use the maximum power level or the static power level that kernel Minstrel-HT uses.
3.2) Best Rate Selection
The set of best rates for the MRR chain could also be selected by the py-minstrel-ht as it already provides the sort_rates_by_tp function to find the best-performing MCS rates. However, the power annotation for each rate in the MRR, except the max probability rate, would be carried out by the power controller. As the max probability rate is used as the last fallback option, it could only use a static high power level.
3.3) Power Sampling and Fallback
As Minstrel-HT already probes every 20ms, in order to get the most out of power sampling, it could be only done on a small subset of sorted rates by throughput. This way the algorithm can better gather ideas about the effect of different power levels for the most used rates instead of gathering less information on more MCS rates. For example, the algorithm could only consider the top 5 throughput rates for power level sampling. However, this could easily be added as a configurable parameter in the rc_opts structure.
For each MCS rate that is considered for power sampling, the algorithm will keep track of two power levels, namely “safe” and “optimal“. The power level which gives the best transmission probability is stored in the “safe” parameter for reference. On the other hand, the “optimal” parameter will store the lowest power level which still provides performance comparable to the maximum throughput. In the beginning, the “safe” and “optimal” parameters will start at the highest power level. The power level stored in these parameters will depend on 𝛿 and 𝜎 in the following way:
where 𝛿, 𝜎 ∈ [0, 1], 𝑃𝑅(𝑋) is the success probability of rate 𝑅 at power level 𝑋, and max_prob is the highest success probability observed across the power levels. The 𝛿 constant specifies the minimum success probability that the “safe” power level needs to satisfy.
In case equation 3.1 is satisfied, then we explore a lower power level to check if it can still satisfy the “safe” success probability. All of the power levels to be sampled with an MCS rate are stored in a 𝑆𝑇𝑋𝑃 set.
Similarly, if equation 3.2 is satisfied:
In case 3.1 is not satisfied, we increase the “safe” power level considering the tolerance factor Ψ. We allow a tolerance around the 𝛿 limit which still denotes that the performance at the power level hasn’t completely deteriorated and hence, we simply increase the safe level by Δ𝐼 . If the 𝑃𝑅(𝑠𝑎𝑓𝑒) falls down even beyond this tolerance factor then we simply switch the safe level to the maximum power level supported.
Similarly, in case 3.2 is no longer satisfied, we also increase the “optimal” power level considering the same tolerance factor Ψ.
3.4) Updating Rate Statistics
The rate statistics used by Minstrel-HT will be updated at every update interval, i.e. 50ms, but we could update the per power level statistics independently. In order to not influence Minstrel-HT too much, the rate control algorithm could only consider 𝑜𝑝𝑡𝑖𝑚𝑎𝑙 and 𝑠𝑎𝑓𝑒 packet counts for statistics.
As using the probe API command may not generate enough packet counts to judge the actual performance of an MCS rate at a certain power level, the per power level statistics could be updated when the curr_attempts reach a certain update threshold. However, if we fix a power sample frequency that could build up enough packet counts, then we can also use a time-based per-power level interval.
3.5) Power Sampling Frequency and Sequence
Since the joint controller would mostly be working on the subset of the best throughput rates for probing power levels, having a higher power sampling frequency in comparison to rate probing may not have an adverse effect on the throughput. For instance, we could set the power sampling frequency to every millisecond or lower for time-based per power level update. However, while power sampling, the algorithm should be able to quickly identify power levels that do not work and reduce the sampling of such power levels so as to not decrease the link throughput.
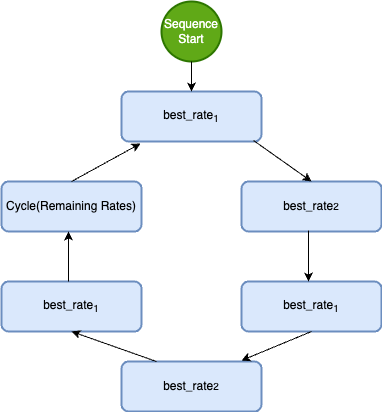
I have formulated a sequence for the power sampling such that priority is set in the following order: 𝑏𝑒𝑠𝑡_𝑟𝑎𝑡𝑒1 > 𝑏𝑒𝑠𝑡_𝑟𝑎𝑡𝑒2 > 𝑟𝑒𝑚𝑎𝑖𝑛𝑖𝑛𝑔 𝑟𝑎𝑡𝑒𝑠. As at any point in time, for a single MCS rate, the 𝑆𝑇𝑋𝑃 set will only consist of two sample power levels: one derived from 𝑠𝑎𝑓𝑒 and the other derived from 𝑜𝑝𝑡𝑖𝑚𝑎𝑙. Hence, during the power sampling of a rate, both the power levels will be sent for sampling together.
3.6) Rate Probing
Judging from the transmit power vs throughput graph in the introductory blog, testing out whether an MCS rate works at all is best at high power levels. As Minstrel-HT already has a robust probing mechanism with three distinct sampling types, I propose not to change it in any way. However, a feature can be added where the user can also specify how high the static power level of sample rates should be. By default, it could be set to the power level that the kernel Minstrel-HT uses for sampling packets or the “safe” power level.
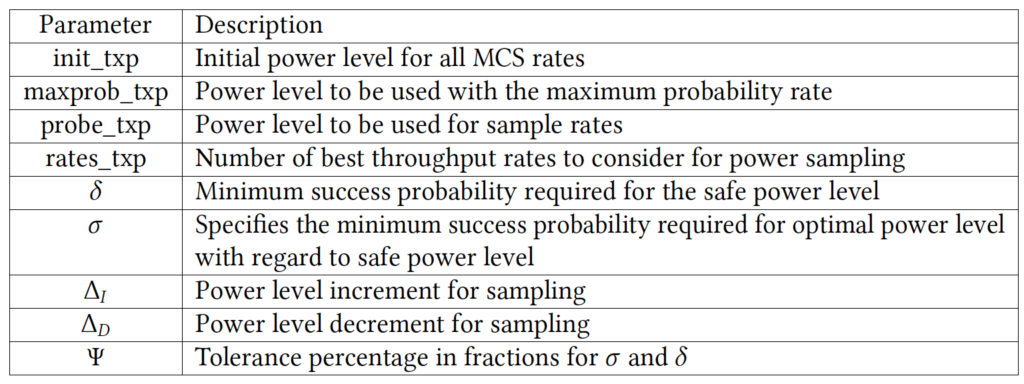
3.7) Configurable Parameters
4) Concluding Thoughts
The next half of the GSoC ’23 coding period will mostly be testing and extending the py-minstrel-ht with power tuning. The foundations of py-minstrel-ht rate control have been extensively tested out and the passive experiments show that the kernel and user space algorithm are comparable. If you want to know more about my project, please feel free to reach out. Thanks for reading!