Load-correlated distributed bandwidth analysis for LibreMesh networks – #2: Setting up the LibreMesh test network

In order to use the latest version of everything, I merged the latest commits from the LibreMesh community into my forked lime-packages repository.

To set up the test network was more complex than expected.
I managed to collect a very disperse set of routers: 8 routers of 6 different producers and 7 different models.
Two of these are officially supported by LibreMesh (TP-Link TL-WDR3600, Ubiquiti NanoStation Loco M2) and the others which are supported by OpenWrt but not by LibreMesh (Comtrend AR-5387un, Huawei HG556a-C, Observa VH4032N, Comtrend AR-5315u, Astoria ARV7519RW22-A-LT).

The non-LibreMesh-supported routers either cannot do multi-AP or mesh via IEEE802.11s, but this was not expected to be a problem as I took care to add the support to AP-client networks (no need for the routers to support IEEE802.11s mesh, only the last mentioned router does not have support for wifi at all).
My solution was based on BMX6 which seems will be dropped in the next LibreMesh release in favour of Babeld, and this will require an adaptation of the AP-client solution.

As mentioned in the previous post, I started compiling my LibreMesh firmware based on LibreRouter fork of OpenWrt 18.06 repository.
When I flashed my routers and configured the wireless interfaces for using AP or client rather than the default AP+AP+IEEE802.11s, most of them were showing strongly erratic behaviours.

So I decided to flash the routers with plain OpenWrt 18.06.2 without using LibreRouter fork and to install all LibreMesh packages via opkg.
In order to ensure that the compiled packages will be compatible with OpenWrt 18.06.2 release, the LibreMesh packages were compiled in my local buildroot of OpenWrt branch openwrt-18.06.
Then the openwrt/bin/ directory was served via HTTP from my local machine.
In order to have the routers accept my local repositories I had to install usign, create a key pair, sign the Packages file, push the public key to the routers and add the directions of the local repositories to /etc/opkg/customfeeds.conf
So for example, the customfeeds.conf file of the Observa VH4032N router will look like:

src/gz local_base http://192.168.1.3/packages/mips_mips32/base
src/gz local_libremap http://192.168.1.3/packages/mips_mips32/libremap
src/gz local_libremesh http://192.168.1.3/packages/mips_mips32/libremesh
src/gz local_luci http://192.168.1.3/packages/mips_mips32/luci
src/gz local_packages http://192.168.1.3/packages/mips_mips32/packages
src/gz local_routing http://192.168.1.3/packages/mips_mips32/routing
src/gz local_brcm63xx_smp http://192.168.1.3/targets/brcm63xx/smp/packages

Once completely configured, the network structure planned is represented in black in the following scheme.

Planned test network structure.

In order to better test the on a proper mesh, I ordered 3 additional routers fully supported by LibreMesh: YouHua WR1200JS (see here and here) from here.
They come with OpenWrt pre-installed and they fully support multi-AP + IEEE802.11s.
Once I will receive these two additional routers I will be able to add the mesh part of the test network as indicated in the scheme in red.

Regarding the load analysis of the network, the first approach will be to obtain this value from the number of clients currently connected to the network.
This number will be obtained in at least the following ways:

batadv-vis -f jsondoc | sort -u | wc -l

ip neigh show nud reachable | wc -l

In the meanwhile, a minor enhancement has been suggested and two others were accepted.

OpenWrt Firmware Wizard – Update Phase 1 Completion

Following the introductory post on “OpenWrt Firmware Wizard” project for GSoC 2019, there have been a number of progress updates.
I have been working with Paul Spooren and Moritz Warning on the project for the past couple of months.

Progress Till Now

Achievements so far can be summarized as below:

  1. Appropriate modifications to the build system have been made to produce JSON for each targets and a consolidated one to be read later by the firmware selector.
  2. Metadata was stored in the buildsystem’s makefiles. Modifications to the data stored has been carried out. The DEVICE_TITLE variable was split into at most three variables namely DEVICE_VENDOR, DEVICE_MODEL and DEVIDE_VARIANT. In addition to this, DEVICE_RAM and DEVICE_FLASH has been added. We received positive response on the first from the community while the second modification is still under review.
    A sample output of this will look like this:


    I wrote a script to split the DEVICE_TITLE into the required fields which could be found here. It uses Paul’s https://github.com/aparcar/openwrt-devices for DEVICE_RAM and DEVICE_FLASH.
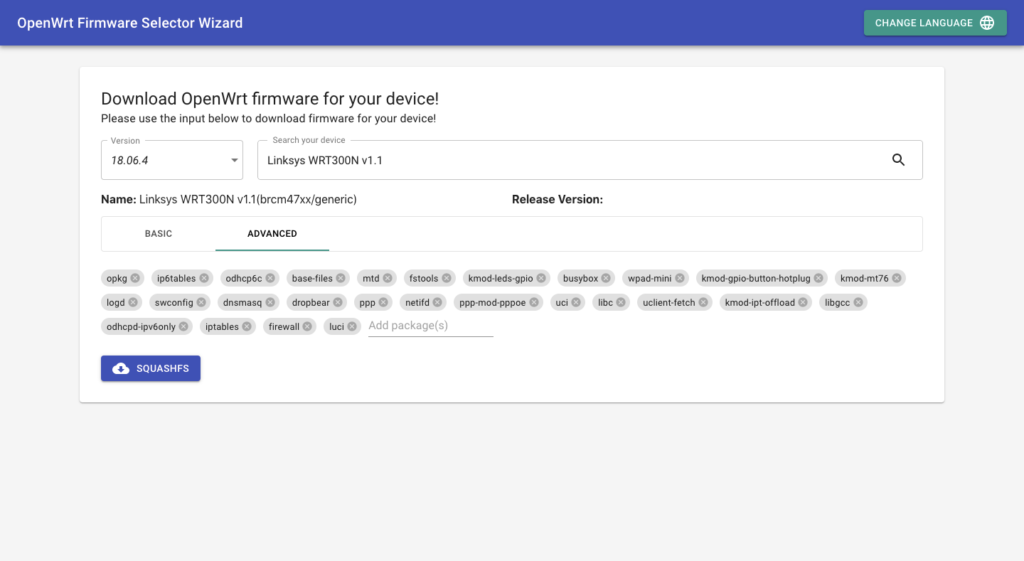
  3. I built a basic version of the firmware-selector for PoC and the source code for the same could be found here. It looks like this:


Next Steps

Through the next phase of the program, the following is to be achieved:

  1. Though almost everything is done regarding the Makefile metadata, but accuracy of the data has to be reviewed. Also, the addition of DEVICE_RAM and DEVICE_FLASH is still under review and is subject to change.
  2. Take community feedback and improve upon the firmware wizard. Functionality to build custom images will be added. A server backend has to be created for the generation of images and serving the same.
  3. Start working on the auto upgrade feature for OpenWrt.

conTest – First Update for GSoC 2019

During the last few weeks I setup the testbed for the wireless connection testing
framework conTest and brought in some new functions
The figure below show the physical setup, followed by a schematic overview.

conTest testbed setup
Schematic overview of conTest setup

The user can now specify which files should be collected by conTest.
Currently there is only an overall collection time adjustable by the user. To
ensure everything is captured, half the time interval the most frequently written
file uses should be set. As a next step I will introduce individual file read times,
as this will reduce network, CPU and storage/memory load.

In addition I added functions to monitor the wireless network interfaces and
capture the traffic using tcpdump. The captured output will be written to the
controlling machine directly over the wired network interface.

I started to improve the overall code quality of conTest to have a solid code base.
To reduce overhead I started sharing code between the monitoring part, which can
be separated from the rest of the conTest framework.

The current reduced flow of conTest can be seen in the figure below. conTest will
check if the necessary dependencies are present, after it processed the command line
arguments and loaded the configuration file. If all dependencies are present, conTest
will start it’s first test run. Before each test run, it will check if there are
packages provided by the user to update and install them. After that the program
will check if the user provided the monitoring flag and start tcpdump accordingly.
Now conTest will start iperf on both sides after killing all running iperf processes.
I’m the next step the parallelized file collection and the attenuator control software
is started. After the attenuator controller returns the software collection
is stopped and the program restarts the loop until the given number of experiments is
finished.

ConTest reduced flowchart

Unfortunately there isn’t anything flashy to show right now. The next steps will
be to create a Makefile and package both applications. Furthermore I will add some
scripts to process the collected data and scripts working on it for data representation.
In addition I will add sane defaults to the config file and add individual file
collection speed.

GSoC 2019 – Upgrading the Meshenger App – Update 1

Meshenger App

In my previous blog post, I gave an overview of the project, that I am working upon. Since then there has been quite a lot of progress in upgrading the Meshenger app.

Progress Till Now

Since the official coding period began, I started with fixing the existing bugs in the app which were crashing the app. There were quite many of them such as a splash screen issue, a night-mode bug, video-call crash issue etc. Apart from this I also made some UI/UX changes in the app such as changing the About activity of the app, matching the app-bar theme with the status bar etc.

The main thing which I did in Phase 1 of GSoC was to establish a secure authentication at the initial handshake between two devices. For this, I followed asymmetric cryptography to do the authentication work. Firstly, I created a new table in the database of the app to transfer all the data such as settings data, keypair, database version, MAC address from SharedPreferences to that database table of the app. For the key pair generation, I used the Lazysodium library to generate a public key and a secret key in both appA and appB. After generating both the keys, I passed the public key into the QR-Code of both the apps, so as to share it between both the parties. Now when appA makes a call to appB, an offer is exchanged between the apps which had to be to be encrypted and decrypted. For that, I used a nonce(random string), public key of appA and secret key of appB to encrypt the offer(signalling blog/SDP offer) in appB and then I decrypted the encrypted offer using the secret key of appA and the public key of appB in appA. Finally, the authentication was secured and voice and video-calling were established.

Next Steps

The next phase i.e. the Phase 2 of GSoC 2019, will be about achieving the Internet feature functionality in the app which will enable the app to contact people over the Internet as a fallback option.

GSoC 2019 – Monitoring of a community network, first results

1 Intro

Like any network, in community networks it is important to know the status of each of the teams that compose it, to track these over time and identify possible problems.
To monitor the routers of the network we need to store the data of all the equipment, centralize, analyze and visualize it. The metrics that we reveal can be divided into two large groups:

  • Numbers such as uptime, sent packets, signal strength, etc.
  • Those that are text like the logs.

In this first stage we are going to concentrate on those of the first type.

2 Collecting the metrics

Prometheus is one of the most used free software for event and alert monitoring. The clients (the routers in this case) expose a http server which Prometheus scrapes with a periodic frequency (HTTP pull model) and saves the data in a time database. Prometheus defines 4 types of metrics that are used to generate each instrument (what we are going to measure).
Grafana allows us to connect with Prometheus and generate different personalized dashboards and extend the existing graphics to our needs. It also allows us to generate a system of alerts.

2.1 The setup for the first metrics

In our experimental setup we will create a mesh network with a router that has LibreMesh. In addition we will have a raspberryPi in the network where we will have installed Promemtheus and Grafana.

2.2 Prometheus client

As mentioned previously, each router will be running a Prometheus client which will serve via http a plain text with the client’s metrics.

2.2.1 Python vs Lua

Prometheus offers a library in python to do the implementation of the client. The problem is that when we are working on routers, the space available to install applications is very limited. The interpreter of python weighs 50MB but the interpreter of Lua only 4kB

2.2.2 A new client

OpenWRT has a client implementation of Prometheus on Lua, but we found two “problems” in this implementation :

  • Use lua-socket to create the server which need install an external package. We are going to use uhttpd which is a server already installed on the router and allow us to execute a Lua script in a custom url.
  • Each instrument is written from scratch. We want to implement 4 basic objects (the possible metrics) so that it is simple to extend to new instruments.

2.2.3 Initial Metrics

Initially we will measure:

  • Uptime
  • Load avg
  • Mem info
  • Package per interface
  • iwinfo
  • Chanel occupation

3 The first results

Some metrics collected by Prometheus visualized in a Grafana dash

Next steps

In the next week we will be working on:

  • Add missing instruments
  • Pack the client correctly
  • Testing in a real mesh network
  • Document these steps

GSoC 2019 Import public datasets to Retroshare network – Update 1

After three weeks of code here we have the first evaluation! 
The first week I started to talk with my mentors of how to guide the project. I started a [repo](https://gitlab.com/jpascualsana/retroshare-python-bot) to code a “bot” that will wrap the Retroshare JSON API for better interaction. But I didn’t continue the job because we are looking a way to wrap the API using Doxygen generation (looking at [https://gist.github.com/sehraf/23cbc8ba076b63634fee0235d74cff4b](@Sehraf work)).


So I get a list of different projects, provided by my mentors, and I started to[write different scripts](https://gitlab.com/jpascualsana/public-datasets-import) to import the data on to Retroshare network. Some of this projects are:

  • Wikimedia based projects
  • WordPress blogs
  • Gutemberg project
  • ActivityPub
  • RSS
  • Radio onda Rossa
  • XRCB.cat
  • RadioTeca

So this scripts parse in different ways this sites, and get their information as previous step to publish it on to RetroShare network categorized as channels.This scripts are able to:

  • Parse the site/project getting all “pages” of interest with different strategies.
  • Get updates (the pages that have changed since last time the info has been retrived)
  • Command line executable with argument parse. See -h option to get supported options.

So the next step is to use this scripts to import this information on Retroshare network using a wrapper dynamically generated by Doxygen.

On the next screenshot we can see the help for the script that import from ActivityPub

GSoC 2019 – Unit testing LibreMesh – Update 1

In the last weeks I have been involved in getting deeper into becoming part of the development team of LibreMesh.

During that process, I worked together with NicoPace in writing this blogpost where we build a solid ground for unit testing: https://blog.freifunk.net/2019/06/03/gsoc-2019-evaluating-options-to-do-unit-and-integration-tests-in-libremesh-and-a-first-working-example/

Not covered by the last blog post is the work that I did in a fake/mock implementation of the libuci library in lua. This allows writing a lot of tests for LibreMesh as ucithe most used library in the codebase that make sense to write a mock. The implementation is very small but covers the most used functionality of libuci: cursor(), get(), set(), save(), delete() and foreach(). This was implemented doing TDD with the support of the unittesting framework.

All this work is being done in the following branch of my lime-packages fork: https://github.com/spiccinini/lime-packages/commits/unittest_docker

During the upcoming weeks all this work will be properly released as a PR to the lime-packages repo accompanied by the Travis CI integration in a Docker container to do the tests in a contained environment, and more tests are going to follow 🙂

Retroshare for Android – Update 1

It’s been a while since my last post. For a reminder, my job is to create a functional Retroshare application for Android. As in May, also in this period of time I focused on the visual aspect of the application, but this time from the technical side.

It started with choosing the technology in which the application was to be written. Selected framework should provide an easy way to combine the frontend with libretroshare, have an active development community and be cross-platform so that in the future it can be used to easily transfer application to iOS as well. One the basis of these criteria, Flutter was chosen.

So far main screens has been implemented and can be seen below:

There is still a lot of work to be done on the visual side and I will be working on it in the near future. In addition, I will explore the addition of asynchronous messaging and storage of message history to libretroshare.

qaul.net – Choosing a Web Framework

These days, Rust has quite the collection of web frameworks to choose from. The Are we web yet? framework list lists some 17 frameworks and this number is growing constantly. One of my activities since the last update has been selecting one of these frameworks to base qaul.net’s http api on.

Requirements

For qaul.net we are doing our best to keep the binary size as low as possible. The qaul.net binary should be simple to move and the larger the program gets the harder that becomes. Aside size we also want to pick a framework that’s easy to use and that’s likely to be maintained for a while (it’d be a shame to have the framework be abandoned after we complete the project).

Results

From this initial list of 17 frameworks, 6 were cut because they were either abandoned or I couldn’t get any of their examples running.

We evaluated a series of test programs for various web frameworks and found that for the most part everything is within a couple hundred kilobytes in size. actix-web was the largest in our testing coming in at around 2.8 Mb for a fairly simple example program. This makes sense, actix pulls in the actix actor framework and that probably comes with a fair bit of code the other frameworks don’t bother with. rouille and Thruster were the smallest by a decent margin coming in at 1.2 Mb for a hello world. This makes sense as rouille is based on tiny-http and foregoes any sort of async code and Thruster by default uses it’s own backend. Most of the rest of the frameworks all came in between 1.7 and 2.3 Mb, and this too makes sense. Most of these frameworks were based on hyper and even using hyper directly gets you an executable around 1.6 Mb.

There were a few frameworks I was quite interested in that I decided against because of lack of documentation or non-functional examples.

Conclusion

In the end I decided to go with iron as I find it’s middleware model to be quite pleasant and extensible and it’s fairly well documented. Iron came in squarely in the middle of the pack in terms of binary size but I had strong maintainability and usability concerns for the very smallest frameworks making this choice a matter of a couple hundred kilobytes.

Next Steps

Presently I’m working on an authentication system for the api. Hopefully next month I’ll be able to talk about that and a bit more about the modular design of the api.

Web Interface for Retroshare – Update 1

Since the first post, there has been quite a lot of progress on development of the new Web Interface for Retroshare.

As the build process is not using any JavaScript-specific tools, I spent a lot of time making sure that the development process was made as streamlined as possible. All the components are logically isolated and functionality moved to their relevant places. Using mithril also helped a lot, which has this concept of components, a mechanism to encapsulate different parts of views. Which massively helps in project organization and code reuse.

One more important feature which was completed is automatic data refresh and redrawing of views. I decided to use a combination of mithril’s lifecycle methods and JavaScript’s browser setTimeout method that can be used to create background tasks which when attached to their respective components, will periodically fetch and refresh data. The background task gets activated whenever a component’s view is rendered and gets killed when a component goes off of display. Mithril also has it’s own auto-redraw system which refreshes views when a component’s event handlers are called. But it does not refresh when component attributes are updated, or when raw promises are resolved.

Here are a few screenshots displaying the new UI style:

Next Steps

Along with the goals displayed in the first post, these will be given a higher priority for completion during the coming phase leading up to the next evaluation:

  • Node panel in config tab for handling most(if not all) network settings like node information, Net mode, NAT, Download limits, ports, etc.
  • Shares panel showing shared files, allowing to edit them, set view permissions, among other options.
  • Peers tab to display connected peers and set their reputations.
  • Modify the main Retroshare client to enable/disable the WebUI.