The Turnantenna – Final evaluation update

We are at the end of the journey. Today is the last day of the 2018 version of the Google Summer of Code.

So, here what I have done during this month of hard (and hot) work!
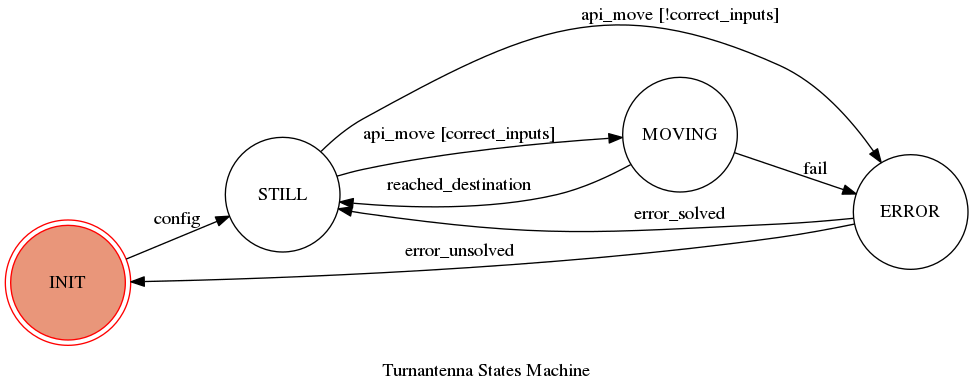
States Machine

The SM presented in the previous article has evolved to a newer and more complete version. The whole machine is defined through the following states and transitions:

# In controller.py

class Controller(object):
    states = ["INIT", "STILL", "ERROR", "MOVING"]
    transitions = [
        {"trigger": "api_config", "source": "INIT", "dest": "STILL", "before": "setup_environment"},
        {"trigger": "api_init", "source": "STILL", "dest": "INIT", "after": "api_config"},
        {"trigger": "api_move", "source": "STILL", "dest": "MOVING", "conditions": "correct_inputs",
         "after": "engine_move"},
        {"trigger": "api_move", "source": "STILL", "dest": "ERROR", "unless": "correct_inputs",
         "after": "handle_error"},
        {"trigger": "api_error", "source": "STILL", "dest": "ERROR", "after": "handle_error"},
        {"trigger": "engine_reached_destination", "source": "MOVING", "dest": "STILL",
         "before": "check_position"},
        {"trigger": "engine_fail", "source": "MOVING", "dest": "ERROR", "after": "handle_error"},
        {"trigger": "error_solved", "source": "ERROR", "dest": "STILL", "after": "tell_position"},
        {"trigger": "error_unsolved", "source": "ERROR", "dest": "INIT", "after": ["reconfig", "tell_position"]}
    ]

There are not many differences with the older graph but, behind the appearance, there is a lot of work. Now every arrow correspond to a series of defined actions, and the scheme was implemented as a real working program.

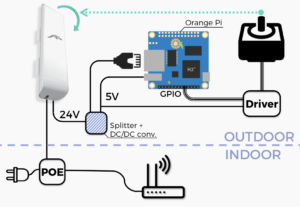
The structure of the Turnantenna’s brain

During the last week I worked on the refactoring of all the work done until that time. The final code is available in the new dedicated “refactor” branch on GitHub.

The States Machine above is implemented in the main process, which is able to communicate with 2 other processes: the engine driver and the RESTful server.

# In turnantenna.py

from multiprocessing import Process, Queue
from controller import Controller      # import the states machine structure
from stepmotor import engine_main      # import the engine process
from api import run                    # import the api process

def main():
    engine_q = Queue()
    api_q = Queue()
    api_reader_p = Process(target=run, args=(api_q, ))
    engine_p = Process(target=engine_main, args=(engine_q, ))
    controller = Controller(api_q, engine_q)                  # start the SM

    api_reader_p.start()                                      # start the api process
    engine_p.start()                                          # start the engine process
    controller.api_config()

The processes communicate with each other through messages in the queues. Messages are json, and have the following format:

{
    'id': '1',
    'dest': 'controller',
    'command': 'move',
    'parameter': angle
}

The “id” key is needed in order to control more than one engine, this is useful for future upgrades. “dest” specify the process that should read the message, and avoid wrong deliveries. “command” is the central content of the message, while “parameter” contains detailed (optional) informations.

Processes are infinite loops, where the queues are checked continuously. An example of this loop is:

# In api.py

from queue import Empty

while True:
    try:
        msg = queue.get(block=False)
        if msg["dest"] != "api":
            queue.put(msg)       # send back the message
            msg = None
    except Empty:
        msg = None

    if msg and msg["id"] == "1":
        command = msg["command"]
        parameter = msg["parameter"]
        if command == "known_command":
            # do something

API

In order to interact with the turnantenna, I defined 3 methods: get_position(), init_engine() and move().

It is possible to call them through an HTTP request. A json needs to be attached to the request in order to make things work. In fact, APIs need some critical data: e.g. the id of the specific engine targeted, or a valid angle value to move the engine of that amount. If the request come without a json, or with a wrong one, the RESTful service respond with an error 400.

Here an example of input controls:

import requests

if not request.json or not 'id' in request.json:
    abort(400)
id = request.json['id']
if id != '1':            # still mono-engine
    abort(404)

For the moment the system works with only one engine, but in the future it will be very simple to handle more motors

...
# if id != '1':
if id not in ('1', '2')
    abort(404)
...

Final results

In these moths we started from an idea and a basic implementation, and we build-up a complete system ready to be tested. It is possible to see the Turnantenna logic run cloning the Turnantenna code from GitHub from the link Musuuu/punter_node_driver/tree/refactor.
Following the instructions in the readme file, you can run the turnantenna.py file and observe how it reacts to the HTTP requests made with curl.
The full documentation of the project could be found at turnantenna.readthedocs.io.

We are proud of the work done, and we’re ready to implement the whole system onto the hardware and make the Turnantenna turn!

The Turnantenna – Second evaluation update

Time is passing, and work is proceeding.

Last month I reported a problem concerning speed of our beloved Turnantenna: the acceleration was not constant during movement of the stepper engine, as I wanted. The error was caused by implementation of a bad algorithm. A constant acceleration is important to provide a smoother movement, and is needed to reduce the load on the engine. Force is equal to mass times the acceleration; if the acceleration is constant, so is the force; but if the acceleration grows, the stepper’s force grows as well, as long as it can keep up. Uncontrollable acceleration lead to unpredictable forces (or better, toques).

To understand the issue, a brief summary should be given: the way to control the stepper’s speed consists of changing the time between two consecutive steps. The shorter the time, the faster the movement. The previous (and wrong) algorithm, is documented in the older post. It wasn’t a good way to control a torque-limited engine because, as said before, the acceleration was not constant. In the previous algorithm, speed was taken like this:

vn = vn-1 + const

namely, at time tn the speed was a fixed amount more than tn-1.
Time between two steps was

dt = (n – n-1)/vn = 1 / vn

It may appear correct, but the resulting graph was the following:

As can be seen, the speed is not linear. This mean that the acceleration is not constant, but increasing.

I found a solution thanks to a document written by Atmel Corporation. It made me think about the relationships between speed (v), space (s), time (t) and acceleration (a) that comes from physics laws:

s = a ½  t² + v₀ * t + s₀

this equation is always true, when accelerating, when the speed is constant, and even when decelerating. Quantities change inside the formula, but it always remain true.

Now, to keep it simple, let’s consider the first phase: the acceleration. A the beginning of its movement, the engine is still (v0 = 0), and it starts without having already done one single step (s0 = 0). The resulting equation is evaluated at v₀ =0  and s₀= 0:

s = a ½  t² + 0 * t + 0
s = a ½  t²

Now, let’s think about what is known: the acceleration a, that it is constant (because I want it so), s and t; s is the number of steps already done at time t. If I know how many steps -s- I have to do I can find how much time I have to wait –t-, and vice versa.

To find the time between two steps (the step #n and the step #n+1) the formula is:

s = a ½  t²
==>  t = sqrt(2 * s / a)

# at the step number ‘n’
tn = sqrt(2 * n / a)

# time between step ‘n’ and ‘n+1’
dt = tn-1 – tn = sqrt(2 / a) * (sqrt(n+1)-sqrt(n))

Using this calculation, acceleration is constant, and speed increases linearly, as it can be seen in the graph below:

AAAAAH.. a perfect blue line! 😀

Problem: Solved!

Working on tests

Now, more progresses have been done in tests. For those who don’t knows, I’ve started my programming adventure with with this project. Everything for me is anexciting discovery, and during this month I learned and implemented the “argparse” and “logging” libraries. Now it is possible to execute the tests with three verbose levels: the first is silent, the second shows debugging informations and the third shows the info level.
It could appear trivial, but I’d never done it before, and now tests are smarter!

It is not all: I reviewed all the tests, fixed problems and improved their reliability. They’re still not perfect, but I’m working on them daily to get details right.

Fly across borders

It was time to go outside the boundaries, and to think about an interface that bring into communication the web interface and the driver. This is what I’m working on in these days.

To achieve that goal, the problem has to be studied starting from an high level. The main process, which is constantly running, float between a small number of determined states: initialising, still, moving and error handling. Together with the Ninux Florence developers community I built the following state machine graph:

This was realized with the GraphMachine module of the “transmissions” library. Now I’m working on the full representation of this map in code lines. But there is something more.. In fact, at this point, multiprocessing became necessary to provide a safe environment: when the engine is in the MOVING state, for example, and a new command is sent to make a new different rotation, the main process should have the possibility to manage simultaneously the ongoing movement and newer requests.

That’s why we choose to keep the main process always active and make it decide when to run the movement procedure in a dedicated process, like a traffic light.

Turnantenna.me

The greatest effort, this month, was done writing down a full, detailed documentation of the project. 80 pages on what is the Turnantenna, how it works, and when and why to use it.

Many people expressed their interest in the project, someone has offered to support us but, without a complete documentation available, it is difficult to provide a starting point.

The whole doc will be soon available, and this post will be updated with the dedicated link. So, if you are interested in the project, let us know! For the moment, GitHub repository is available here.

See you next month!

— UPDATE —

The link of the full documentation of the project is provided below.
turnantenna.readthedocs.io

The Turnantenna – First evaluation update

After a month of work on the project, the Turnantenna’s driver is evolving to the definitive version.

During this month I worked hard in order to write a good driver for the stepper motors. If you’re looking for more details and want to understand the basic functioning of the Turnantenna system look at my first blog. My work could be find on GitHub.

Overview

Image found at http://abhieeeprojects.blogspot.com

From wikipedia:

a unipolar stepper motor has one winding with center tap per phase. Each section of windings is switched on for each direction of magnetic field.

To control the position of the rotor, we have to play with the stator’s windings, following a proper pattern in order to make the first move smoothly.

The driver does exactly this, it turns ON and OFF the pins of the logical board (the orange pi) following the correct pattern; doing so the coils of the engine are powered properly, and the rotor turns.

The older version of the driver was a good prototype, and I based my work on it. As a good starting point, I didn’t change the overall scheme, but I found some problems with my mentor and I worked to solve them. The most important issues were the following.

Problem #1 : A poor control of inputs

We used python 3 to write the code. The driver is a class, called Stepper, that has some methods. Calling those methods, the object controls the real engine. To do so we needed to use the python wiringpi library.

The old code was something like this:

import wiringpi as w

class stepper():
    def __init__(self, pin1, pin2, pin3, pin4):
        """Set up the GPIO pins and all the attributes"""
        w.some_method_to_initialize_the_board()
        w.some_method_to_configure_the_pins(pin#)
        self.initial_attributes = XYZ
        ...

    def stop(self):
        """make the engine stops"""
        w.some_method_to_turn_off_the_pin(pin1)
        w.some_method_to_turn_off_the_pin(pin2)
        ...

    def move(self,speed,rel=1,dir=1):
        """make the engine run somehow"""
        ...

engine = Stepper(0,1,5,12)  # Random pin numbers

engine.move(250, 100)

To make sure that everything works, inputs should be controlled properly:

  • Pins choice should be controlled, different coils can’t use the same pin.
  • Values should be integers, not chars, lists, tuples or others
  • At this time, I don’t know what happen if I run the engine with negative speed. Will it go back?

This kind of control was lacking in the older version. This is our first problem.

Problem #2 : Too many input variable

Look at the “move” method, could it be simplified? The answer is yes.

dir (direction) parameter is not so useful. It was intended to switch between “go ahead” and “go backward”. But if I want to go in the opposite direction, I could say I want to do a movement with a negative speed. In the newer version I adopted this scheme allowing negative values for the speed, and removing the dir parameter.

rel (relative) could be removed too. Its function is to keep in memory the last position of the engine, but it could be better done using an object’s attribute.

Problem #3 : Wrong speed management

Thanks to Leonardo (my mentor) who discovered this problem, I had to plot the following graph that demonstrates the presence of an error in the algorithm used to accelerate the engine. To understand the problem, you need to see that the driver was intended to make the engine accelerate with a constant rate. In other words, acceleration has to be constant [1], and speed has to increase linearly [2].

Note: in the real code I added an acceleration factor which allows to manage the magnitude of this acceleration. That doesn’t impact on the constant acceleration hypothesis.

The simplified version of the algorithm is something like this:

# inputs: num_step, final_speed, speed = 0

step_count = 0
while step_count <= num_step
    speed += 1
    t = 1 / speed
    self.do_one_step()
    time.sleep(t)
    step_count += 1

Where:

  • num_step stands for the total number of steps that should be done in the acceleration phase;
  • final_speed is the goal, the speed wanted by the user;
  • speed is the actual speed value. Here we are in acceleration phase, and that’s why we’re starting from speed=0

It’s clear that the algorithm increase the speed constantly (and linearly). So the condition [2] seems to be satisfied.

However, speed is not directly used. To manage the step frequency, the time delay is used instead: this simplify the algorithm. But there is a problem, and this graph demonstrate that hypothesis [1] is not verified:

The graph shows a first interval where speed increases (acceleration), another one where speed is constant, and the last one where the engines slows down (deceleration). We can say that deceleration is a negative acceleration, in fact the two external intervals are specular.

In the graph we can note an hyperbolic shape of the acceleration phases. That’s a proof of the non-constant acceleration. The problem is that we expected a different graph, and wanted to see a linear shape of the speed function. The driver works, but not as we like.

The bug here is in time managing, since it don’t decrease linearly. Time is defined as t=1/speed, and that’s an equilateral hyperbola’s equation. Right now I’m working on a solution to obtain a linear, simple equation.

Solving problems : Make it clear

As this code will be published, I added a lot of documentation like comments, docstrings, and more verbose and specific error handlers. I rebuilt the entire move method to make it more clear and readable, and to solve the problems listed before. I wrote it down simultaneously with the tests, and it’s still work in progress just because it has to be bullet proof.

Tests

I can say that tests was the core activity of this month. I wrote tests, done tests, tests the tests, delete some tests, write new tests, correct other tests, added new tests, and still testing.

All the improvements done to the original code, was born from tests. I’m a newbie with python, and testing opened my mind to a tons of things about coding. Now I’m still testing and deepen the code, and how to improve it.

Conclusion

Now this first period is almost finished, and it’s time to conclude the last things. After that I’ll starting develop the web interface to control the driver from remote.

I make no secret of the fact that this project is a very challenge for me. This is my first serious coding experience. Almost everything is new, but the Ninux community is really supporting me. A special thanks goes to Leonardo and Edoardo, and their patient.

See you at the next post!

The Turnantenna

Intro

This year the “Battle of the Mesh” was hosted by the c-base community in Berlin. It was an awesome event, with amazing people coming from everywhere. I was able to present my project here, and it was exciting because many people was interested in. I also met some other students involved in the actual Google Summer of Code.

Unfortunately the week is over, and so is the bonding period.

Description of the project

Now it’s time to code, so let me introduce my project: The Turnantenna.

As its name suggests, the Turnantenna is a directional antenna paired with an engine that should be remotely controlled.

The advantages of having such a system are:

  • It could allow rapid changes of the mesh of the network;
  • It can make easy to dotests and optimization of the network;
  • It provides security as you don’t have to climb onto the roof (or pole, or pylon …) everytime, saving time and reducing dangerous operations.

Think about all the times that you had to reach the antenna to change it’s orientation. Now you can cut down this practice!

The Turnantenna was designed from and idea of Salvatore Moretti, another member of the Ninux community. With the other Ninuxers we made a working prototype of the Turnantenna, but now all the project should be improved.

The electrical scheme and a render are shown below.

The goal in the next month is to write down a new driver for the two engines, and to make them work through HTTP APIs. The orientation of the antenna will be changed interacting from a dedicated web page (that will be shaped in the next month) or sending HTTP requests; in the last month I’ll publish all the documentation and packaging the application with PIP.

Thanks

I wish to thank all the Freifunk members for the reception, and for giving me  the opportunity of being part of the Google Summer of Code this year.

I’d like to express my sincere thanks to all of the Ninuxers that helped and are still helping me in this adventure. I love you guys!