GSoC 2017 – Spectrum Analyzer updates (2)

This is the second update of the spectrum analyzer project.

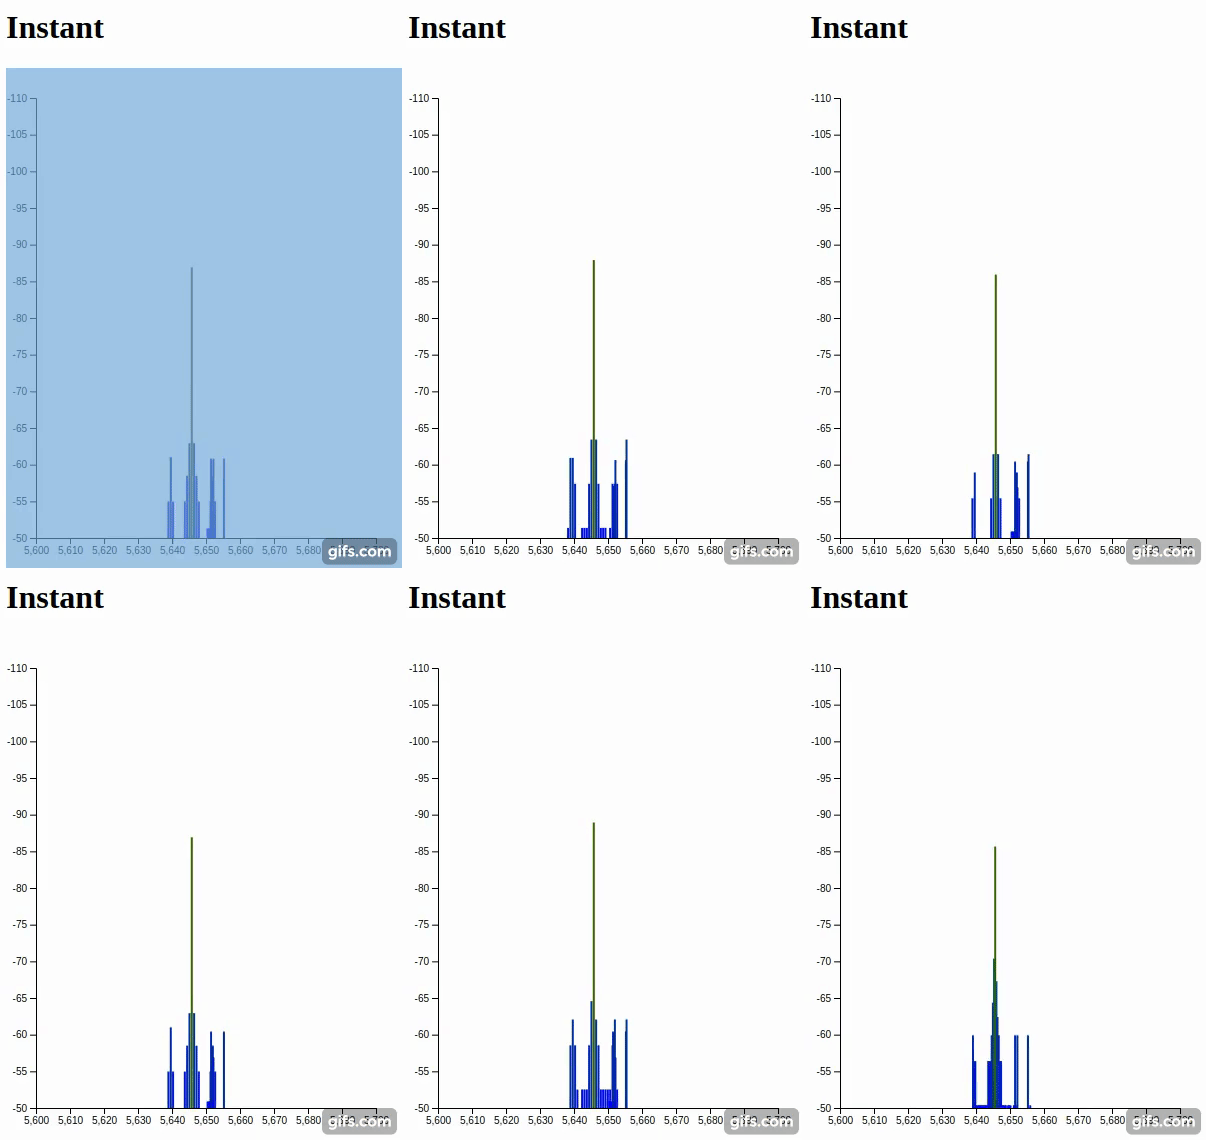
I’m glad to say that we have a visualization that is allowing us to view the output of the card in a meaningful way.

After polishing this interface I will create the waterfall and the cumulative views that are useful for this.

I will leave you a screenshot of how it looks right now (it will get better soon).

Also, we have started conversations with a University that has done an MVP of a PAWS database. The purpose of this is to gather information on the spectrum usage in the TVWS frequency.

With the help of the TVWS Frequency Shifter that Elektra is developing, we will be able of doing site surveys on those frequencies.

This will allow any OpenWRT device with an ath9k radio and a frequency shifter and a GPS to act as a surveyor of those frequencies.

Also had the chance to support the LibreMesh project by adding a Continuous Integration server that will be soon merged to the master branch. That will allow the project to keep on safely by having tests that ensure that the code does what it says it does.

How to streamline app development on OpenWRT

I’ve been strugling with the workflow of the development.

The development workflow has a lot of shortcomings:

  • depends on hardware features (like a radio)
  • the platform where it runs is an embedded operating system, so you need one to test
  • the architecture is not the same as my development computer, so running the same code in my computer is difficult (don’t have ubus, libc is different)

If I solve this, the solution can be used to better do Continuous Integration by testing code on a comparable platform.

So I started looking for a way to work easier.

These are my requiremnets:

Must:

  • openwrt machine (could be VM)
  • be able to run recently coded code

Desirable:

  • virtual machine
  • rapid turnaround time

So, this are the options that I found:

Portable OpenWRT devices (MR3020)

Use this with an ethernet cable and ethernet card, connect to it through ssh and sync code with device.
On the router:

opkg install openssh-sftp-server

On the pc:

sudo apt install sshfs
sshfs root@192.168.1.1:/root/testcode testcode

In order to umount the directory:

fusermount -u testcode

This allows to have a native platform, all the hardware features, but has the downside of having to have a device connected to the computer.

Virtual Machine

This way of calling qemu lets me have a local virtual machine, but does not have access to the network:

qemu-system-x86_64 -nographic -M q35 -drive file=output/x86/generic/Default/lime_default/lede-17.01.2-libremesh-x86-generic-combined-ext4.img,id=d0,if=none,bus=0,unit=0 -device ide-hd,drive=d0,bus=ide.0

I was able to connect to the network using virt-manager… and from there I got this long call to qemu:

qemu-system-x86_64 \
-enable-kvm \
-name guest=generic,debug-threads=on \
-S \
-object secret,id=masterKey0,format=raw,file=/var/lib/libvirt/qemu/domain-5-generic/master-key.aes \
-machine pc-i440fx-yakkety,accel=kvm,usb=off \
-cpu Broadwell-noTSX \
-m 1024 \
-realtime mlock=off \
-smp 1,sockets=1,cores=1,threads=1 \
-uuid 062afe50-1e83-4c7a-a16a-e3078d53dd63 \
-no-user-config \
-nodefaults \
-chardev socket,id=charmonitor,path=/var/lib/libvirt/qemu/domain-5-generic/monitor.sock,server,nowait \
-mon chardev=charmonitor,id=monitor,mode=control \
-rtc base=utc,driftfix=slew \
-global kvm-pit.lost_tick_policy=discard \
-no-hpet \
-no-shutdown \
-global PIIX4_PM.disable_s3=1 \
-global PIIX4_PM.disable_s4=1 \
-boot strict=on \
-device ich9-usb-ehci1,id=usb,bus=pci.0,addr=0x6.0x7 \
-device ich9-usb-uhci1,masterbus=usb.0,firstport=0,bus=pci.0,multifunction=on,addr=0x6 \
-device ich9-usb-uhci2,masterbus=usb.0,firstport=2,bus=pci.0,addr=0x6.0x1 \
-device ich9-usb-uhci3,masterbus=usb.0,firstport=4,bus=pci.0,addr=0x6.0x2 \
-device virtio-serial-pci,id=virtio-serial0,bus=pci.0,addr=0x5 \
-drive file=/home/nicopace/projects/redlibre/altermundi/librestack/lime-sdk/output/x86/generic/Generic/lime_default/lede-17.01.2-libremesh-x86-generic-combined-ext4.img,format=raw,if=none,id=drive-ide0-0-1 \
-device ide-hd,bus=ide.0,unit=1,drive=drive-ide0-0-1,id=ide0-0-1,bootindex=1 \
-netdev tap,fd=26,id=hostnet0 \
-device e1000,netdev=hostnet0,id=net0,mac=52:54:00:86:34:95,bus=pci.0,addr=0x3 \
-netdev tap,fd=28,id=hostnet1 \
-device e1000,netdev=hostnet1,id=net1,mac=52:54:00:86:8b:58,bus=pci.0,addr=0x8 \
-chardev pty,id=charserial0 \
-device isa-serial,chardev=charserial0,id=serial0 \
-chardev spicevmc,id=charchannel0,name=vdagent \
-device virtserialport,bus=virtio-serial0.0,nr=1,chardev=charchannel0,id=channel0,name=com.redhat.spice.0 \
-spice port=5900,addr=127.0.0.1,disable-ticketing,image-compression=off,seamless-migration=on \
-device qxl-vga,id=video0,ram_size=67108864,vram_size=67108864,vram64_size_mb=0,vgamem_mb=16,max_outputs=1,bus=pci.0,addr=0x2 \
-device intel-hda,id=sound0,bus=pci.0,addr=0x4 \
-device hda-duplex,id=sound0-codec0,bus=sound0.0,cad=0 \
-chardev spicevmc,id=charredir0,name=usbredir \
-device usb-redir,chardev=charredir0,id=redir0,bus=usb.0,port=1 \
-chardev spicevmc,id=charredir1,name=usbredir \
-device usb-redir,chardev=charredir1,id=redir1,bus=usb.0,port=2 \
-device virtio-balloon-pci,id=balloon0,bus=pci.0,addr=0x7 \
-msg timestamp=on

I need to distill the relevant information from there.

With that last config and using an ui option in virt-manager, I was able to access the usb device TP-Link TL_WN822Nv1 on the Virtual Machine, but I was not able to use it yet because of driver problems.

Have to keep digging into that.

If you have any idea on how to do this better, please write in the comments.
Pub/Sub messaging over ubus with Lua

In my GSoC project (more about this here) I need to do a lot of ubus use.

In this case, I want to connect a series of services in a publish-subscribe model.

I want to thank Commodo for his ubus examples… I will be showing a similar example that you can test to have a publish-subscribe pattern implemented in ubus and lua.

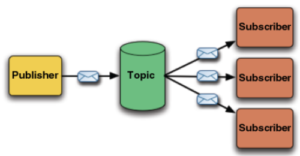
In a publish-subscribe you have two type of agents: publishers and subsribers.

Publishers send messages tagged with a specific topic.

Subscribers wait for messages about a specific topic.

Tue Bus is in charge of routing messages based on the topic from publishers to subscribers.

In our case, ubus will act as the Bus.

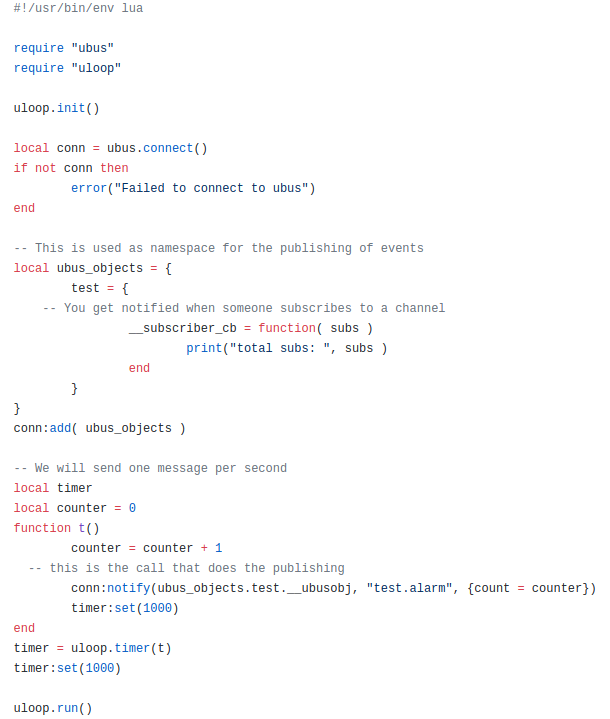
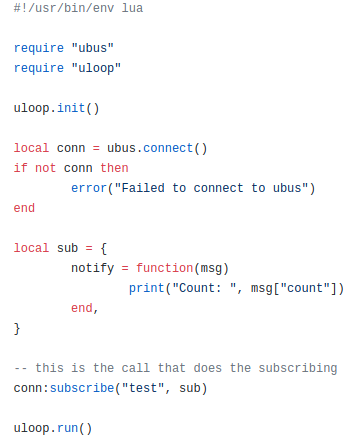
Here is the code:

First, the publisher:

And this is the subscriber:

I still have to figure out how it works… will expand this post once I finish understanding everything.
In particular, I still don’t understand how the notify send an event with a “test.alarm” topic, but the subscribe just listens to “test”… maybe is listening to everything that starts with test.

Easy ubus Daemons with rpcd

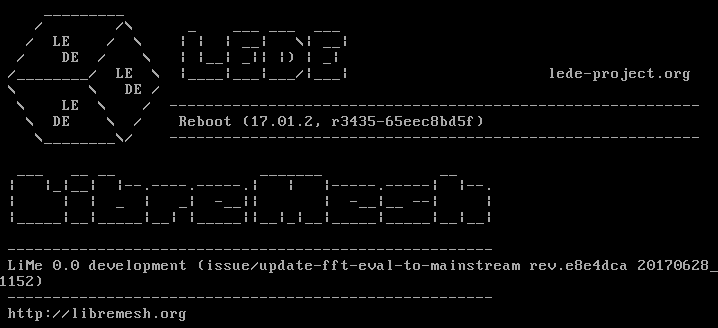
Libremesh /etc/banner

In this article we will see how to create a simple ubus daemon with RPCd.

Ubus is an amazing piece of software that allow inter-process communication inside and in between nodes.

For inter-process communications it uses a common bus with synchronous and asynchronous calling, publish/subscribe and event paradigms.

For in-between nodes communication it provices a JSON-RPC 2.0 Server (and I hope will do WebSockets soon!).

For more information on how ubus works check out OpenWRT’s Wiki page.

If you want to expose simple functionality to ubus (or you are prototyping an interface before creating an efficient daemon) you can use rpcd for this.

This is a simplified example based on the one in the wiki

$ cat << EOF > /usr/libexec/rpcd/banner
#!/bin/sh

# The RPCd interfaces with commands via two methods: list and call.
case "$1" in
	list)
                # List method must return the list of methods and parameters that the daemon will accept. Only methods listed here will available to call.
		echo '{ "append": { "content": "str"}, "show": { } }'
	;;
	call)
                # The way rpcd calls the methods is by calling your script like this: <script-name> call <method-name> << <json-input>
                # So, in order to retrieve the called method, you need to read $2
		case "$2" in
			append)
				# And in order to retrieve the method parameter, you need to read stdin
				read input;
                                CONTENT=`echo $input | jsonfilter -e '@.content'` 
                                echo $CONTENT >> /etc/banner
				echo '{ "result": "ok" }'
			;;
			show)
				# return json object or an array
				echo -n '{ "content": "`; echo $(cat /etc/banner | text_to_json); echo '"}'
			;;
		esac
	;;
esac

function text_to_json() {
JSON_TOPIC_RAW=`echo $1`
JSON_TOPIC_RAW=${JSON_TOPIC_RAW//\\/\\\\} # \ 
JSON_TOPIC_RAW=${JSON_TOPIC_RAW//\//\\\/} # / 
JSON_TOPIC_RAW=${JSON_TOPIC_RAW//\'/\\\'} # ' (not strictly needed ?)
JSON_TOPIC_RAW=${JSON_TOPIC_RAW//\"/\\\"} # " 
JSON_TOPIC_RAW=${JSON_TOPIC_RAW//   /\\t} # \t (tab)
JSON_TOPIC_RAW=${JSON_TOPIC_RAW//
/\\\n} # \n (newline)
JSON_TOPIC_RAW=${JSON_TOPIC_RAW//^M/\\\r} # \r (carriage return)
JSON_TOPIC_RAW=${JSON_TOPIC_RAW//^L/\\\f} # \f (form feed)
JSON_TOPIC_RAW=${JSON_TOPIC_RAW//^H/\\\b} # \b (backspace)
echo JSON_TOPIC_RAW
}
EOF
$ chmod +x /usr/libexec/rpcd/banner
$ service rpcd restart

And then we can try the new daemon:

$ ubus -v list banner
'banner' @xxxxxxx
    "append":{"content":"String"}
    "show":{}

$ ubus call banner show
LEDE blah blah
...

$ ubus call banner append 'Hello world!'
LEDE blah blah
...
Hello world!

Update:
@Rundfreifunk comment suggested that if you want to use this RPC commands via JSON-RPC, you need to add authentication parameters.
In this case, let’s suppose that we want to grant anonymous read access to the banner.show method.

We could do that like this:

$cat << EOF > /usr/share/rpcd/acl.d/banner.json
{
  "unauthenticated": {
    "description": "Alfred data types via batman-adv meshrouting",
    "read": {
      "ubus": {
        "banner": ["show"]
      }
    }
  }
}

The documentation related to ACLs can be found in this OpenWRT wiki page.

TDD and Unit Testing in Lua: The OpenWRT/LEDE case

A lot of code has been written, and none of the LUA code written for OpenWRT/LEDE (at least on my knowledge) uses testing as a way of verifying the quality of the code.

I want to use this approach as it has proven useful for other projects.

If you are interested in understanding what TDD is, here there is a little excerpt from one of Uncle Bob’s explanations of how TDD works: https://www.youtube.com/watch?v=GvAzrC6-spQ

In order to do testing on this platforms, the library should not require LuaROCKS (because the default development environment does not require it).

Let’s see what LUA has to offer in this area.

Lua Unit Testing Libraries

Thankfully, Lua wiki is an amazing source of information. You can find information about unit testing over here: http://lua-users.org/wiki/UnitTesting

There are many Lua Unit Testing libraries, but for what I understood the most used is Luauit, so I will try to work on an example and share it with you ASAP.

Lunitx: a good contender

There is also a guy that did a review on the available tools: http://web.archive.org/web/20141028091215/blog.octetcloud.com/?p=32

His concern was not in the context of OpenWRT/LEDE, so there are things that need to be considered that don’t apply for him.

He basically saw that lunit was good, but needed some tweaks, to he forked it into lunitx… which was forked again and this is the outcome: https://github.com/dcurrie/lunit

Conclusions

These seems to be the mos viable options.

I’ll be testing these during the next days.

If you have any suggestion or comment, please leave it below.

Choosing a Spectrogram visualization Library in Javascript

Today I decided to invest time on choosing the right Spectrogram library in order to create a visualization of the spectral scans.

The requirements that I thought relevant are:

  • size: as this library needs to be installed inside the routers, the Spectrogram should be as small as possible.
  • customizable: most of them are prepared to show information in the audio spectrum… they should be prepared to show spectrum in different frequencies.
  • realtime: the library must render information streamed in realtime. The ones that uses a microphone can be adapted to do that.
  • well mantained: this can be measured based on stars, commits, commiters and forks.
  • responsive: if you resize the container, the graph resizes.

This is the result of the Survey:

rank repository works realtime weight (kb) responsive stars forks last update notes
1 https://github.com/drandrewthomas/Speccy yes yes 3 no 0 0 2017/03/22
2 https://github.com/sebleier/spectrogram.js yes yes 4 no 7 3 2013/09/09
3 https://github.com/pachacamac/spectrum_analyzer yes yes 5 no 0 0 2015/09/09
4 https://github.com/miguelmota/spectrogram yes yes 8 no 51 9 2017/05/22
5 https://github.com/pietgeursen/inu-spectrogram yes yes 166 no 2 0 2016/07/29
6 https://github.com/borismus/spectrogram yes yes 2000 yes 78 12 2014/06/13 have to refactor, cause it uses the microphone
https://github.com/vlandham/spectrogramJS yes no 500 no 65 5 2014/01/23 it doesn’t work in realtime
https://github.com/abarbu/audio-annotation no? ? ? ? 4 0 2014 not instalable after some time
https://github.com/arirusso/d3-audio-spectrum no yes 83 18 2016/11/22 throws errors in javascript console
https://github.com/octatone/spectrogram no ? 110 8 0 2013/08/11 seems to work only in the safari browser, couldn’t test

Most of the Spectrum Analyzers are very simple ones… till now I havent found that allows advanced things like multiple levels of zoom, pause and resume, etc.
In the future we may need to do some work to implement this functionality.
Lets discuss the main ones.

Reviews

Speccy

It is a very Spectrogram traditional visualiation with an additional realtime curves graph on the upper part. It draws from top to bottom.
In relation with the visualization, the other relevant characteristic is that it draws the graph in a continuous fashion… so the old information get’s lost, and the rest scrolls each time new information arrives. We could call this one a `scrolling drawer`.
It is the most lightweight (pretty close to the next one) weighting 3kb.
The code is not elegant or customizable at all, but is small enougth to understand it easily and include new updates.

Spectrogram.js

This one is a standard Spectrogram, could be characterized as a `rolling drawer` in the sense that once it gets to the end of the canvas, it continues drawing at the beginning of the canvas, `rolls` to the other side, instead of `scrolling` the content.
This one is very lightweight also, 4kb, and the code is very easily updateble to support external sources of data.

Pachacamac’s spectrum_analyzer

This is also a `scrolling drawer`.
It looks better for my taste (probably related with the color scale choosen) but at the functionality level is quite similar to the previous one.
The code is also very small, so it would be easy to understand it. Many configurations are hardcoded.

Mighel Mota’s Spectrum_analyzer

This is still very lightweight, but is still very basic.
The one good thing about this is that is coded in a very professional fashion… The developer uses TDD, the code is very well organized, the documentation is simple but comprenhensive, has pause and resume functionality.

inu-spectrogram

This one doesn’t bring any new stuff to the table.
It uses new technologies (like JSX) but doesn’t improve in the way it is done, or the functionality it brings.
It weights many orders of magnitude more (2000kb), so it is out of the discussion.

Next steps

I haven’t decided between Speccy and Spectrogram.js … but I know that with any of these I will need to do a lot of work, cause many of the desired features are not there yet (customization, mantainability, responsiveness) and others desirable are not there either (like drawing rulers, pause/resume).

I’ll build a prototype with one of those to move forward with the Spectrum analyzer for LibreMesh.

Spectrum Analyzer for LibreRouter June Updates

What I have been working on

During the past weeks, I had the chance to work on the spectrum analyzer in the following topics:

  • During the BattleMesh, I has the chance to engage with several developers that are working on topics related:
    • Felix Fietkau is one of the developers of the ath9k module, and we had a conversation to understand better the inner workings of the driver, and what the output of the module will serve me for the Spectrum Analyzer functionality
    • Paul Fuxjäger from FunkFeuer, with whom we discussed some potential uses of the module, along with other collaborations that could arise in the future related with the module.
  • I engaged with the FFT_eval project’s source code, that is used to decode radio i/q signals into easily representable values, and added a JSON output for the data. Instead of continue our own fork of the project, I did this in the mainstream project, promoting one codebase. The merge request is currently pending: https://github.com/simonwunderlich/FFT_eval/pull/13 . Many thanks to Gui Irribarren and BrainSlayer from the DD-WRT project to provide most of this implementation.

Once I engaged with the LibreMesh projects, I understood that one of the purposes of having the Spectrum Analyzer was to be able to do a Frequency Survey in the TVWS spectrum. This is very valuable because one of the proposals of using this part of the spectrum is through a regional database of usage, where you can ask for permission to use a frequency and the database needs to authorize you.

So, my other job has been to seek for current implementations of TVWS Database and, in particular, the PAWS protocol (an IETF draft proposal for TVWS Databases). I managed to found a team that is working on this (Prof. Karandikar from the IITB of Mombay and his OpenPAWS project) and we are talking to see if we can collaborate.

That’s a rougth report on what has been happening during the last weeks.

What I’ll be working on

I’ll describe the architecture that I expect to implement in the upcoming weeks.

With the help of ubus, I will be working on an event based architecture that involves the following parts:

The yellow parts are the new parts.

A brief description of the parts involved:
* Spectral Scan Manager: It manages ath9k states, recovers i/q data from the atheros modules and hands them over through ubus
* Spectral Scan Decoder: FFT_eval wrapper that will receive Spectral Scan Manager i/q data and turn it into JSON
* Spectral Analysis Collector: A configurable daemon that will collect the Spectral Scan Decoder data for further analysis. This collection could be kept in memory or sent to a secondary server (like the OpenPAWS server)
* Visualization Module: Will access the information handed by the Decoder or the Collector (depending which information we would like to access) and visualize it in a Waterfall graph.
* Spectrum Availability CLI Interface: This is a potential proposal (if time allows) to have a simpler interface that can be accessed from command-line. Could implement something similar to this: https://wiki.mikrotik.com/wiki/Manual:Spectral_scan

For the next week, I’ll implement the Spectral Scan Manager, the Spectral Scan Decoder wrapper, and a simple visualization.

Spectrum Analyzer in the context of LibreRouter

Hello to all!

My name is Nicolas Pace and this is the first time and engage into participating in the GSoC for Freifunk.

For this opportunity I’m engaging with the LibreMesh community on the context of the LibreRouter project by implementing a Spectrum Analizer for LibreMesh and also for LEDE/OpenWRT.

Spectrum Analisis is a very powerful tool for anyone that wants to enhance the quality of the links created, but also can be used as a base for more complex functions like diagnose of the physical layer, or many other things that have been implemented in other firmwares.


What has been done already

During this last weeks I’ve the chance to engage the community, and also to deepen my understanding of the problem at hand.

Also, I’ve got a working prototype of the command-line interface, and a prototype of code that has been used to show that information.

Next steps

  • To create a lightweight service that shares the information with the web
  • To make a nice interface for the output

Thanks for the opportunity of joining you, and hope to deliver as expected!