Dear Freifunkers,
Now that GSoC 2016 comes to its end, please allow me to update you on the powquty project. Despite some delays regarding the hardware, the goals set for GSoC 2016 have been reached. Here follows a picture that shows a compact demonstration for powquty.
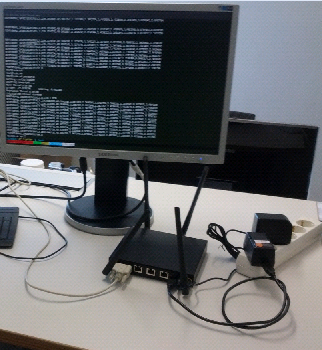
The picture depicts the set-up for powquty, which consits of a LEDE based wireless router, connected to the PC over serial interface, where a Termial session of the router is running. The oscilloscope is attached via USB to the router. On the router’s terminal session we see that powqutyd has been started, with the correspondent messages shown on stdout. These message show the calculated power parameters.
Installation
For installing powquty follow these steps:
- add the following line to your feeds.conf in your source directory:
src-git powquty https://github.com/thuehn/powquty.git
- update the your feeds, then install powqutyd from feed
- Include powqutyd in your config (make menuconfig) by choosing powqutyd from: Utilities –> powqutyd
- Save and exit menuconfig
- Compile and install powqutyd
- scp the ipk file to your router and install it
- opkg install powqutyd_0.1-1_<target>.ipk
Note this package depends on the following libraries/packages, that have to be installed before installing powqutyd:
- libmosquitto
- libconfig
- kmod-usb-acm (kernel module)
When successfull the powqutyd package will create:
- the binary powqutyd in /usr/sbin
- the configuration file in /etc/powqutyd/powqutyd.cfg
Usage
Before running powqutyd you need to configure it.
- Powqutyd needs to read the measurement samples from the USB oscilloscope. The USB oscilloscope has to be plugged to the router before running powqutyd. The USB oscilloscope implements the USB Communication Device Class (CDC) device specification. This means that the kernel module kmod-usb-acm will recognize the USB oscilliscope once plugged and will create a tty device probably under /dev/ttyACM0. Depending on your setup this could be different. Check your system logs after plugging the USB oscilloscope to find out the actual path of the tty-device on your setup and adjust the path in the config file of powqutyd (/etc/powqutyd/powqutyd.cfg) accordingly. Note: if the tty-device is not set right the powqutyd will not start!
- Powqutyd will send the calculated power quality parameters using MQTT-protocol to an MQTT-broker. This means that powqutyd requires IP connectivity between your router and the MQTT-broker. Of course this is given if you set up an MQTT broker on your router itself, but this is not a requirement, as long as the router has an IP connectivity to an MQTT-broker. For testing purposes we used mosquitto on the router as MQTT-broker. Depending on your setup you need to adjust the mqtt_host config option in your /etc/powqutyd/powqutyd.cfg accordingly. The mqtt_host config option is a string that could contain either the IP-address of the Fully Qualified Domain Name (FQDN) of the MQTT-broker. Note: at the current state, the MQTT-client implemeted by powqutyd uses the port 1883 with no SSL support.
- Furthermore the powqutyd’s MQTT-client is an publish only client, thus it will not subscribe and has no will. Nonetheless the topic under which the powqutyd’s MQTT-client publishes needs to be set. This can be done by adjusting the mqtt_topic config option in your /etc/powqutyd/powqutyd.cfg accordingly.
- Powqutyd sends three types of messages to the MQTT-broker: i)msg_device_online, ii) msg_device_data, iii) msg_device_offline. These messages are explained below, yet all of them use a common setting which is a (universally) unique id for the devices that communicate with the same MQTT-Broker. This way the MQTT-broker can differenciate between the messages it receives. This device-unique-id is set by the config option dev_uuid
- It is possible to print the results messages that powqutyd sends to the MQTT-Broker to stdout. This can be set by the option powqutyd_print. If set to 0 (zero) powqutyd will not print the result to stdout.
- Running powqutyd: Once all the configuration above are done powqutyd can be started by typing: “powqutyd &” to your terminal.
Work achieved
For the powquty project, my mentor and I set up a dedicated Github page accessible under the following link:
https://github.com/thuehn/powquty
There the list of my commits can be seen under:
https://github.com/thuehn/powquty/commits/master?author=neez34
Code
The following picture depicts the folder structure of the work done during the porject.
.
├── etc
│ └── powqutyd
│ └── powqutyd.cfg
├── include
│ ├── calculation.h
│ ├── config.h
│ ├── emulator.h
│ ├── helper.h
│ ├── mqtt.h
│ └── retrieval.h
├── lib
│ ├── libpqlib.a
│ └── PQ_App.h
├── Makefile
├── src
│ ├── calculation.c
│ ├── config.c
│ ├── emulator.c
│ ├── helper.c
│ ├── main.c
│ ├── mqtt.c
│ └── retrieval.c
└── test
 ├── mqtt_test.c
 ├── usb_test.c
 └── vserial_test.c
During the project I had to reschedule the tasks planned repeatedly according to the progress and to the other circonstances. The order of the tasks changed significantly from the original plan, yet it was necessary to achieve the Goals of the project. Finally the tasks I did were in the following order:
- First I had ported the library to a binary blob that can be used on the router.
- Next I ve implemented the MQTT-functionality.
- After that, I started working on the emulator, then I started working on the USB communication. For that I followed a trial and error approach, for which I used the folder called test to try out different things. Strictly speaking it is not needed at all for the software to compile and run, yet I kept it for future reference. For the USB comuication I implemented two solutions: One using libusb, and another one using virtual serial port (termios.h), since i wasn’t sure how will the USB oscilloscope will behave on the router and if any driver on the router will provide me with a tty device. luckily the kmod-usb-acm did so, thus i continued the project with the virtual serial port solution.
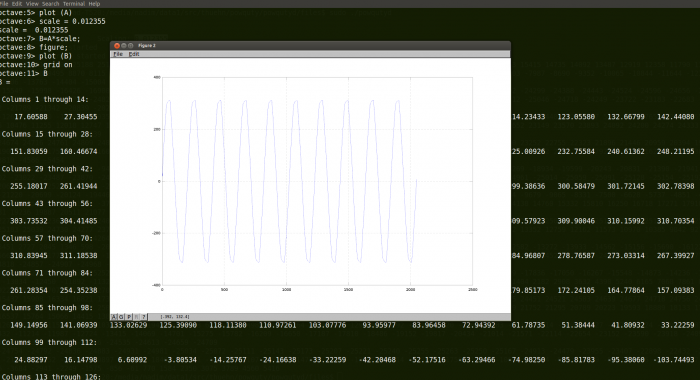
- Once the USB communication was working, the next step was to retrieve the sampled data from the oscilloscope. First trials yielded the first sine signal as shown in the next figure

- The picture shows ten sine waves corresponding to 200 ms, with 10kHz sampling rate, formed by 2048 samples. Yet as it can be seen the calibration was missing and the values were between +2500 and -2500. That is because the values (as seen in the background of the figure) where signed short numbers, and uncalibrated. (I used octave for plotting).
- Once I was able to get the calibration parameters from the USB oscilloscope, I thereafter applyed them to the samples and got the expected sine – Wave with the Voltage-values expected in EU (RMS = 230 Volts) as shown in the next picture
- After successful retrieval of the sampling values, I continued designing the software for powquty. I decided to use a multi-threaded approach with a Thread for sending MQTT-messages, a second for retrieving measurment samples and a third for calculating the power quality parameters. I included a ring-buffer as an interface between the retrieval thread and the calculating-thread.
- once all three component were integrated and working together I added the configuration (using libconfig) instead of hard-coded MQTT-Broker address, and hard-coded TTY-device …etc.
Goals and future work
As described in the first blogpost, the goal of the powquty project within GSoC 2016 is to create a LEDE package which ensures the following three functionalities:
- Retrieving sampled voltage data from the power quality measurement device via USB
- Calculating statistical power quality parameters (such as: avg. voltage, harmonics, ect.) form the retrieved voltage samples
- Provisioning of the calculated parameters for retrieval and graphical representation
At this point the powquty project has reached its first big Milestone where the basic functionalities set for the GSoC 2016, have been completely implemented.
Yet the end of one milestone is the begin of the next milestone. This is why I conclude with some propositions for future work on powquty:
- Design and implementation of error handling
- Migration of the config to uci config
- Design and implementation of another log option than stdout
- Design and implementation of a Luci App for easy configuration and showing results
Nonetheless, please allow me to express my gratitude to my mentor, Dr. Thomas Hühn, for his outstanding support, and constant availability. Also great thanks are due to Freifunk, whose distinguished voluntary efforts – not only in regard to GSoC – made this possible in the first place. Last not least, great credits are due to Google for encouraging this innovative type of value creation.
Cheers,
Neez