This is Victor and in this blog post I will update regarding my progress for GSOC2025 : Adding wifi support to QEMU wifi simulations in LibreMesh
A bit of back regarding wifi in the Linux Kernel
Modern Linux kernel wifi stack can be seen like that :
- userspace tools
- netlink
- nl80211 driver
- cfg80211 subsystem
- mac80211 subsystem – basic hardware handling
In simple terms, it works like this :
- Userspace programs fires a command that interacts with wifi : programs such as `iw`, `hostapd`, `wpa_supplicant` etc.
- Command is passed to the kernel through _nl80211_ over the netlink protocol, in openwrt it is usually handled by [tiny-libnl](https://git.openwrt.org/?p=project/libnl-tiny.git)
- _cfg80211_ is here to bridge the userpace and the drivers so that with nl80211 they provide a consistent API, it’s also here that parts of the regulatory spectrum use is enforced depending on country specific legislation.
- _mac80211_ then provides a software implementation of wifi behaviors such as queuing, frame reordering, aggregation, mesh support etc.
- The driver (ath9k or *mac80211_hwsim*) then handles hardware specificities
Why is this important for our project
This layered approach is essential to our project, as it will enable us to create virtual tests beds that should be almost transparent to a real world experiment.
By just simulating the last brick – mac80211_hwsim – we’ll be able to recreate the whole wifi stack.
We will still see the same exact path consisting of :
userspace configuration -> nl80211 -> cfg80211 -> mac80211
Which means that without the need for expensive and complicated set up, we achieve the same possible tests for configuring the different interfaces, and in our case with the added reproducibility : setting up the infrastructure will only require a computer able to launch qemu-system, and if we decide to reproduce it with real hardware, we should observe an almost 1:1 reproducibility of the tests.
Virtualizing wifi : many tools, troubling setup
So we now that we have a clearer understanding on how wifi is handled in the Linux Kernel, and the existence of a tool to simulate wifi hardware, let’s see what is possible to do with it !
mac80211_hwsim in LibreMesh ?
Since LibreMesh is built on OpenWRT, our first task will be to bring mac80211_hwsim to OpenWRT.
Thankfully, this tool is known and already used by the OpenWRT community, and it is delightfully provided as a package that you can install in your system through opkg :opkg install kmod-mac80211-hwsim
Which means, no need for custom kernel setup and compilation – and that’s good news.
Installation methods :
If your machine has an AMD/Intel CPU, simply go get the combined (squashfs) of the Generic x86/64 through the firmware selector.
unzip the image : gunzip openwrt-*-x86-64-generic-squashfs-combined.img.gz
You should then end up with something like that :
openwrt-24.10.2-x86-64-generic-squashfs-combined.img
Simply put, this is a kernel+root file system (that’s what combined means), using a compressed
read only filesytem (squashfs).
Now we need to instantiate our virtual machine, using qemu it can be done like this :
qemu-system-x86_64 -enable-kvm -smp 1 -m 512 -drive file=openwrt-24.10.2-x86-64-generic-squashfs-combined.img,if=virtio,format=raw -nic user,model=virtio-net-pci,hostfwd=tcp::2222-:22 -nographic
Just wait a bit for the boot to finish, you should see a Please press Enter to activate this console.
Inside the vm you’ll then have to run :uci set network.lan.proto='dhcp'
uci commit network
service network restart
Inside the vm you’ll then have to run :uci set network.lan.proto='dhcp' uci commit network service network restart
This convert the LAN to a DHCP client and allow the VM to grab the 10.0.2.x lease from QEMU,
Which will then enable you to run :opkg update
and finally :opkg install kmod-mac80211-hwsim
By default, mac80211_module is loaded with 2 radios, but the behavior can be changed with this command :
insmod mac80211_hwsim radios=X` with X the number of radios you want to have in your VM.
Let’s also not forget to include the right packages since we want to test wifi :
Since we’re not constrained by flash space on our laptop/computer, we’ll use wpad :opkg install wpad
Congratulation, you now have an OpenWRT based virtual machine with a working virtual wifi ! Actually, not so fast…
One of the classical example when searching for the documentation regarding mac80211_hwsim module is the access point/station association using two different virtual radios (on the same host). 1 2
So let’s be original, and recreate this example (but in this case in OpenWRT !).
Virtual AP/Station association in a OpenWRT virtual machine :
When we install mac80211_hwsim/boot the VM, it should auto load the module with 2 radios.
You can check the presence of the 2 radios with this command :
iw phy | grep phy
Wiphy phy1
wiphy index: 1
Wiphy phy0
wiphy index: 0
As for the wifi devices, so far, nothing :iw dev won’t return anything at this point.
We now need to configure these two (virtual) physical radios in order to have : an AP and a station.
Let’s check the default configuration of the wireless in our image :
root@OpenWrt:~# cat /etc/config/wireless
config wifi-device ‘radio0’
option type ‘mac80211’
option path ‘virtual/mac80211_hwsim/hwsim0’
option band ‘6g’
option channel ‘auto’
option htmode ‘EHT80’
option disabled ‘1’config wifi-iface ‘default_radio0’
option device ‘radio0’
option network ‘lan’
option mode ‘ap’
option ssid ‘OpenWrt’
option encryption ‘none’config wifi-device ‘radio1’
option type ‘mac80211’
option path ‘virtual/mac80211_hwsim/hwsim1’
option band ‘6g’
option channel ‘auto’
option htmode ‘EHT80’
option disabled ‘1’config wifi-iface ‘default_radio1’
option device ‘radio1’
option network ‘lan’
option mode ‘ap’
option ssid ‘OpenWrt’
option encryption ‘none’
As we can see, both of our wifi-device are disabled, and also both in ap mode.
So the easy way out of this would be to do :uci set wireless.radio0.disabled=0
uci set wireless.radio1.disabled=1
uci set wireless.radio1.mode=sta
uci commit
wifi reload
With all that we should be set ? No ?
Still nothing.
This was a real mystery for me, but after some digging, it appears that when using the 6g band, wpa3 is mandatory.
This is defined by the IEEE 802.11ax standard, and in our case the wifi 6E extension.
Since encryption testing isn’t on the scope of this project so far, let’s be conservative and try some true and tested wifi bands (2g) and see what happens.
In the end your /etc/config/wireless should look something like that :
config wifi-device ‘radio0’
option type ‘mac80211’
option phy ‘phy0’
option band ‘2g’
option channel ‘1’config wifi-iface ‘default_radio0’
option device ‘radio0’
option network ‘lan’
option mode ‘ap’
option ssid ‘OpenWrt’
option encryption ‘none’config wifi-device ‘radio1’
option type ‘mac80211’
option phy ‘phy1’
option band ‘2g’
option channel ‘1’config wifi-iface ‘default_radio1’
option device ‘radio1’
option network ‘wann’
option mode ‘sta’
option ssid ‘OpenWrt’
option encryption ‘none’With this configuration you still need to
wifi reloadorrebootif you don’t see any changes happening.
We finally have our prized AP/station association :daemon.notice hostapd: phy0-ap0: interface state UNINITIALIZED->ENABLED
daemon.notice hostapd: phy0-ap0: AP-ENABLED
daemon.notice wpa_supplicant[1825]: phy1-sta0: SME: Trying to authenticate with 02:00:00:00:00:00 (SSID=’OpenWrt’ freq=2412 MHz)
daemon.info hostapd: phy0-ap0: STA 02:00:00:00:01:00 IEEE 802.11: authenticated
daemon.notice wpa_supplicant[1825]: phy1-sta0: Trying to associate with 02:00:00:00:00:00 (SSID=’OpenWrt’ freq=2412 MHz)
daemon.info hostapd: phy0-ap0: STA 02:00:00:00:01:00 IEEE 802.11: associated (aid 1)
daemon.notice hostapd: phy0-ap0: AP-STA-CONNECTED 02:00:00:00:01:00 auth_alg=open
daemon.info hostapd: phy0-ap0: STA 02:00:00:00:01:00 RADIUS: starting accounting session 2E622F6D18713536
daemon.notice wpa_supplicant[1825]: phy1-sta0: Associated with 02:00:00:00:00:00
daemon.notice wpa_supplicant[1825]: phy1-sta0: CTRL-EVENT-CONNECTED – Connection to 02:00:00:00:00:00 completed [id=1 id_str=]
daemon.notice wpa_supplicant[1825]: phy1-sta0: CTRL-EVENT-SUBNET-STATUS-UPDATE status=0
Let’s check what iw is reporting :iw dev
phy#1
Interface phy1-sta0
ifindex 7
wdev 0x100000002
addr 02:00:00:00:01:00
type managed
channel 1 (2412 MHz), width: 20 MHz (no HT), center1: 2412 MHz
txpower 20.00 dBm
multicast TXQ:
qsz-byt qsz-pkt flows drops marks overlmt hashcol tx-bytes tx-packets
0 0 0 0 0 0 0 0 0
phy#0
Interface phy0-ap0
ifindex 8
wdev 0x2
addr 02:00:00:00:00:00
ssid OpenWrt
type AP
channel 1 (2412 MHz), width: 20 MHz (no HT), center1: 2412 MHz
txpower 20.00 dBm
multicast TXQ:
qsz-byt qsz-pkt flows drops marks overlmt hashcol tx-bytes tx-packets
0 0 11 0 0 0 0 1358 11
And finally :
iw dev phy0-ap0 station dump
Station 02:00:00:00:01:00 (on phy0-ap0)
inactive time: 4950 ms
rx bytes: 2077
rx packets: 50
tx bytes: 131
tx packets: 2
tx retries: 0
tx failed: 0
rx drop misc: 0
signal: -30 dBm
signal avg: -30 dBm
tx duration: 0 us
rx bitrate: 54.0 MBit/s
rx duration: 0 us
authorized: yes
authenticated: yes
associated: yes
preamble: short
WMM/WME: yes
MFP: no
TDLS peer: no
DTIM period: 2
beacon interval:100
short preamble: yes
short slot time:yes
connected time: 1232 seconds
associated at [boottime]: 59.854s
associated at: 1752513660712 ms
current time: 1752514892128 ms
All in all, lots of troubleshooting, qemu-system network was a bit novel for me and I spent a lot of time on it figuring it out why some things worked on others didn’t.
Also having mac80211_hwsim fully working in a OpenWRT qemu vm was definitely not easy at first : some documentation for the setting it up in a regular Linux environment, but didn’t find much regarding OpenWRT ?
Enabling mac80211_hwsim in LibreMesh
Now that we have a proof of concept of virtual wifi working in OpenWRT, let’s port it to LibreMesh.
Using the LibreMesh firmware selector :
Using LibreMesh firmware selector it is very easy to get an image with mac80211_hwsim enabled.
Simply add these two packages :
- ‘kmod-mac80211-hwsim wpad` to the firmware selector (getting opkg to work in a Libremesh vm is a bit tricky – doing like so is a lot easier)
- request a build
then you’ll be able to recreate the steps from the last section to have AP and mesh radios (You should be able to see the mesh interfaces connect to each other if put on the same channels)
On a custom build
Now that we mostly have figured out mac80211_hwsim with a generic image, let’s enable it in a custom LibreMesh build.
By following these instructions you should be able to get mostly there.
using make menuconfig, you will need to select these targets :
Target System : x86
Subtarget : x86_64
Then it will simply selecting the specific libremesh packages, and lastly :
Kernel modules -> Wireless Drivers -> kmod-mac80211-hwsim
Network -> WirelessAPD -> wpa
Save your config in .config, compile it make -j$(nproc) and then you’ll find your different images in bin/targets/x86/64.
Setting up mac80211_hwsim will require the same steps as the last two (setting the right band/channels/radio)
Conclusion of mac80211_hwsim in Libremesh
In the end mac80211_hwsim provides an excellent tool to test different wifi configuration, enabling it in a LibreMesh build is pretty straight forward, but as for OpenWRT stock image t requires a bit of manual work to set everything right.
My trials and errors for enabling mac80211_hwsim in Libremesh led me to discover some undefined behavior in LibreMesh when the firmware interacts with a wifi 6E able radios, which I will need to provide a patch for in order to continue my integration of qemu wifi testing to LibreMesh in the next half of my GSOC.
VM to VM communication using wifi
I’m proud to announce that I’ve finally managed to recreate the AP-STA scenario using two differents QEMU virtual machines ! OpenWRT <-> OpenWRT as well as LibreMesh <-> OpenWRT was possible. Once I’m able to fully control it and document it, I will provide a libremesh-profile with and easy setup.
This experiment relies on the vwifi project which comes in two part :
- vwifi-server which will run on the host and is here to provide a medium for our wifi : in its default config, it will broadcast the wifi frames of the client connected to it to the other clients.
- vwifi-client that will run on the guest : it basically relies on mac80211_hwsim to create real wifi frames, then relay them to the vwifi-server it is connected to. It also receives wifi frame from the others clients through the server, and manage to inject them in the VM wifi stack, so they get treated correctly and connection is possible.
Building the project is well documented in the README, and one advantages of this project is that it is OpenWRT compatible if we follow closely the instructions.
I struggled a lot a first, thinking I should cross compile it against my custom LibreMesh build, but it seems that as long as you get the right SDK you shouldn’t encounter any issues, aside from the usual qemu troubleshooting.It is also possible to build vwifi-client in order for it to work with vhost-vsock instead of TCP, but I so far didn’t manage to do that/didn’t test it right.
Caveats
run the vwifi-server like this :vwifi-server -u this will prevent overlapping in the mac address when relaying to the other clients, and save you some time figuring out what’s really happening.
When copying the vwifi-client file to the guest, use these options :scp -O -p <forwarded port> root@127.0.0.1 since otherwise it will try to rely on sftp, which might not be installed on the OpenWRT guest VM.
vwifi-client needs to connect to the host : use the IP from hostname -I.
Inside the VM you need to run something like that :
`vwifi-client -n –mac
If you don’t want to set it up as a service, remember that you need to remove the mac80211_hwsim module, then insert it again but with 0 radios :insmod mac80211_hwsim radios=0
In LibreMesh, the current default wireless config is broken, a patch is coming very soon that will allow a seamless integration with the testing, but so far lime-config will put each radios advertised by mac80211_hwsim in the 6g band channel 48 : this won’t work, you need to manually change it to have (modify the /etc/config/wireless)
I still need to provide a full guide and scripts on how to recreate the experiment, but with this picture you should see what it is expected to have :
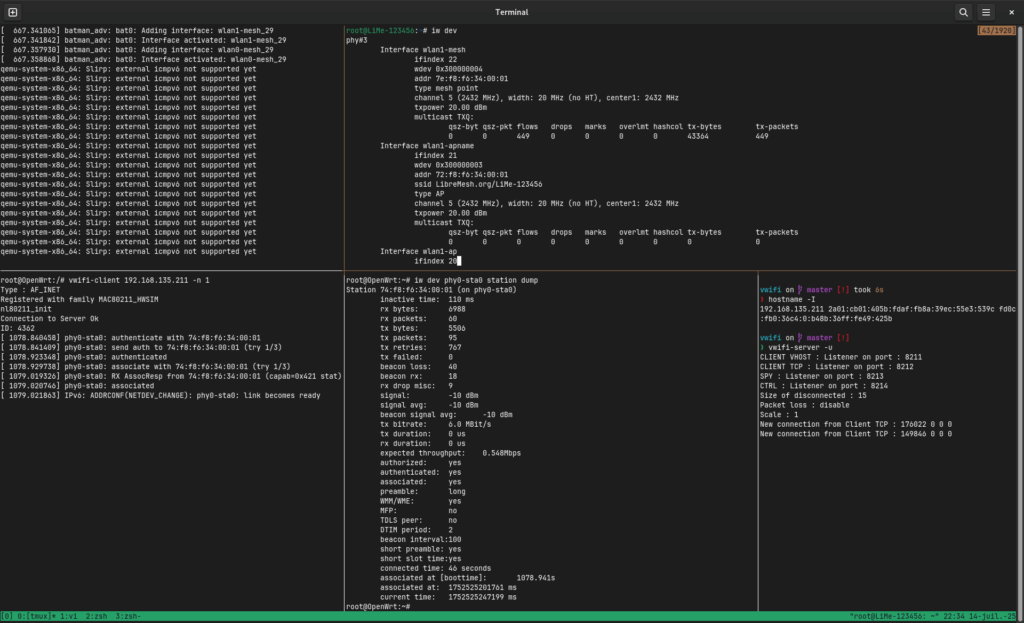
You can see on the top the LibreMesh VM acting as the access point, with on the left the serial interface running vwifi-client and on the right an ssh connection to this VM used to manage it.
At the bottom of the image it is the same setup but using a different VM, this time with a regular OpenWRT image, acting as the station. We can clearly see the station being connected to the AP from a the other VM.
Integration with LibreMesh testing ?
My initial tests and discoveries with virtualized wifi in a QEMU environment and the different tools that this kind of setup enables makes me more and more confident in the usefullness of adopting this approach for future development in LibreMesh and OpenWRT.
From this 6 weeks coding period that were mostly troubleshooting and figuring why things don’t work I’ve managed to find an undefined behavior in the way LibreMesh sets itself up on newer hardware without the need to acquire the said hardware, it also seems that it’s not even been discovered yet by an user : fixing bugs before they even show up.
Now for integrating this kind of qemu testing, the LibreMesh community have decided to use the openwrt-tests framework, a framework based on labgrid aimed at providing ways to write and run tests for OpenWRT devices, being real hardware or virtual one (in our case).
I’ve already made some preliminary work for enabling LibreMesh to integrate with this framework.
So far the framework provide satisfaction with my goals, the only real issues I’ve encountered were actually the divergence between OpenWRT and LibreMesh in some areas, meaning all the demos tests need some integration before being part of the testing pipeline.
Conclusion
I’ve mostly met my goal of having a working virtualized LibreMesh wifi mesh using a qemu infrastructure, I’m a bit behind regarding documentation as well as automation, but my plan is still well defined and I hope now mostly trouble free.
I now should be able in the coming weeks to :
- Provide ample documentation for future work in this area
- Leverage the new testing framework to provide reproducible and automated testing scenario, portable to real hardware
- Fully integrate the project with LibreMesh testing pipeline, with documentation for extension
- Port the current Docker based test to the new QEMU environment.
Bonus
I’ve had the pleasure to meet with the Freifunk/OpenWRT/LibreMesh community over the BattlemeshV17 organized in Sundhausen and I must say it was a very nice experience, learned a lot, flashed my first router with LibreMesh and more than everything felt very welcomed ! Thank you very much to the organizators and the participants, hope to see you again very soon.
One thought on “Virtual wifi in LibreMesh : real virtual mesh ! midterm project update”